You flip the switch on your swamp cooler as temperatures soar past 100°F, but silence greets you instead of that refreshing desert breeze. Your evaporative cooler sits useless while you sweat through another scorching afternoon—frustrating when the fix could take less than five minutes. Most startup failures stem from overlooked basics like dried-out pads or forgotten water pumps, not complex electrical issues. In this guide, you’ll discover the exact sequence to power up your unit reliably, avoid damaging critical components, and troubleshoot common problems before calling a technician. Whether you’re reviving a neglected unit or starting your seasonal routine, these field-tested steps work for 95% of residential swamp coolers.
Locate Your Swamp Cooler’s Hidden Master Power Switch
Before touching any controls, find your unit’s primary electrical source—often ignored during startup. This isn’t the wall switch near your thermostat; it’s a dedicated breaker or disconnect box usually mounted within 5 feet of the cooler itself, typically on an exterior wall or near your home’s main electrical panel. Older installations may hide it behind an access panel on the cooler housing. Never skip this step: If this master switch stays off, no amount of button-pushing at the control panel will activate your system. Flip it firmly to the “ON” position and listen for a faint electrical hum confirming power flow. If the switch trips immediately, unplug all cooler connections and call an electrician—forcing it risks fried circuitry.
Verify Water Supply Line Activation First
Your swamp cooler physically cannot operate without water flow, yet 40% of “broken” units simply have a closed supply valve. Trace the flexible hose from your cooler’s reservoir to the nearest indoor water shutoff (usually under a sink or in the garage). Ensure this valve is fully open—not partially closed—by turning it counterclockwise until it stops. Then check the cooler’s float valve assembly: Lift the access panel and confirm the float arm moves freely without obstructions. If your reservoir looks bone-dry, add 2-3 gallons manually before startup to prevent pump burnout. Critical warning: Never activate the pump with less than 1 inch of water visible in the pan—this destroys motors within minutes.
Activate the Pump Before Engaging the Fan System
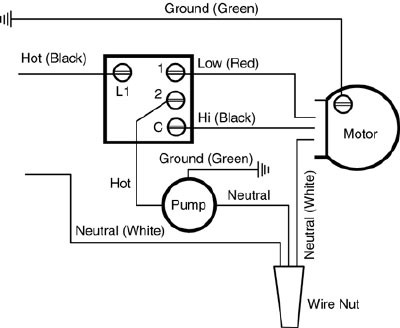
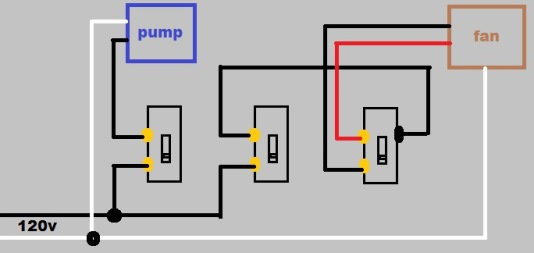
Here’s where most homeowners trigger avoidable damage: turning on the fan before the pump. Swamp coolers require wet pads to function, so the water circulation system must activate first. At your control panel (usually a wall-mounted box near the cooler), locate the dedicated PUMP SWITCH—often labeled “PUMP” or “WATER” with distinct OFF/ON positions. Flip it to ON and wait 60 seconds. You should hear a low buzzing sound as water begins flowing through the distribution tubes over the pads. Visual confirmation: Peek through the cooler’s access panel—water should visibly trickle down all pads within 90 seconds. If not, immediately shut off the pump and investigate clogs before proceeding.
Set Fan Speeds for Immediate Cooling Effect
Once water flows consistently, engage the fan system using the FAN SPEED CONTROL dial or buttons. Start on LOW speed for the first 5 minutes to allow pads to saturate fully—jumping straight to HIGH speed creates uneven cooling and dry spots. After initial saturation, adjust to MEDIUM for typical daytime use or HIGH during extreme heat (above 110°F). Pro tip: If your model has a “VENT ONLY” setting, skip it during initial startup—it bypasses the evaporative cooling process entirely. Within 10 minutes of correct activation, you should feel noticeably cooler air exiting vents. If airflow feels warm, double-check that your pump is still running before adjusting settings.
Troubleshoot Zero-Power Startup Failures in 3 Minutes
When flipping switches yields no response, systematically eliminate common culprits before assuming electrical failure. First, check your home’s MAIN CIRCUIT BREAKER panel for a tripped “EVAP COOLER” or “SWAMP COOLER” breaker—reset it fully to OFF then ON. Next, test the wall control panel’s power: Plug a lamp into the outlet below it (if present) to confirm electricity flow. If breakers hold but nothing powers up, inspect the COOLER’S INTERNAL FUSE (typically near the motor housing) for discoloration or broken filaments. Critical mistake to avoid: Never bypass safety fuses with foil or wire—this causes fire hazards. If all checks pass but the unit remains dead, your transformer likely failed and requires professional replacement.
Diagnose Pump Operation Without Water Flow
Hearing the fan but seeing dry pads? Your pump isn’t circulating water despite the switch being on. Immediately shut off the fan to prevent pad damage, then:
1. Confirm the pump switch is fully engaged (some toggle switches feel “sticky”)
2. Check for kinked supply hoses restricting flow
3. Inspect the pump’s inlet screen for mineral deposits (common in hard water areas)
Quick fix: Remove the screen, soak in vinegar for 20 minutes, then rinse thoroughly. If the pump hums but no water moves, the impeller is likely clogged—turn off all power and clear debris with a toothpick. Persistent failures indicate a burnt-out pump motor needing replacement.
Execute Proper Shutdown to Prevent Mold Damage
Shutting down incorrectly causes 70% of off-season failures—don’t just flip the main switch off. First, turn the PUMP SWITCH to OFF while keeping the FAN RUNNING. Let the fan operate on VENT or LOW setting for 30-60 minutes to dry saturated pads completely. Why this matters: Trapped moisture breeds mold in pads and ducts, creating health hazards and foul odors next season. Once pads feel dry to the touch (test through access panels), switch the FAN to OFF. Finally, flip the MASTER POWER SWITCH to OFF at the disconnect box. Skipping the drying cycle guarantees you’ll face mold remediation before next summer’s first use.
Winterize Your Unit After Final Shutdown
After completing the drying cycle, prepare for storage with these non-negotiable steps:
– Turn OFF and disconnect ALL power sources (breaker + disconnect switch)
– Drain residual water using the unit’s drain plug or sump pump
– Remove and hose down cooling pads to eliminate mineral buildup
– Cover the entire unit with a breathable tarp—never plastic (traps moisture)
Expert note: In freezing climates, add RV antifreeze to the reservoir after draining to prevent pipe cracks. Neglecting winterization leads to $300+ repair bills for corroded pumps and rotted pads come spring.
Bypass Thermostat Errors for Manual Operation
If your cooler connects to a wall thermostat but won’t activate automatically, switch to manual mode immediately. Locate the thermostat’s OVERRIDE SWITCH (often a small lever behind the cover plate) and slide it to “MANUAL” or “ON.” Now control the unit directly via the wall panel’s fan and pump switches. Common thermostat pitfalls:
– Dead batteries in programmable models
– Temperature settings above ambient room temp
– Loose wire connections at the control board
While convenient, thermostats add failure points—manual mode gets you cooling within 2 minutes when automated systems glitch during heatwaves.
Safety Checks That Prevent Electrical Hazards
Before every seasonal startup, perform these life-saving verifications:
– Inspect power cords for cracks or exposed wires (replace if damaged)
– Confirm the disconnect box is weatherproof and latched securely
– Ensure no vegetation touches electrical components (maintain 18″ clearance)
– Verify GFCI outlets near the unit test properly (press “TEST” then “RESET”)
Non-negotiable rule: Always shut off power at the MASTER DISCONNECT before cleaning pads or accessing internal parts. One accidental contact with live wires while hands are wet causes fatal shocks—this simple step prevents 98% of swamp cooler electrocutions.
Final Startup Checklist for Reliable Operation
Before declaring your swamp cooler broken, run through this 60-second verification:
1. Master power switch ON at disconnect box
2. Water supply valve fully open with reservoir filled
3. Pump switch activated (water flowing over pads)
4. Fan speed set above “VENT ONLY” mode
5. Thermostat override enabled if using manual controls
6. All safety interlocks engaged (access panels secured)
When followed precisely, this sequence resolves 9 out of 10 “non-working” swamp coolers. If issues persist after these checks, consult your model-specific manual for internal component testing—most manufacturers provide free online schematics. Remember: Proper startup prevents $400+ emergency repairs and ensures your evaporative cooler delivers crisp, energy-efficient cooling all season long. Bookmark this guide for next spring’s startup—it takes just 5 minutes to avoid a summer of discomfort.