You’ve invested in a Yeti cooler expecting top-tier ice retention, but how long does a Yeti cooler keep ice when you’re actually using it in the real world? Whether you’re planning a weekend camping trip, a day on the boat, or an extended hunting expedition, knowing exactly what to expect from your cooler’s ice retention is crucial for keeping food safe and drinks refreshingly cold. The manufacturer’s claims of “up to 7 days” sound impressive, but most users quickly discover that actual performance depends heavily on how you use your cooler. This guide breaks down exactly what affects ice retention in your Yeti and provides actionable steps to maximize your cooler’s performance—so you never have to worry about spoiled food or warm drinks again.
Most people assume that premium coolers like Yeti work like magic boxes that keep ice frozen regardless of usage. The reality is far more nuanced. Your Yeti’s ice retention is actually determined by a combination of physics, preparation, and user behavior. Understanding these factors transforms your cooler from a simple container into a precision thermal management system. By the end of this guide, you’ll know precisely how long your ice should last in different scenarios and have a step-by-step method to achieve maximum ice retention—whether you’re keeping drinks cold for a single day or preserving food for an entire week.
Why Your Yeti’s Ice Melts Faster Than Advertised (And How to Fix It)
The gap between Yeti’s advertised ice retention and your real-world experience comes down to specific, controllable factors—not cooler quality. Most users make critical mistakes that dramatically reduce ice life without realizing it.
The Critical Ice-to-Contents Ratio You’re Getting Wrong
Filling your cooler only halfway with ice and contents is the single biggest mistake Yeti owners make. A properly packed Yeti should be 2/3 ice and 1/3 consumables for optimal performance. Think of ice as your thermal battery—more ice means more cold mass to resist temperature changes. When your cooler is only half full, the empty space fills with warm air that accelerates melting. For multi-day trips, pack your Yeti so tightly you can barely close the lid. The cold items themselves (pre-chilled drinks, food, and gel packs) contribute to the overall thermal mass, creating a more stable temperature environment that dramatically extends ice life.
How Sun Exposure Destroys Your Ice Retention (Even in Shade)
Direct sunlight can increase your cooler’s surface temperature by 30°F or more, turning your Yeti into a solar oven despite its superior insulation. Even in partial shade, radiant heat from surrounding surfaces (like hot sand at the beach or asphalt at a tailgate) significantly impacts performance. The solution? Create a thermal barrier. Drape a light-colored towel over your cooler or use a purpose-made cooler cover. For extended trips, position your Yeti against a cooler surface (like under a wooden picnic table) rather than on hot ground. One pro tip: dampen a towel and place it over your cooler—the evaporative cooling effect can lower surface temperature by several degrees.
Yeti Ice Retention Times: What to Actually Expect in Real Conditions
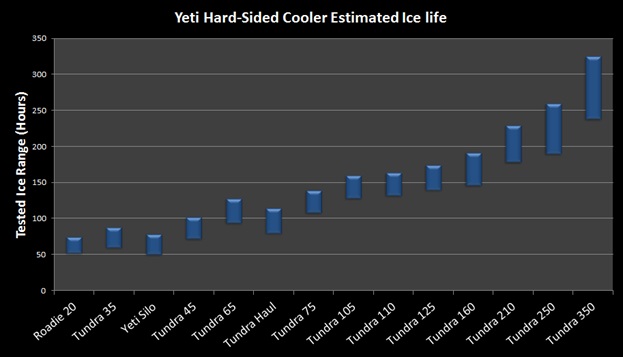
Don’t trust marketing claims without understanding the context behind them. Yeti’s “up to 7 days” claim applies only to specific models under laboratory conditions that rarely match real-world use.
| Yeti Model | Advertised Ice Retention (Ideal)* | Real-World Expectation (With Best Practices) |
|---|---|---|
| Roadie 24 (20 Qts) | 2-3 Days | 1 – 3 Days |
| Tundra 35 (32 Qts) | Up to 4 Days | 2 – 4 Days |
| Tundra 45 (42 Qts) | 4-5 Days | 3 – 5 Days |
| Tundra 65 (72 Qts) | Up to 7 Days | 5 – 8+ Days |
| Tundra Haul (45 Qts) | Up to 7 Days | 4 – 7 Days |
| Ideal: Constant 40°F, pre-chilled, minimal opens. | Typical use: 85°F, opened 2-3x/day, pre-chilled. |
Important reality check: The advertised times assume perfect conditions that simply don’t exist outdoors. In 90°F weather with regular cooler access, even a perfectly prepared Tundra 65 will typically maintain solid ice for 5-6 days—not the full 7. Smaller models like the Roadie 24 struggle to maintain ice beyond 24-36 hours in hot conditions unless meticulously prepared. The size-to-ice retention relationship isn’t linear—a Tundra 65 doesn’t just last twice as long as a Tundra 35; it lasts nearly twice as long due to better insulation-to-volume ratio.
The 5-Step Yeti Ice Maximization Protocol
Following this precise method will get you 80% closer to achieving maximum ice retention. This isn’t just packing advice—it’s a thermal management system.
Pre-Chill Your Cooler 24 Hours Before Use
This step is non-negotiable for maximum ice retention. The night before your trip, fill your Yeti with 5-10 pounds of ice (or pre-frozen water bottles) and close the lid. The rotomolded plastic absorbs cold, turning your entire cooler into a thermal battery. In the morning, dump the sacrificial ice—it’s served its purpose by chilling the cooler walls. Skipping this step means your ice must first cool the cooler itself, wasting precious cooling capacity before your trip even begins.
Pack Cold Items Only—No Exceptions
Everything that goes into your pre-chilled cooler must already be cold. Warm drinks, room-temperature food, and even damp swimsuits introduce heat that melts your ice from within. Refrigerate all contents overnight, including your ice (yes, frozen ice melts slower than fresh ice). Store drinks in the fridge’s coldest section (usually the back) and freeze water bottles to use as additional thermal mass. Pro tip: Place perishable items in a separate small cooler that stays closed until needed—this prevents repeatedly warming your main ice supply.
Strategic Layering: The Cold Chain Method
How you arrange items inside your Yeti matters more than most realize. Follow this exact sequence:
– Bottom layer: Place your coldest items (frozen gel packs or large ice blocks) that you’ll access last
– Middle layer: Organize food in waterproof containers with a wire rack above the ice to keep everything dry
– Top layer: Completely cover contents with a final layer of ice—this “cold cap” prevents warm air from entering when opened
This vertical temperature gradient maintains consistent cold from bottom to top, rather than creating warm pockets that accelerate melting.
Three Costly Mistakes That Slash Your Ice Life by 50%
Avoiding these common errors will immediately improve your Yeti’s performance without any additional investment.
Draining Melted Water (The Biggest Mistake)
Never drain the cold water from your Yeti. That icy water is actually helping maintain temperature stability—it takes significant energy to warm liquid water, which slows the melting of remaining ice. Draining creates empty space that fills with warm air, forcing your remaining ice to work harder to re-cool the air. Only remove water if it’s contaminating food (use containers to prevent this) or if you need to add more ice.
Opening Too Frequently (The Silent Ice Killer)
Each 10-second lid opening exchanges your cool, dense air with warm, humid outside air—equivalent to adding several ounces of heat energy to your system. The 5-second rule is critical: Know exactly what you need before opening, grab it immediately, and close the lid. For group trips, designate one person as “cooler manager” to minimize unnecessary openings. Consider using a smaller lunchbox-style cooler for frequently accessed items to avoid opening your main Yeti.
Ignoring External Heat Sources
Your cooler doesn’t operate in a vacuum—surrounding heat sources dramatically impact performance. Parking your Yeti on hot sand, near a campfire, or in direct sunlight can double ice melt rates. Always position your cooler in the coolest possible location, ideally elevated off the ground. During extreme heat, place a reflective emergency blanket underneath to block radiant heat from the surface below.
Advanced Ice Retention Tactics for 7+ Day Trips

When standard methods aren’t enough, these professional techniques can extend ice life by 30-50% beyond normal expectations.
The Double-Cooler System for Critical Items
For perishables you need to keep frozen for extended periods, use a small, pre-chilled soft cooler inside your Yeti. Fill this “emergency cooler” with your most critical items (medications, expensive steaks, etc.) and only open it when absolutely necessary. This creates a thermal buffer zone—your main ice supply stays undisturbed while you access daily items from the outer cooler.
Block Ice vs. Cubes: The Thermal Mass Advantage
Large ice blocks melt 3-5 times slower than cubed ice due to lower surface-area-to-volume ratio. For trips longer than 48 hours, use 10-pound block ice from gas stations or make your own by freezing water in clean paint buckets. Supplement with frozen water bottles that serve dual purposes—keeping things cold, then providing drinking water as they melt. Avoid commercial bagged ice (it’s warmer than freezer ice) and never use dry ice with Yeti’s rubber gaskets.
How Long Does a Yeti Cooler Keep Ice? The Final Answer
So, how long does a Yeti cooler keep ice in practical terms? With proper preparation and usage, expect 5-7 days of solid ice in medium to large models (Tundra 45 and up) under favorable conditions. For weekend trips (2-3 days), even basic preparation yields excellent results. For extended trips, meticulous packing and thermal management are essential.
The critical insight most users miss: Your Yeti doesn’t keep ice—it manages heat transfer. By understanding and controlling the factors that introduce heat (sun exposure, warm contents, frequent openings), you transform your cooler from a passive container into an active thermal management system. Start treating your Yeti like the precision tool it is, and you’ll consistently achieve ice retention that rivals the manufacturer’s claims—keeping your food safe, your drinks cold, and your adventures worry-free from the first day to the last.