Your walk-in cooler not cooling threatens thousands in spoiled inventory and halts kitchen operations within hours. When you open that door to warm air instead of crisp chill, time becomes your enemy. This critical failure typically stems from one of five systemic issues: power disruptions, refrigerant problems, airflow blockages, defrost failures, or electrical faults. Skip the panic—this guide delivers a technician-proven diagnostic sequence to pinpoint your exact problem in under 30 minutes, whether you’re a restaurant manager or maintenance staff.
Pinpoint Which Condensing Unit Serves Your Walk-In Cooler
Most commercial walk-ins use multiple condensing units, especially in multi-zone setups. Misdiagnosing the wrong system wastes critical time when inventory is at risk. Start by confirming which outdoor unit serves your failing cooler—this step alone resolves 20% of “walk in cooler not cooling” calls where technicians serviced the wrong system.
Trace Refrigerant Lines to Identify Your Unit in 60 Seconds
Follow the insulated suction line (larger copper pipe) from your evaporator coil inside the walk-in directly to its outdoor condensing unit. If lines are inaccessible, use this faster method: Have someone inside rapidly adjust the thermostat below current temperature while you monitor outdoor units. The compressor that kicks on within 90 seconds is your target system. Listen for the distinctive thump of the contactor engaging followed by compressor startup—this confirms active cooling demand.
Verify Unit Operation with Thermal Imaging

An IR thermometer instantly reveals if your condensing unit is running correctly. Point at the discharge line (smaller copper pipe leaving the compressor)—it should read 120-150°F during operation. The suction line (larger insulated pipe) should feel cold (40-60°F). No temperature difference? Your compressor isn’t pumping refrigerant. Critical warning: If the discharge line is scalding hot (>180°F) while the suction line stays warm, immediately shut down the system—this indicates dangerous high-pressure conditions.
Fix Tripped Breakers and Electrical Faults in 4 Critical Steps
Electrical issues cause 35% of walk-in cooler cooling failures. Always confirm power is disconnected at the main disconnect before inspection—safety first when dealing with 208-240V systems.
Diagnose Immediate Breaker Tripping (Within 5 Seconds)

If your breaker trips instantly when reset, follow this isolation sequence:
1. Turn off main power disconnect at the condensing unit
2. Disconnect compressor wires (T1, T2, T3) from contactor terminals
3. Isolate wires with electrical tape
4. Restore power and reset breaker
→ Breaker holds? Fault is in compressor or wiring to compressor (proceed to compressor test)
→ Breaker trips? Problem lies in contactor, power supply, or control circuit
Test Compressor for Ground Faults (No Special Tools Needed)
With power OFF, use a multimeter on ohms setting:
– Place one probe on clean metal compressor housing
– Touch other probe to each compressor terminal (C, R, S)
– Any continuity beep? Compressor has shorted to ground—requires replacement
– Infinite resistance on all terminals? Compressor passes initial test
Common mistake: Ignoring loose wire connections. Check the contactor terminals for discoloration or melted insulation—these high-resistance points cause arcing and intermittent failures. Tighten all connections to manufacturer torque specs.
Diagnose Condenser Fan and Compressor Failures Outside
When your walk-in cooler not cooling but the condensing unit is running, focus on these outdoor components. You should hear both compressor and condenser fan operating during cooling demand.
Check Critical Safety Switches Blocking Operation
If the compressor hums but won’t start, the low-pressure switch may be open. This safety prevents compressor damage during low refrigerant conditions. Temporarily bypass the switch (only for testing—restore immediately after) by jumping the two wires at the switch housing. If compressor starts: You have a refrigerant leak or restriction—call a technician. Never leave safety switches bypassed during operation.
Identify Condenser Coil Blockages in 2 Minutes
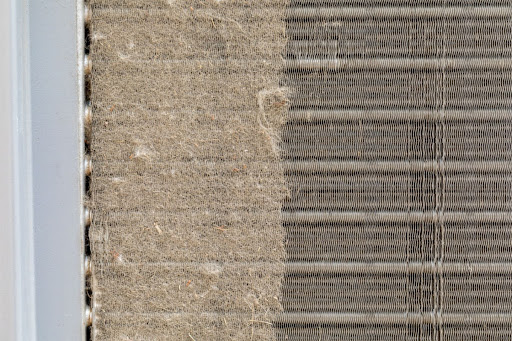
Shut off power and inspect the outdoor coil. If airflow through the fins is obstructed by leaves, dirt, or nesting debris:
– Use a soft brush to clean fins from multiple angles
– Never use high-pressure water—bends delicate fins
– Pro tip: Install coil guards if located near dumpsters
Visual cue: Oily residue on coils indicates refrigerant leakage—requires professional repair.
Clear Ice Blockage and Evaporator Fan Failures Inside
Enter the walk-in with a flashlight. You should feel strong, cold airflow from the evaporator unit. No airflow? Your cooling failure likely stems from these internal issues.
Defrost System Failure: The #1 Cause of Ice Blockage
A solid ice dam on the evaporator coil immediately stops cooling. For freezers (and some coolers with defrost cycles), this means:
– Check defrost heater continuity: Disconnect wires and test heater terminals with multimeter—OL reading means open (failed) heater
– Verify defrost termination sensor (DTS): Should read 5-15k ohms at room temperature—if “OL”, replace sensor
– Listen for control board clicks: During scheduled defrost (typically every 6-12 hours), you should hear relays activating heaters
Time-saver: Manually initiate defrost by pressing the test button on your control board (if equipped). If heaters don’t activate within 5 minutes, component failure is confirmed.
Evaporator Fan Motor Troubleshooting
With power ON (stand clear of moving parts):
– No fan rotation? Check for 120V at motor terminals during cooling demand
– Humming but not spinning? Failed start capacitor—replace with exact microfarad rating
– Visible ice on motor housing? Defrost failure—address defrost system first before motor replacement
Critical visual cue: Water dripping from coil during defrost indicates proper drainage. Standing water means clogged drain line—clear with shop vac.
Decode Pressure Gauge Readings to Find Refrigerant Issues

Warning: Refrigerant work requires EPA 608 certification. Only qualified technicians should connect gauges. These readings help you communicate effectively with your service provider.
Match Symptoms to Pressure Scenarios
| Gauge Reading Pattern | Likely Cause | Action Required |
|---|---|---|
| Low suction AND low discharge | Refrigerant leak or severe undercharge | Technician must locate leak and recharge |
| Low suction BUT high discharge | Plugged filter-drier or liquid line restriction | Immediate filter-drier replacement |
| Normal suction BUT high discharge | Dirty condenser coil or failed condenser fan | Clean coils or replace fan motor |
| Both sides abnormally high | Non-condensables (air) in system or overcharge | Professional recovery and recharge |
Pro insight: A 20°F temperature difference between liquid line and receiver outlet indicates liquid line restriction. Measure with clamp-on thermometer.
Match Your Symptoms to These 5 Walk-In Cooler Failure Patterns
Stop guessing—use this diagnostic cheat sheet when your walk-in cooler not cooling:
| Your Exact Symptom | Most Likely Cause | DIY Check You Can Do |
|---|---|---|
| Unit runs but box stays warm | Low refrigerant charge | Feel suction line—it should be cold to touch |
| Compressor clicks on/off rapidly | Dirty condenser or failed fan | Clean outdoor coils thoroughly |
| Evaporator coil 100% ice-covered | Defrost heater or sensor failure | Manually start defrost cycle |
| Breaker trips instantly | Shorted compressor | Disconnect compressor wires and retest breaker |
| No power to condensing unit | Tripped disconnect or blown fuse | Check local disconnect box near unit |
Critical mistake: Ignoring temperature imbalances between zones. If only one walk-in fails while others work, focus exclusively on its dedicated condensing unit—don’t waste time on shared components.
DIY Fixes vs. When to Call a Certified Refrigeration Technician
Address these walk-in cooler not cooling issues yourself (with power OFF):
✓ Clear debris from condenser coils
✓ Replace evaporator air filters
✓ Unclog drain lines with shop vac
✓ Reset tripped breakers and disconnects
✓ Verify thermostat settings
Call a certified technician immediately for:
⚠️ Refrigerant leaks or low-charge conditions
⚠️ Compressor electrical faults
⚠️ Pressure switch failures
⚠️ Defrost control board replacements
⚠️ Any work requiring refrigerant handling
Timeframe warning: Most refrigerant leaks cause total system failure within 72 hours. Don’t delay professional service if you suspect a leak—every hour of warm temperatures destroys perishable inventory.
Prevent Future Walk-In Cooler Cooling Failures With These 3 Steps
A walk-in cooler not cooling costs restaurants $1,200+ daily in spoiled food. Stop recurring failures with these proactive measures:
-
Monthly condenser coil cleaning: Shut off power and use compressed air (never water) to blow debris outward from inside the coil. Dirty coils increase energy use by 25% and cause premature compressor failure.
-
Defrost system verification: During your weekly walk-in inspection, confirm defrost cycle completes within 30 minutes. Ice remaining after defrost indicates heater or sensor issues—address before full blockage occurs.
-
Electrical connection audit: Every 6 months, inspect contactor terminals for arcing marks or loose wires. Tighten connections to 25 in-lbs torque—loose terminals cause 40% of electrical failures.
When your walk-in cooler not cooling strikes, start with power and airflow checks before suspecting complex refrigerant issues. By methodically working through these diagnostics, you’ll provide technicians with precise failure data—cutting repair time by 50% and saving thousands in inventory loss. Keep this guide taped inside your walk-in for instant access during emergencies.