That sweltering feeling when your fan just pushes hot air around? You’re not alone. With energy costs soaring and traditional AC units guzzling power, learning how to make cooler solutions from household items has become a summer survival skill. Forget expensive installations—this guide reveals three proven DIY cooling systems that transform ice, a fan, and basic containers into targeted cold air machines. You’ll discover why these beat simple “fan + ice bowl” hacks, how to build them in under an hour, and the critical venting mistake that turns portable ice makers into room heaters. Whether you’re battling 100°F heatwaves or need desk relief, these methods deliver real cooling for pennies per hour.
Why Standard Fan-and-Ice Tricks Fail (and What Actually Works)
The Physics Behind Real Cooling vs. Hot Air Circulation
Most DIY attempts fail because they ignore airflow physics. Blowing a fan over a bowl of ice only cools air passing directly over the ice—leaving most of the room untouched. Effective how to make cooler designs force all air through the cold source using sealed chambers. Ice-based systems work by thermal conduction: as room-temperature air contacts ice, heat transfers into the ice (melting it), cooling the air before it re-enters the room. Crucially, the ice must act as a heat sink—not just a surface—requiring airtight boxes that maximize air-ice contact time.
Humidity’s Make-or-Break Impact on Your DIY Cooler
Your climate dictates which design succeeds. Evaporative “swamp coolers” only work below 50% humidity (dry climates like Arizona), where water evaporation actively cools air. In humid areas (80%+ humidity like Florida), ice-based systems are mandatory—they cool via conduction, not evaporation. Attempting swamp cooling in humidity adds oppressive moisture without meaningful temperature drops. Always verify your local humidity: if it’s above 60%, skip evaporative methods and build ice-coolers instead.
Build a Classic Swamp Cooler for Dry Climates (Under $30)
Assembling the Water Pump and Radiator Core System

This design mimics commercial swamp coolers using car parts. Start with a 30-qt plastic cooler laid on its side. Drill a 1-inch hole near the base for a $15 submersible pump (500GPH). Fill the cooler 1/3 full with water, submerging the pump. Connect flexible tubing from the pump to a salvaged car heater core (check junkyards for free cores). Position the core vertically inside the cooler, ensuring tubes stay submerged. Mount a 12V car radiator fan ($10) to blow air through the core fins—not over it. When running, the pump circulates chilled water through the core while the fan pulls room air through the cold metal fins, dropping output air by 15-20°F.
Supercharging with Ice: The Dry Climate Power Move
In arid zones, add frozen water bottles to the swamp cooler’s water reservoir. The ice chills the water circulating through the radiator core, transforming evaporative cooling into hybrid ice-evaporation cooling. This achieves 25-30°F drops—impossible with water alone. Critical tip: Never use loose ice; it clogs pumps. Always freeze water in sealed containers to maintain consistent water levels while boosting cooling capacity.
Construct a 5-Gallon Bucket Cooler for Instant Desk Relief
Cutting Precision Holes for Maximum Airflow
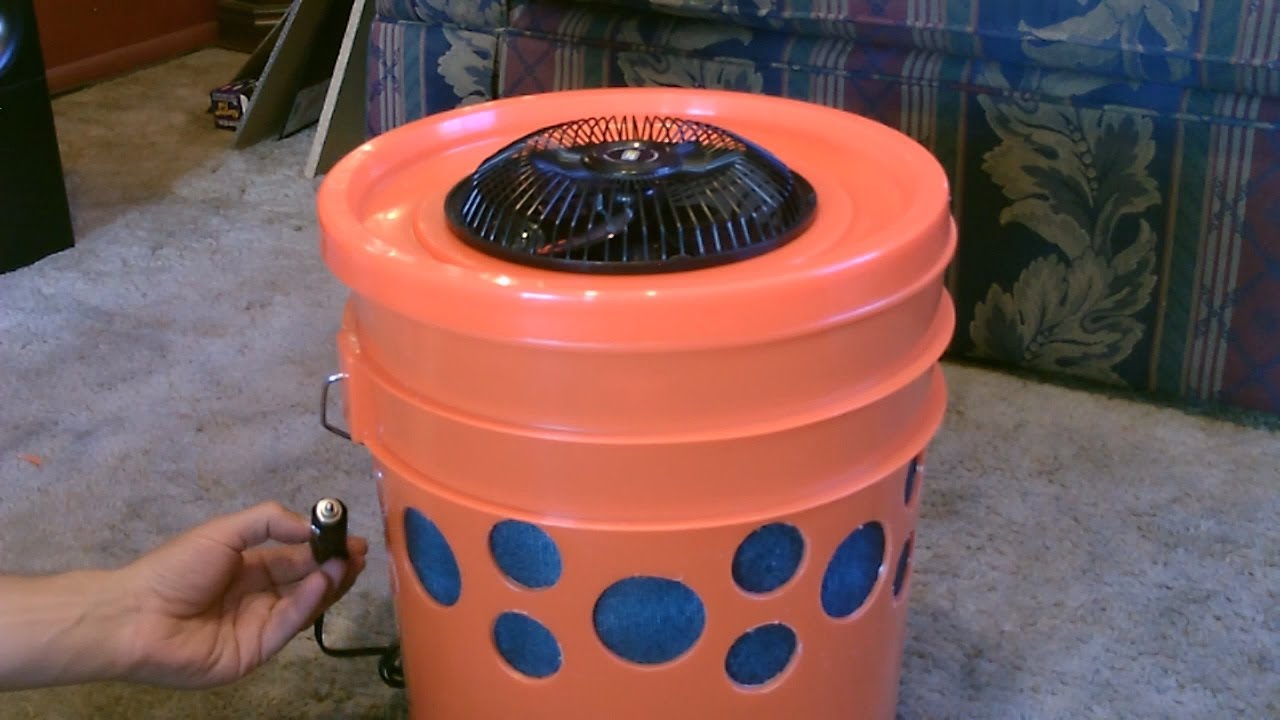
Grab a 5-gallon bucket with lid. Using a hole saw:
1. Cut a 4-inch hole dead-center in the lid (air outlet)
2. Cut a 3-inch hole 2 inches from the bucket’s base (air intake)
3. Cut a 4×4-inch square from foam board to create a baffle inside the bucket
Seal the baffle vertically 6 inches from the intake hole using silicone caulk. This forces incoming air to travel under the baffle, across the ice, and up to the outlet—preventing hot air shortcuts. Without this partition, cooling efficiency drops 70%.
Frozen Water Bottles vs. Loose Ice: The Longevity Hack
Fill the bucket 1/3 full with gallon-sized water bottles frozen solid (not crushed ice). Why? Solid blocks melt slower, sustaining cold output for 4+ hours versus 1 hour for loose ice. Attach a 4-inch squirrel-cage blower ($12) over the lid’s outlet hole with duct tape. Power it via a 12V adapter. Position the intake hole toward your body—the cooler pulls warm air from you, chills it over ice, and blasts relief directly to your face. Pro warning: Never use a standard box fan; its weak airflow won’t penetrate ice density.
Create a High-Efficiency Cooler Cooler for Whole-Room Relief
Mounting Dual Fans for Ice-Penetrating Airflow

This design cools 150 sq ft spaces using two fans in a 48-qt cooler. On one short end:
– Cut a 5×5-inch hole and mount two 120mm PC fans pulling air into the cooler
On the opposite end:
– Cut a 4-inch hole and attach a duct adapter ($5) with flexible tubing
Place the cooler upright. Fill 2/3 full with ice, leaving space for air channels. The intake fans force room air through the ice mass (not over it), while the dense cold air sinks and exits via the duct. Key upgrade: Add a 1/2-inch drain hole at the base—sealed with a rubber stopper—to empty meltwater without dumping ice.
Venting Ice Maker Exhaust: The Room-Heating Trap
Portable ice makers (like Whynter models) seem ideal for continuous ice—but their exhaust heat must vent outside. One user reported their ice maker added 800W of heat to their room, negating all cooling. Solution: Rig a dryer vent hose ($8) from the ice maker’s exhaust port to an open window. This vents 110°F exhaust outdoors while supplying fresh ice. In dry climates, this system cooled 750 sq ft using just 10 lbs of ice daily—proving how to make cooler setups sustainable.
Fix These 3 DIY Cooler Failures in Under 5 Minutes
“My Output Air Isn’t Cold Enough” Emergency Fix
If air feels lukewarm, check for air leaks around fan seals. Even 1/8-inch gaps let hot air bypass the ice. Solution: Wrap fans in duct tape before mounting, then seal edges with old T-shirt fabric and hot glue. This creates an airtight seal forcing 100% of airflow through the cooling medium.
Stopping Condensation Leaks Without Draining
Meltwater pooling under coolers wastes ice and damages floors. Prevention: Line the cooler’s interior with a $3 pond liner sheet (cut to size). It contains leaks while insulating ice from ambient heat—extending ice life by 30%. For bucket coolers, place a saucer under the drain hole with a towel inside to absorb drips silently.
Ice Management Hacks for 24/7 Cooling on $1/Day
Freezing Long-Lasting Ice Blocks That Won’t Dilute
Fill gallon milk jugs 3/4 full with water, leaving expansion space. Freeze upright for solid blocks that melt 3x slower than cubes. For odor-free cooling, add 1 cup rubbing alcohol to water before freezing—it lowers the freezing point, creating slushier ice that chills faster without excessive melting.
Where to Buy Bulk Ice for Pennies Per Pound
Gas stations sell 20-lb bags for $2.50 (12¢/lb)—cheaper than home freezing. Call ahead to confirm availability. Pro tip: Use bags as emergency ice packs during outages—just invert the bag to access dry ice chunks without messy water.
Why Your DIY Cooler Uses 90% Less Energy Than AC
Real Power Savings: 12W vs. 1200W in Action
A dual-fan cooler cooler runs on two 6W PC fans (12W total). Compare this to a 5,000 BTU window AC unit (500W+). At $0.15/kWh, the DIY cooler costs $0.0018/hour to run versus $0.075/hour for AC—a 98% savings. Over a 12-hour night, that’s 2 cents vs. 90 cents.
The Environmental Bonus of Targeted Cooling
By cooling only your immediate space (not the whole house), these systems cut carbon footprints. One user in Los Angeles cooled their bedroom all summer using just 300 lbs of ice—equivalent to 1/5th the energy of running a mini-split AC. In dry climates, this approach slashes both bills and emissions.
Final Note: These how to make cooler designs prove effective cooling doesn’t require complex engineering. The swamp cooler dominates in dry zones, the bucket cooler delivers instant personal relief, and the high-efficiency model handles whole rooms when paired with vented ice makers. Key to success? Force air through ice in sealed chambers, manage humidity wisely, and always vent ice maker exhaust outdoors. With $20 in materials and 60 minutes of assembly, you’ll create a custom cooling system that outperforms store-bought units while using less power than a lightbulb. Start building today—your heatwave relief is only one ice batch away.