That sticky summer feeling where your home turns into a steam room by noon? You’re not alone. Over 40 million American households rely on portable cooling solutions, but most waste energy because they don’t know how to use portable air cooler effectively. Unlike energy-hogging air conditioners that remove heat, evaporative coolers—often called “swamp coolers”—use nature’s own process to drop temperatures up to 30°F in dry climates. The catch? They fail miserably if you treat them like standard AC units. This guide reveals the exact setup, placement, and operation secrets that turn your portable air cooler from a noisy paperweight into your summer’s MVP. You’ll discover why positioning near open windows matters more than BTU ratings and how to avoid the #1 humidity mistake that turns rooms into saunas.
Why Dry Air is Non-Negotiable for Portable Air Cooler Performance
Your portable air cooler isn’t broken when it underperforms—it’s fighting physics. These units work by pulling warm, dry air through water-saturated pads. As evaporation occurs, heat energy transfers to the water, cooling the air by 15-30°F before the fan blows it into your space. This explains why your cooler delivers instant relief in Phoenix but barely chills the air in Miami. In humid conditions above 50% relative humidity, the air can’t absorb additional moisture, crippling the evaporation process. You’ll recognize this failure when walls develop condensation and the “cool” air feels damp and sticky. Always check your local humidity levels before expecting significant cooling—this machine thrives where desert air dominates but functions as little more than a fan in coastal regions.
Selecting the Perfect Portable Air Cooler for Your Space and Climate
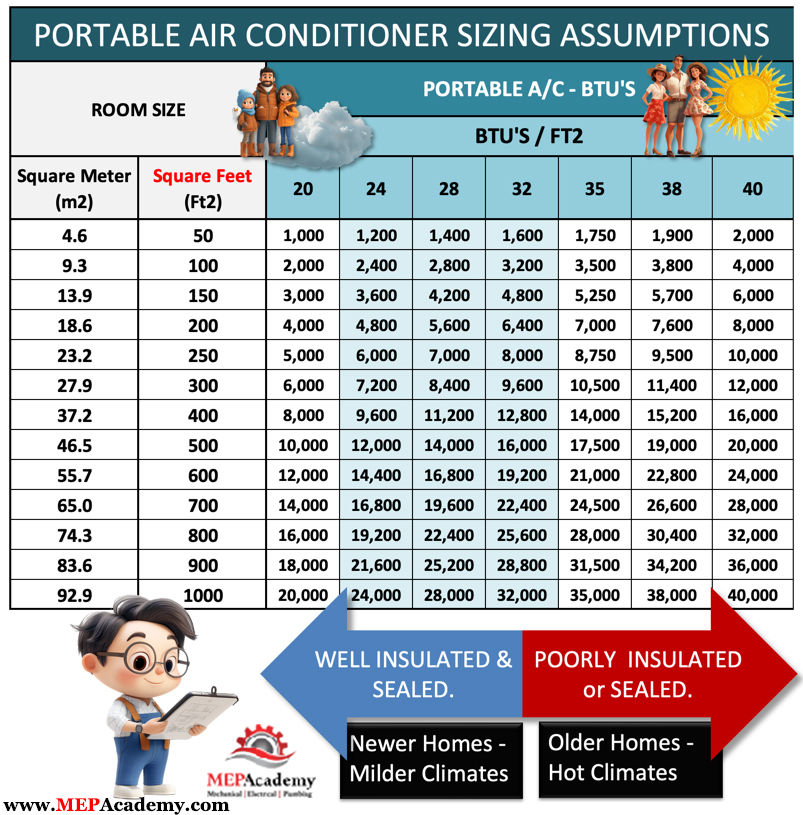
Choosing the wrong unit guarantees disappointment, so match these critical specs to your environment before plugging in. Cooler capacity must exceed your room size—check the manufacturer’s square footage rating and add 20% buffer. A 300 sq ft room needs a 360 sq ft cooler. Tank capacity directly impacts runtime; 1.5-gallon tanks last 4-6 hours while 4-gallon models run 12+ hours—essential for overnight cooling. Crucially, climate compatibility determines success: units under 3,000 BTU work best below 50% humidity, while hybrid models (with ice chambers) offer marginal improvement up to 60% humidity. If you move the cooler between rooms, portability features become non-negotiable—demand 360° caster wheels and recessed handles, not flimsy plastic grips that snap during relocation.
Matching Cooler Size to Room Dimensions
Measure your space’s length and width, then multiply for square footage. A 12×15 ft living room (180 sq ft) requires a minimum 200 sq ft capacity cooler. Oversizing by 10-15% compensates for high ceilings or sun exposure—never undersize. Units with adjustable airflow settings let you scale output for smaller bedrooms later.
Climate Reality Check: When to Choose Alternative Cooling
If your area regularly exceeds 55% humidity (check Weather.gov’s historical data), manage expectations: your portable air cooler will provide only 3-5°F relief at best. In these conditions, consider it a powerful fan with mild cooling—not AC replacement. Coastal residents should prioritize units with dual-function dehumidifier modes if available.
Step-by-Step: How to Use Portable Air Cooler Setup and First Run
Skip these preparation steps and you’ll battle mold, weak airflow, and premature pump failure within weeks. Always begin with proper assembly and water management—this foundation determines long-term performance.
Unboxing and Critical Assembly Checks
Remove all shipping locks and tape before first use. Most units require snapping side filter panels into frame grooves—these trap dust that clogs cooling pads. Rotate the unit to verify wheels lock securely; wobbling bases cause vibration damage. Pro tip: Run a dry test (fan only, no water) for 5 minutes to confirm smooth operation before adding liquid. If you hear grinding, reseat the fan blades—forced assembly causes 30% of early failures.
Water Filling Protocol for Maximum Cooling
Unplug the unit, then fill the tank with cold tap water—not ice cubes. Ice chunks jam pumps and crack reservoirs. For immediate chill, add manufacturer-approved ice packs to the dedicated chamber (never directly to water). Critical warning: Using hot water or vinegar solutions voids warranties and degrades pads. Always drain stagnant water after 48 hours to prevent bacterial growth that causes “wet dog” odors.
Strategic Placement That Makes or Breaks Cooling

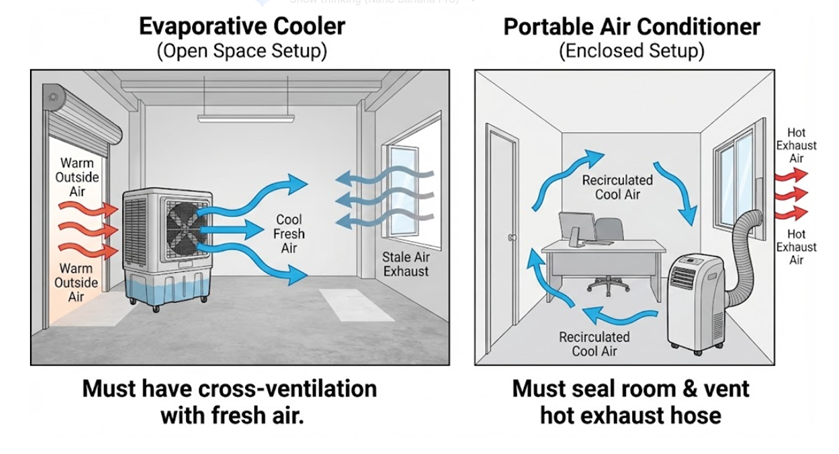
This is where 90% of users fail. Position your portable air cooler within 2 feet of an open window or door—never in room corners. The unit must pull in dry outside air while expelling cooled humid air. Create cross-ventilation by opening an opposite window 2-4 inches to establish airflow. Point the output toward your seating area, but elevate the unit 6+ inches off the floor since cooled air sinks. Visual cue: If moisture beads on nearby surfaces within 20 minutes, increase exhaust ventilation immediately.
Mastering Portable Air Cooler Controls for All-Day Comfort
Your control panel holds untapped potential—understand these settings to avoid wasting energy while maintaining comfort.
Decoding Fan Speed and Cooling Modes
Start on HIGH fan with COOLING MODE active to drop temperatures rapidly for 15-20 minutes. Once comfortable, reduce to MEDIUM. Never run cooling mode without water—this burns out the pump in under 5 minutes. Oscillation spreads airflow but reduces throw distance; disable it when targeting a single person. Pro shortcut: In dry climates, run cooling mode only during peak heat (10 AM-4 PM), switching to FAN ONLY mode overnight when temperatures dip.
Timer and Sleep Mode Hacks
Program the timer to shut off 30 minutes before waking—your room retains coolness while saving 15% energy. Activate sleep mode by reducing fan speed to LOW 1 hour before bed; the slower airflow prevents nighttime chills while maintaining humidity balance. Units with humidity sensors auto-adjust—set these to 55% RH for optimal comfort in dry zones.
Real-Time Humidity Management
Watch for condensation on windows—this signals over-humidification. Immediately open an additional window 2-3 inches to exhaust moist air. In arid regions, keep humidity between 30-50% for effective cooling. Emergency fix: If the room feels muggy, turn off cooling mode for 10 minutes while running the fan to circulate drier air.
Proven Strategies to Boost Your Portable Air Cooler’s Output
These advanced techniques transform marginal cooling into dramatic temperature drops when executed correctly.
Pre-Cooling for Instant Relief
Fill the tank with refrigerated water (not ice) 30 minutes before use. This leverages the “cold water head start” effect, delivering noticeably cooler air for the first 45 minutes. Units with ice chambers accept two commercial ice packs—never overfill, as melting water floods the base.
Cross-Breeze Engineering
Place the cooler near an intake window while opening an exhaust window diagonally opposite. This creates a “cool air river” flowing through your space. In single-window rooms, use a box fan in a second window blowing OUT to pull the cooler’s output through the room.
Night Flushing Technique
In desert climates, turn off the cooler at 10 PM and open all windows to flood your home with 70°F night air. Close windows at 6 AM with blinds drawn—this pre-cooled space requires 40% less cooling effort during daytime heat.
Climate-Specific Tactics: How to Use Portable Air Cooler in Any Weather
Your location dictates your strategy—adapt these approaches for real-world conditions.
Desert Climate Dominance (Phoenix, Las Vegas)
Run cooling mode continuously with windows cracked 1-2 inches. Add ice packs during afternoon peaks. Expect 25-30°F drops from 100°F+ temperatures. Clean pads weekly to prevent mineral crust from hard water.
Moderate Humidity Zones (Atlanta, Dallas)
Limit use to dry mornings (under 50% RH). Position coolers near screened porches to access drier outdoor air. Supplement with ceiling fans to enhance perceived cooling. Manage expectations: 8-12°F reduction is achievable.
High Humidity Fail-Safes (Miami, Houston)
Use exclusively as high-velocity fans with cooling mode disabled. Add moisture-absorbing crystals to the water tank to marginally reduce output humidity. Pair with dehumidifiers for marginal comfort gains.
4 Costly Mistakes That Sabotage Your Portable Air Cooler Results
Avoid these critical errors that waste money and destroy equipment:
Sealed Room Syndrome
Running your portable air cooler in closed rooms creates a humidity trap. Within 30 minutes, relative humidity exceeds 70%, stopping evaporation and making air feel hotter. Fix: Maintain minimum 10% open window area per 100 sq ft of space.
Stale Water Neglect
Leaving water in the tank for >48 hours breeds bacteria and limescale. Fix: Drain, scrub with vinegar solution, and dry completely during off-seasons. Run with water treatment tablets weekly in summer.
Ice Cube Overload
Dumping ice directly into reservoirs cracks pumps and voids warranties. Fix: Use only manufacturer-approved ice chambers with commercial packs.
Climate Mismatch
Expecting AC-level cooling in humid regions. Fix: Verify local humidity averages before purchase—units work best where summer RH averages <45%.
Mastering how to use portable air cooler transforms it from a frustrating gadget into your most valuable summer ally. The secret lies in respecting its evaporative nature: position it near open windows, match it to dry climates, and maintain water hygiene religiously. Within 24 hours of proper setup, you’ll feel the difference—dry, refreshing air instead of muggy disappointment. For lasting results, clean cooling pads monthly and store the unit bone-dry in off-seasons. Remember: in Arizona’s 110°F heat, this machine cools rooms for $0.03/hour versus AC’s $0.30—making it the smartest cooling hack for dry regions. Ready to conquer summer? Position your cooler correctly tonight and wake up to genuinely cool air tomorrow.