If you live near a river or in a humid climate like the Rio Grande Valley, you’ve likely experienced the frustration of your swamp cooler failing during peak summer heat. When humidity rises above 50%, evaporative coolers stop working effectively because moist air can’t absorb additional water vapor—leaving your home stuffy and uncomfortable. This isn’t just an inconvenience; it’s a fundamental limitation of swamp coolers in mixed-humidity regions. Replacing your roof-mounted evaporative cooler with a modern air conditioning system transforms your home’s comfort by delivering dry, consistent cooling exactly when you need it most. In this guide, you’ll discover precisely how to replace a swamp cooler with central AC—including critical electrical upgrades, ductwork modifications, and system selection—so you avoid costly mistakes and enjoy reliable cooling for decades.
Most homeowners attempt this upgrade after enduring years of swamp cooler shortcomings: constant repairs, sky-high humidity indoors, or that muggy feeling on 100°F days. Unlike simple appliance swaps, this project requires strategic planning because swamp coolers and AC systems operate on entirely different principles. While evaporative coolers add moisture using 110V power, refrigerated AC removes humidity through a 220V compressor system with higher static pressure demands. Skipping professional assessments risks improper sizing, duct leaks, or electrical hazards. By following this roadmap, you’ll navigate the transition smoothly—from contractor selection to final commissioning—with confidence that your investment delivers maximum comfort and efficiency.
Why Your Swamp Cooler Fails in Humid Climates (and When to Replace)
The Humidity Problem: Why Evaporative Cooling Stops Working
Swamp coolers rely on dry air to evaporate water through cellulose pads, but high humidity cripples this process. When outdoor humidity exceeds 50%—common near rivers or coastal areas—the air lacks “evaporative capacity.” Instead of cooling, your unit blasts warm, moist air into your home, worsening discomfort. This isn’t a malfunction; it’s physics. Homes a third of a mile from the Rio Grande exemplify this issue, where swamp coolers become counterproductive during monsoon season. Unlike AC systems that dehumidify while cooling, evaporative units actively increase indoor moisture—inviting mold growth and musty odors. If your home feels clammy despite running the cooler, humidity has overwhelmed its capabilities.
4 Clear Signs It’s Time to Replace Your Swamp Cooler
1. Persistent indoor humidity above 60% – Use a $10 hygrometer to confirm. If levels stay high during operation, your cooler can’t cope with ambient moisture.
2. Inadequate temperature drop – Swamp coolers typically lower temps by 15-20°F in dry air. If you’re only seeing 5-10°F reductions on hot days, replacement is overdue.
3. Frequent pump or motor repairs – Aging units (over 10 years) often need annual pad replacements, pump fixes, and valve adjustments—costing $300+ yearly.
4. Water stains on ceilings – Leaks from clogged pads or reservoirs indicate structural damage, making AC conversion more cost-effective than continued repairs.
Choosing the Right AC System: Central, Ductless, or Rooftop?
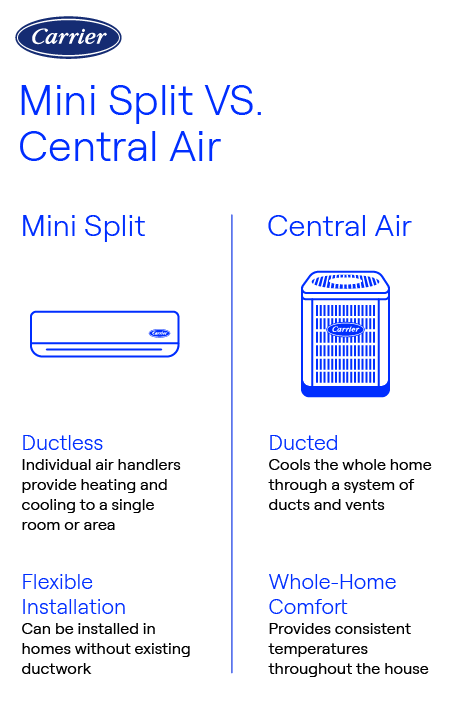
Central Air Conditioning: Best for Homes with Existing Ducts
For most homeowners replacing swamp coolers, central AC is the optimal choice if ductwork exists. Here’s how to replace a swamp cooler with this system: The old unit and roof platform are removed, the penetration sealed, and an indoor air handler installed in your attic or closet. Ducts are modified to handle AC’s higher static pressure—sealing leaks with mastic and resizing sections that were oversized for evaporative cooling. An outdoor condenser connects via refrigerant lines, requiring a dedicated 220V circuit. This setup cools your entire home uniformly while dehumidifying air, solving the swamp cooler’s core weakness. Expect 2-3 days for installation, with costs ranging from $5,000-$10,000 depending on system size (typically 2-4 tons).
Ductless Mini-Split: Ideal for Homes Without Ducts or Zoned Cooling
Choose this if your swamp cooler ducts are unusable or you want room-specific control. A single outdoor compressor connects to wall-mounted indoor units via 3-inch conduits carrying refrigerant lines. Key advantages for swamp cooler replacements: No duct modifications needed, minimal roof work (only small conduit penetrations), and zoning capabilities. Install one unit for open-concept spaces or multiple heads for bedrooms. Installation takes 1 day with lower electrical demands than central AC—ideal for older homes with 100-amp panels. While upfront costs ($3,500-$8,000) are lower, you sacrifice whole-home dehumidification since indoor units don’t share moisture removal.
Rooftop Packaged Units: The Direct Swap for Roof-Mounted Coolers
This is the fastest mechanical replacement for roof-installed swamp coolers. The old unit is removed, and a new packaged system (containing compressor, coils, and blower) mounts directly on your roof curb. It connects to existing ducts with minimal modifications—often reusing the same roof penetration. Critical consideration: Verify your roof structure supports the 200-400 lb unit. Installation is 1-2 days but requires reinforced curbs and weatherproofing. Best for commercial-style homes; residential costs run $6,000-$12,000. Avoid if your roof has structural issues or limited access.
Critical Pre-Installation Steps: Electrical, Ductwork, and Permits
Must-Do: Get 3 Professional HVAC Consultations
Never skip this step—replacing a swamp cooler with AC isn’t DIY. Contact three licensed HVAC contractors for on-site assessments. A quality consultation includes:
– A Manual J load calculation (not a “rule of thumb” estimate) to size your system correctly
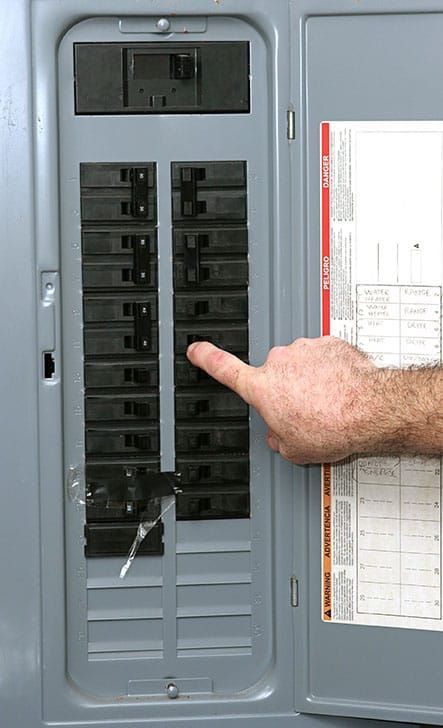
– Inspection of electrical panel capacity (swamp coolers use 110V; AC needs 220V)
– Duct leakage testing with a blower door
– Roof structure evaluation for weight-bearing capacity
Reject contractors who quote over the phone. You’ll pay $75-$150 for assessments, but this prevents $2,000+ mistakes from undersized systems or inadequate wiring.
What Contractors Check: Electrical Service and Ductwork Assessment
Electrical red flags: Homes with swamp coolers often have 100-amp service, but a 3-ton AC requires 200 amps. If your panel is full or outdated, expect $1,500-$3,000 for upgrades. Contractors verify:
– Available breaker slots for a 220V double-pole circuit
– Main service amperage (100A vs. 200A)
– Wire gauge compatibility (minimum #10 copper for 30A circuits)
Ductwork dealbreakers: Swamp cooler ducts are typically leaky and oversized. During assessment, watch for:
– Flex duct sagging or disconnected sections (common in attics)
– Ducts smaller than 8″ diameter for return air
– Unsealed joints at vents or plenums
If over 30% of ducts need replacement, budget $2,000-$4,000 for modifications—critical for AC efficiency.
Step-by-Step Swamp Cooler Removal and AC Installation
Day 1: Removing the Old Swamp Cooler and Sealing the Roof
Safety first: Turn off power at the main breaker and shut off the water supply. Professionals follow this sequence:
1. Disconnect electrical wiring and water lines inside the unit
2. Remove access panels and disconnect duct connections
3. Lift the 100-150 lb unit off its roof curb using a crane or team lift
4. Critical step: Seal the roof penetration with 24-gauge galvanized steel flashing and roofing cement to prevent leaks
5. Remove the old curb and inspect roof decking for rot—repairing any damage before proceeding
Pro tip: Cover the opening with a tarp during removal if rain is forecasted. Never leave it exposed overnight.
Day 2: Electrical Upgrades and Ductwork Modifications
Electrical work: A licensed electrician runs a dedicated 220V circuit:
– Installs a disconnect box within 5 feet of the outdoor unit
– Uses #8 or #10 copper wire (based on unit specs) from panel to disconnect
– Upgrades the main panel if necessary (adding $1,500-$3,000 to project cost)
Duct modifications: Technicians:
– Seal all leaks with mastic (not duct tape!)
– Replace collapsed flex duct with rigid metal piping
– Resize undersized return ducts to 14″x8″ minimum for 3-ton systems
– Balance airflow by adjusting dampers at vents
Warning: Skipping duct sealing wastes 30% of cooling capacity—making your new AC perform like an old swamp cooler.
Day 3: Installing Your New AC System and Final Testing
Installation sequence:
1. Mount the outdoor condenser on a level concrete pad (not directly on soil)
2. Install the indoor air handler on a sturdy attic platform with drip pans
3. Connect refrigerant lines (copper tubing) and vacuum the system to 500 microns
4. Install a smart thermostat compatible with your new system
5. Charge refrigerant to exact manufacturer specifications
Commissioning tests: Reputable contractors perform:
– Superheat/subcooling measurements to verify refrigerant levels
– Airflow tests (aim for 400 CFM per ton)
– Electrical safety checks on all connections
– Humidity removal validation (should drop indoor levels to 45-55%)
Never accept “it’s blowing cold air” as sufficient testing—demand documented performance metrics.
Hidden Costs and Professional Tips for a Smooth Transition
Budgeting for Electrical Panel Upgrades and Ductwork Fixes

While base AC installation costs $3,500-$7,000, swamp cooler replacements often incur hidden expenses:
– Electrical panel upgrade: $1,500-$3,000 (if moving from 100A to 200A service)
– Duct replacement: $1,200-$4,000 (for homes with severely degraded swamp cooler ducts)
– Roof repairs: $500-$1,500 (if decking was damaged under the old unit)
Get itemized quotes that separate these costs. If your budget is tight, prioritize duct sealing and electrical work—skimping here causes system failure within 2 years.
Avoiding Costly Mistakes: Why Installation Quality Matters Most
Top 3 swamp cooler replacement errors to avoid:
1. Oversized systems – Contractors pushing “bigger is better” cause short-cycling and poor dehumidification. Stick to Manual J calculations.
2. Reusing swamp cooler ducts unchanged – Evaporative ducts operate at 0.2 inches static pressure; AC needs 0.5+. Unmodified ducts strain the blower motor.
3. Skipping refrigerant weighing – Charging by pressure alone leads to 30%+ efficiency loss. Demand weight-based charging.
Long-Term Savings: Energy Efficiency and Humidity Control Benefits
Replacing your swamp cooler with a 14-SEER AC system pays off through:
– 30-50% lower humidity – Eliminating that sticky feeling reduces perceived temperature by 5-7°F
– Fewer repairs – Modern ACs last 15+ years vs. swamp coolers’ 10-year lifespan
– Energy rebates – Many utilities offer $250-$750 for high-SEER upgrades
– Home value increase – AC adds 3-5% to resale value in humid climates
Final Tip: Schedule your replacement in spring to avoid summer installation backlogs. After installation, set your thermostat to 78°F with auto fan mode—this optimizes dehumidification while minimizing runtime. Within one hot, humid afternoon, you’ll appreciate why replacing your swamp cooler was the ultimate comfort upgrade.