Nothing ruins a perfect beach day or camping trip faster than warm drinks and spoiled food. Knowing exactly how to pack a cooler properly transforms your outdoor experience from frustrating to fantastic. When you master the science of cooler packing, you’ll keep perishables safely below 40°F for days—not just hours—preventing foodborne illness while preserving taste and texture. The difference between a soggy mess and perfectly chilled provisions comes down to strategic layering, ice management, and temperature control. In this guide, you’ll discover the exact process professional campers and outdoor enthusiasts use to maximize ice retention and food safety, whether you’re heading out for a day trip or a week-long adventure.
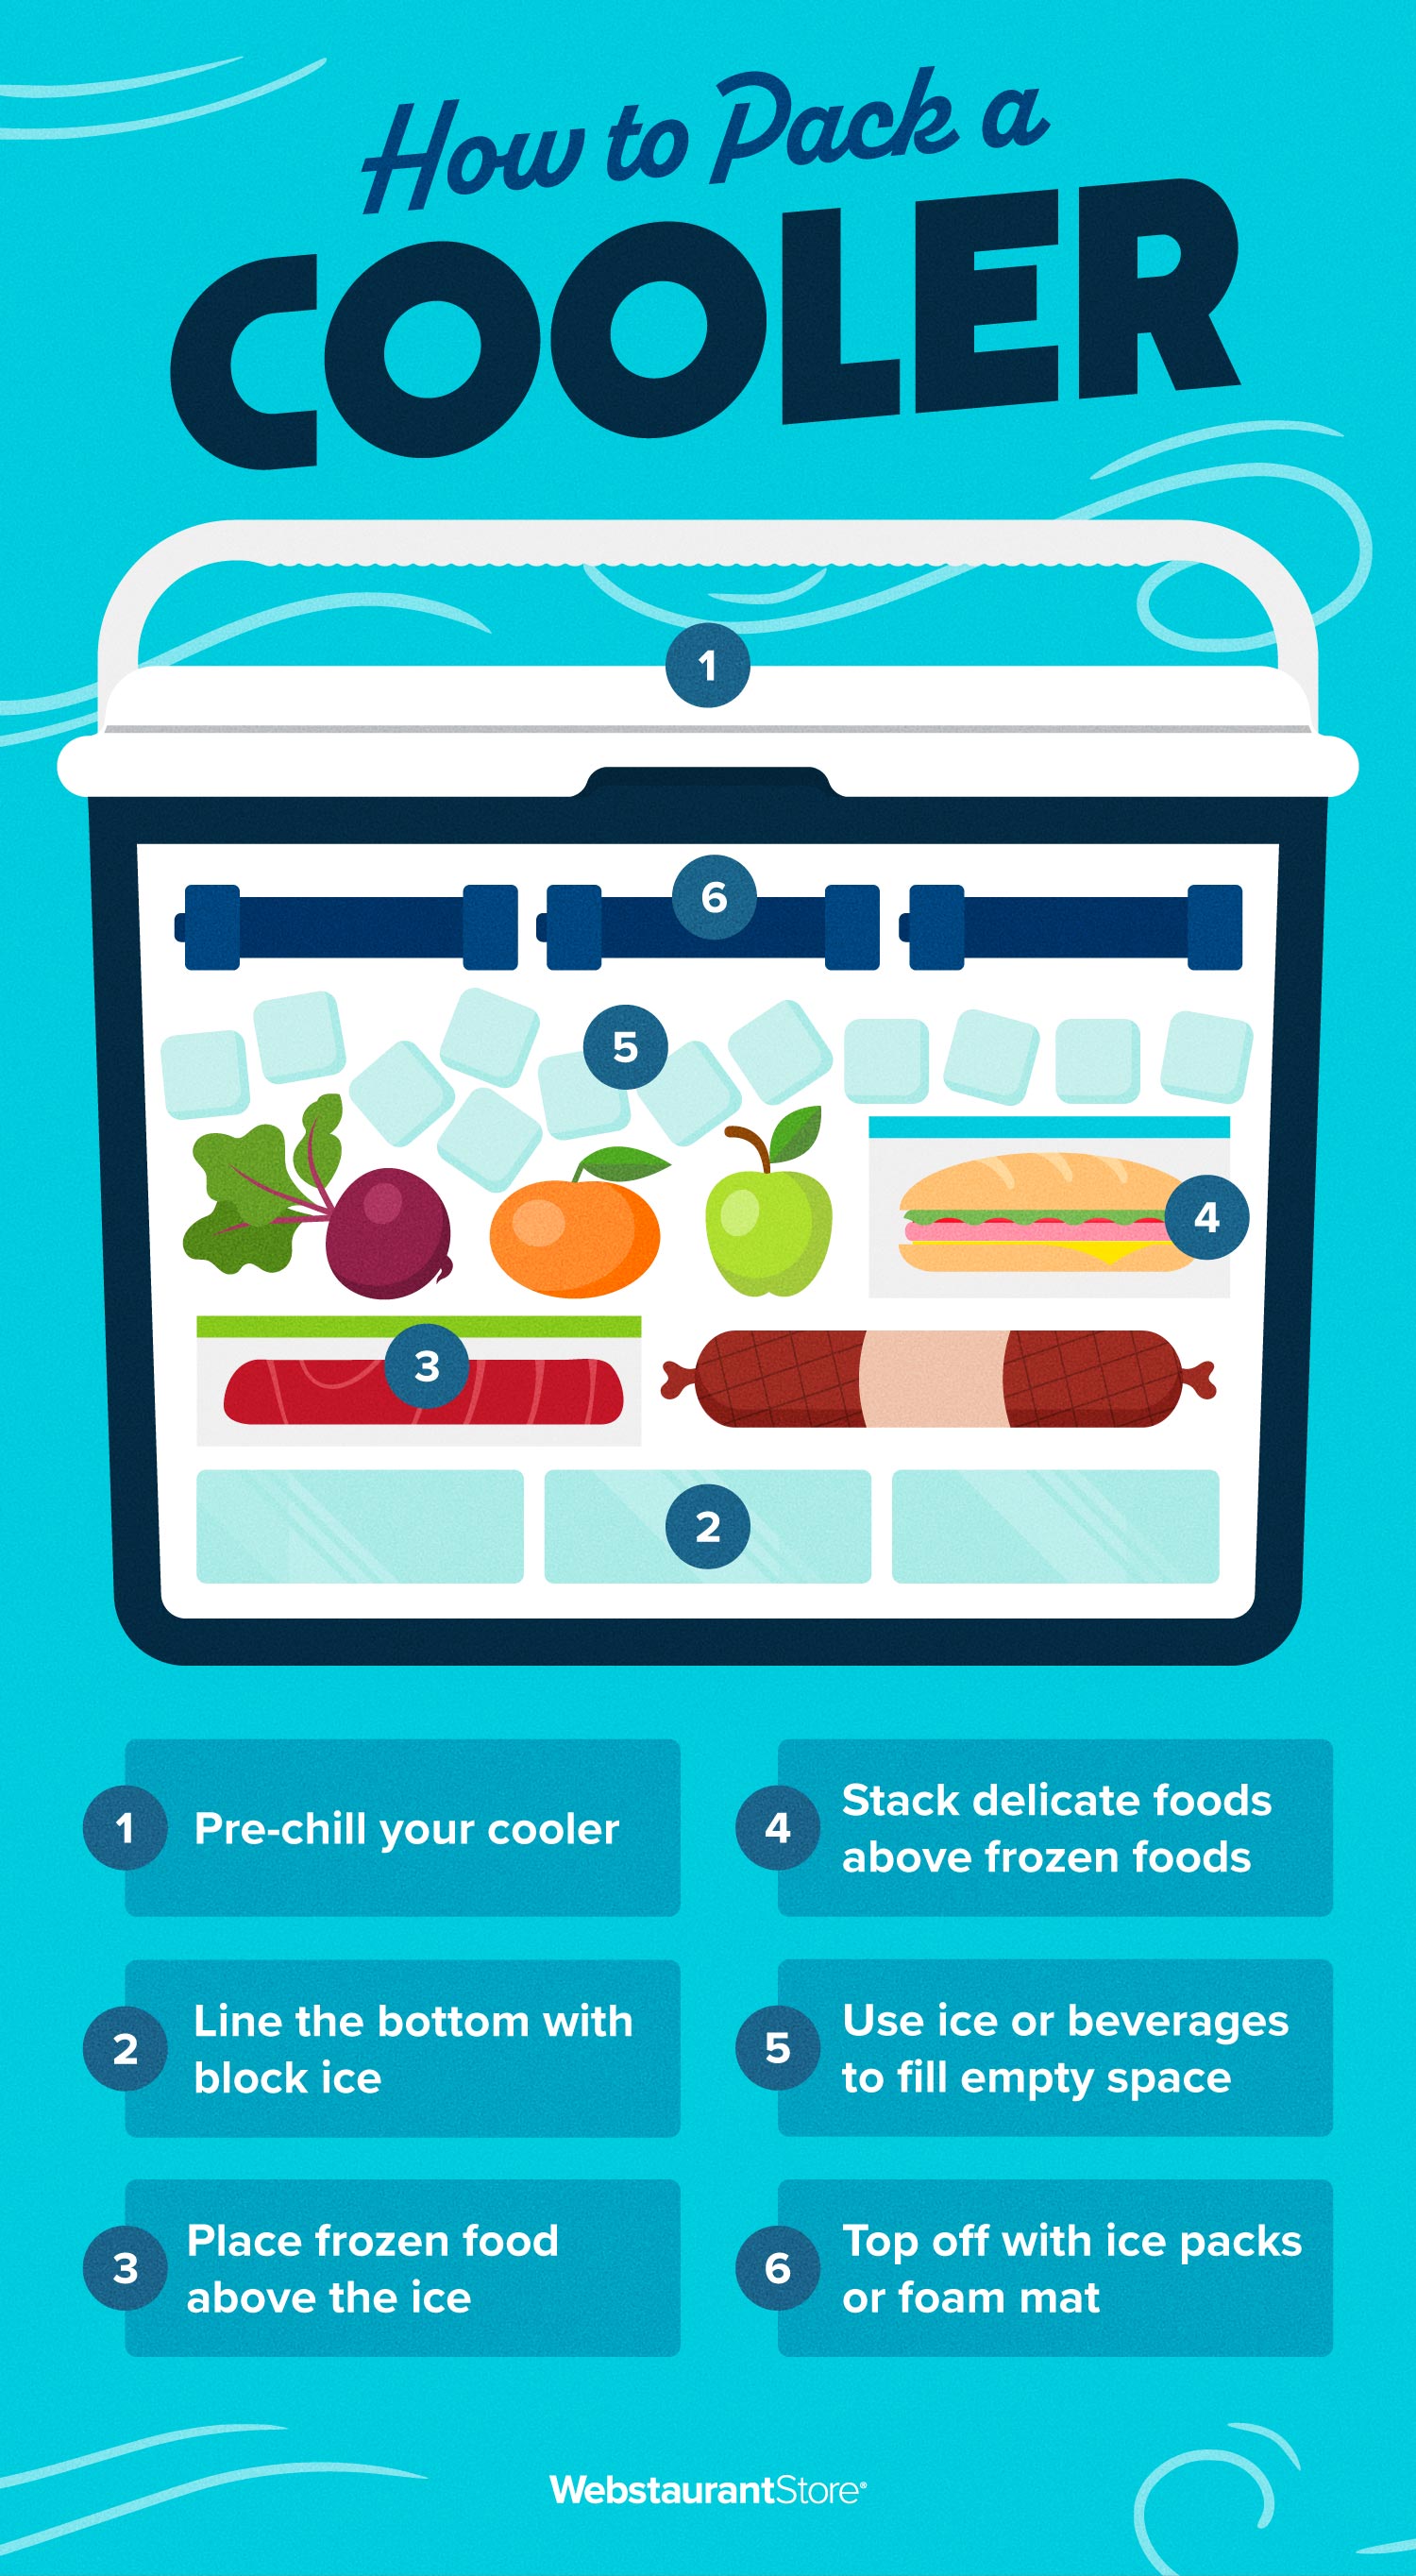
Pre-Chill Your Cooler 24 Hours Before Packing
Starting with a cold foundation doubles your ice retention time and prevents that initial temperature spike that melts ice before your trip even begins. A room-temperature cooler forces your ice to work overtime cooling the walls instead of your food, wasting precious cooling capacity.
Freeze Water Bottles Instead of Using Regular Ice
Skip the ice bags from the gas station and create your own long-lasting cooling system with 2-liter soda bottles or gallon jugs. Fill containers 80% full with water (leaving room for expansion), freeze them solid, and place them strategically throughout your cooler. These frozen water bottles melt 50% slower than regular ice cubes while providing drinking water as they thaw—eliminating the soggy mess of traditional ice. For trips longer than three days, freeze saltwater bottles (1/4 cup salt per gallon) which stay frozen longer due to their lower freezing point.
Avoid These Common Pre-Chilling Mistakes
Many campers sabotage their cooler’s performance before packing even begins. Never place warm food directly into your cooler—refrigerate or partially freeze everything first. Don’t skip the sacrificial ice step; fill your cooler with cheap ice 24 hours before your trip to pre-chill the walls. And never use dry ice without proper ventilation and protective barriers—it can freeze food on contact and create dangerous CO₂ buildup in enclosed spaces. If your cooler feels warm to the touch when you open it, you’ve already wasted 30-40% of your cooling capacity.
Pack Your Cooler Using the Bottom-Up Layering Method
The secret to extended cooling isn’t just more ice—it’s strategic placement that creates natural convection currents. Cold air sinks while warm air rises, so your packing order determines how efficiently cold is distributed throughout the cooler.
Place Block Ice at the Bottom First
Start with a solid 2-3 inch foundation of block ice or frozen water jugs along the entire bottom of your cooler. This creates a “cold sink” where chilled air naturally collects. Block ice lasts significantly longer than cubed ice because it has less surface area exposed to warmer temperatures. If you don’t have block ice, freeze water in clean milk cartons or use commercial ice molds designed for extended retention.
Organize Food by Temperature Zone Requirements
Pack items based on their temperature sensitivity, not convenience:
- Bottom Layer (Coldest Zone): Raw meats, seafood, and dairy products that require consistent temperatures below 40°F
- Middle Layer (Cold Zone): Pre-cooked meals, fruits, and vegetables
- Top Layer (Cool Zone): Beverages and items you’ll access frequently
Keep raw meats in waterproof, double-bagged containers to prevent cross-contamination if leaks occur. Vacuum-sealed packages work best as they eliminate air exposure and prevent waterlogging. Always place the heaviest items on the bottom for stability during transport.
Eliminate Air Space with Strategic Fillers
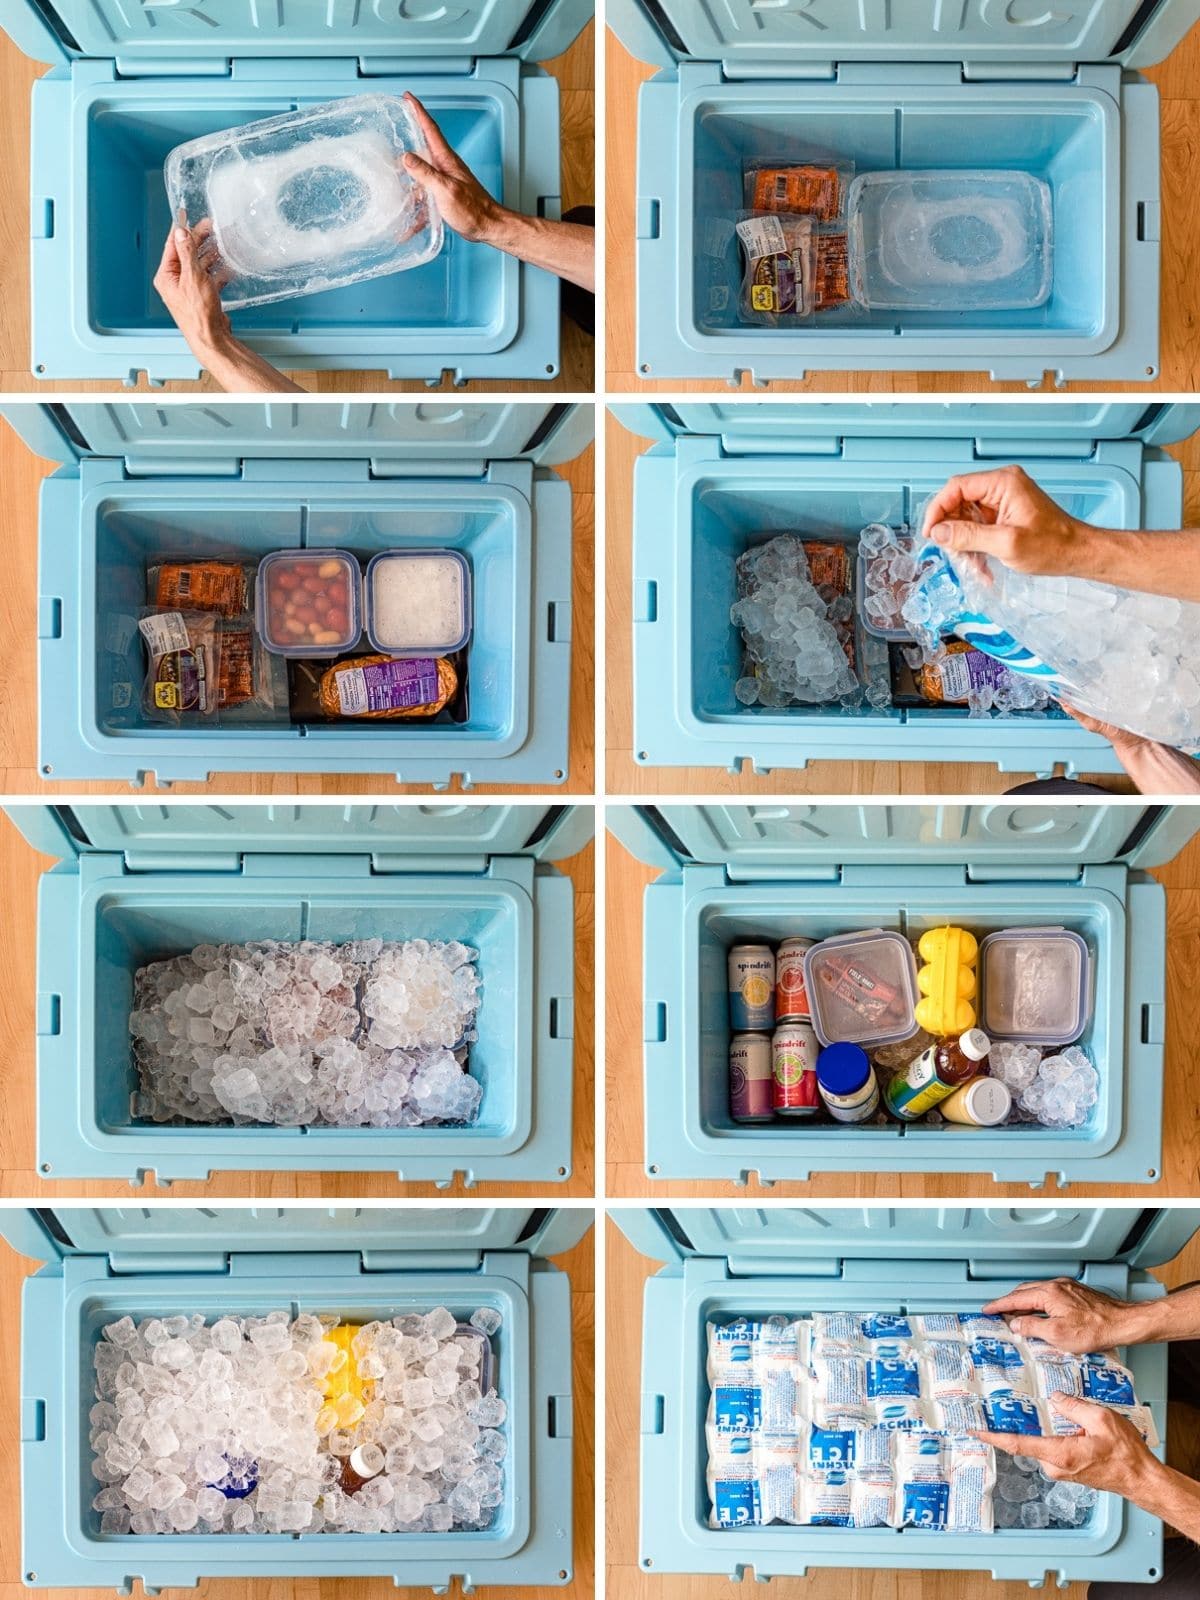
Empty space is your cooler’s enemy—warm air pockets dramatically reduce cooling efficiency. A properly packed cooler should be 90% full, with minimal air gaps between items. Every cubic inch of empty space forces your ice to work harder to maintain safe temperatures.
Create Elevation Systems for Better Airflow
Place metal cooling racks, inverted plastic containers, or stackable crates between your ice and food to create air space that allows cold air to circulate. This simple trick prevents food from sitting directly in meltwater while improving temperature distribution. For fishing trips, use a wire mesh basket to keep your catch elevated above drainage channels.
Use Newspaper or Towels for Moisture Control
Line the bottom of your cooler with crumpled newspaper or paper towels to absorb condensation without creating puddles. Replace these moisture absorbers every 24 hours on multi-day trips. For sensitive items like bread or electronics, add silica gel packs inside their containers to prevent humidity damage. Never let food sit directly in water—this accelerates spoilage and creates dangerous bacterial growth conditions.
Maximize Ice Retention During Your Trip
Your packing method sets the foundation, but how you manage your cooler during the trip determines how long your ice lasts. Smart campers treat their cooler like a refrigerator—opening it only when necessary and keeping it out of environmental stressors.
Keep Your Cooler in Complete Shade at All Times
Direct sunlight can raise internal temperatures by 20°F even with a closed lid. Place your cooler under a canopy, beneath your vehicle’s shadow, or wrap it in a reflective emergency blanket. On boats, position coolers away from engine heat and cover with a damp towel—the evaporative cooling effect can lower temperatures by an additional 5-10°F. Never store your cooler in a hot car trunk; the ambient heat will melt ice twice as fast.
Minimize Opening Frequency with Smart Organization
Every time you open your cooler, you lose 10-15 minutes of cooling capacity as warm air rushes in. Organize contents so frequently accessed items (like drinks) are on top and grouped together—this prevents “cooler gazing” where you leave the lid open searching for items. For group trips, consider the two-cooler system: one dedicated to beverages (which gets opened constantly) and another for food that stays closed until mealtime. Know exactly where everything is stored so you can grab what you need in under 10 seconds.
Troubleshoot Common Cooler Problems Before They Spoil Your Trip
Even with perfect packing, environmental factors can compromise your cooler’s performance. Recognizing early warning signs lets you intervene before food enters the danger zone (40-140°F).
Fix Rapid Ice Melt With These Emergency Measures
If your ice is disappearing faster than expected, immediately check for these issues: damaged gaskets (replace with petroleum jelly as a temporary seal), direct sunlight exposure (relocate to shade immediately), or excessive opening frequency (implement the two-cooler system). For quick fixes, drain excess water (which actually insulates remaining ice) and add frozen water bottles around the perimeter. On multi-day trips, freeze additional ice packs overnight using your vehicle’s AC or nearby convenience stores.
Prevent Food Waterlogging With Proper Drainage
A cooler full of meltwater accelerates spoilage and creates soggy sandwiches. Drill quarter-inch drainage holes in the bottom corners if your model lacks a spigot, and place the cooler on an incline with the drain holes lowest. For non-draining coolers, elevate food on racks and replace moisture-absorbing towels daily. Never let food sit submerged—this creates ideal conditions for bacterial growth that standard ice cannot prevent.
Maintain Food Safety Throughout Your Trip
Temperature control isn’t just about comfort—it’s critical food safety. Bacteria multiply rapidly between 40-140°F, doubling every 20 minutes in ideal conditions. A single cooler failure can hospitalize your entire group.
Monitor Temperatures with Digital Tools
Place a wireless thermometer probe in the center of your food storage area to track actual temperatures, not just guess based on ice levels. Set alerts for when temperatures exceed 40°F—you have only two hours to either consume food or find alternative cooling before it becomes unsafe. For medical applications like insulin storage, use specialized temperature indicators that change color when exposed to unsafe conditions.
Implement the 2-Cooler System for Extended Trips
For trips lasting more than 48 hours, separate your provisions into two dedicated coolers: one for immediate-use perishables (days 1-2) and another for long-term storage (days 3-5+). The second cooler remains completely closed until needed, preserving its ice for when you need it most. Pack your long-term cooler with hard cheeses, cured meats, and root vegetables that tolerate slightly warmer temperatures, reserving the coldest zone for critical items like raw proteins.
Packing a cooler properly isn’t complicated—it’s about applying simple physics principles consistently. By pre-chilling everything, layering strategically, eliminating air gaps, and monitoring temperatures, you’ll keep food safely chilled for days longer than standard methods. Remember that every cooler opening costs cooling time, direct sunlight is your enemy, and proper organization prevents both food waste and safety hazards. Before your next adventure, test your packing method with a 24-hour home trial: place a thermometer inside, note temperature fluctuations, and adjust your technique accordingly. When you master how to pack a cooler effectively, you’ll never again wonder if that chicken salad is still safe to eat—just enjoy your perfectly chilled provisions all trip long.