Running out of cold storage is a critical pain point for restaurants, breweries, and farms during peak season. When your current refrigeration can’t handle inventory demands, knowing how to build a walk-in cooler becomes essential infrastructure—not just a convenience. Many business owners mistakenly assume room size alone determines cooling capacity, leading to inefficient systems that fail to maintain safe temperatures. This guide cuts through the complexity with actionable steps used by professional installers, so you avoid costly mistakes that compromise food safety and energy efficiency. You’ll discover why precise cooling load calculations matter more than square footage, how panel sealing prevents $500/month energy leaks, and the non-negotiable safety features that keep your staff protected.
Building a professional-grade walk-in cooler requires understanding it as a complete thermal system, not just insulated walls. The difference between a reliable asset and a constant headache lies in meticulous planning before the first panel arrives. From foundation preparation to refrigerant charging, every step interconnects—skip one detail, and you risk condensation damage, compressor failure, or failed health inspections. This isn’t a DIY weekend project; it demands certified technicians for refrigeration work. But with clear guidance, you’ll confidently navigate contractor discussions, permitting hurdles, and component selection to create a cooler that lasts 15+ years. Let’s transform your cold storage challenges into a seamless solution.
Why Cooling Load Calculations Trump Room Size for Unit Selection
Selecting the right refrigeration unit based solely on your cooler’s dimensions guarantees failure. Professionals determine capacity through heat load calculations that factor in four critical elements: your interior cubic footage, the initial temperature of stored products (like warm produce versus pre-chilled meat), daily door openings from staff traffic, and ambient conditions where the unit operates. An undersized system will run continuously, struggling to hit 38°F and spoiling inventory, while oversized units short-cycle—wasting 20-30% more energy and causing dangerous temperature swings. Always request a detailed BTU analysis from your contractor; this calculation directly impacts your electricity bills and food safety compliance.
How Product Type Changes Your Cooling Requirements
Storing warm-brewed coffee versus pre-chilled dairy requires vastly different cooling capacity. Freshly cooked items introduce massive “product load” heat, demanding 40% more refrigeration power than maintaining already-cold goods. For high-turnover environments like busy kitchens, factor in at least 15 door openings per hour during peak times. Ignoring these variables causes units to freeze coils or fail during critical moments—like Saturday night service.
Insulated Panel Specifications for Maximum Thermal Efficiency

Your cooler’s structural integrity hinges on selecting panels with the correct thickness and sealing mechanisms. Standard 4-inch polyurethane-core panels suffice for most 35-40°F coolers, but 6-inch variants become essential for sub-zero freezer applications or hot climates. Panels must feature true tongue-and-groove interlocks paired with cam-lock fasteners—not just screws—to create a vapor-proof seal that prevents condensation buildup inside walls. Avoid contractors suggesting 3-inch panels to cut costs; this thin insulation causes “thermal bridging” where metal studs conduct heat, raising energy use by 18% according to industry field tests.
Critical Floor Construction Mistakes to Avoid
Never install panels directly on concrete without a 4-inch insulated curb. This polymer or aluminum base elevates panels above potential moisture, contains spills, and maintains the thermal envelope. For true walk-in freezers, skip heated subfloors at your peril—frost heave from ground moisture can crack panels within two years. Always verify your foundation is level within 1/8 inch across the entire footprint; uneven surfaces compromise panel seals immediately.
Heavy-Duty Door Features That Prevent $500/Month Energy Leaks
The door represents your cooler’s biggest vulnerability—poorly specified units waste cold air with every opening. Insist on a minimum 3′ x 6’8″ insulated door with dual interior/exterior handles and a certified panic bar release (required by OSHA to prevent entrapment). High-traffic locations need an additional strip curtain inside the main door; this simple $200 add-on reduces cold air loss by 70% during frequent entries. Check for magnetic gaskets that seal tightly against the frame—warped doors or worn seals cause 25% of all energy inefficiencies in commercial coolers.
Why Door Sweating Means Hidden Danger
Condensation on door surfaces indicates inadequate heating elements. Every professional installation includes thermostatically controlled jamb heaters that prevent frost buildup at the threshold. Without these, ice accumulation creates slipping hazards and forces staff to prop doors open—spiking energy costs overnight. Test this feature during commissioning: after 24 hours of operation, the door frame should feel slightly warm to the touch.
Optimal Refrigeration Condenser Placement for Reliable Operation
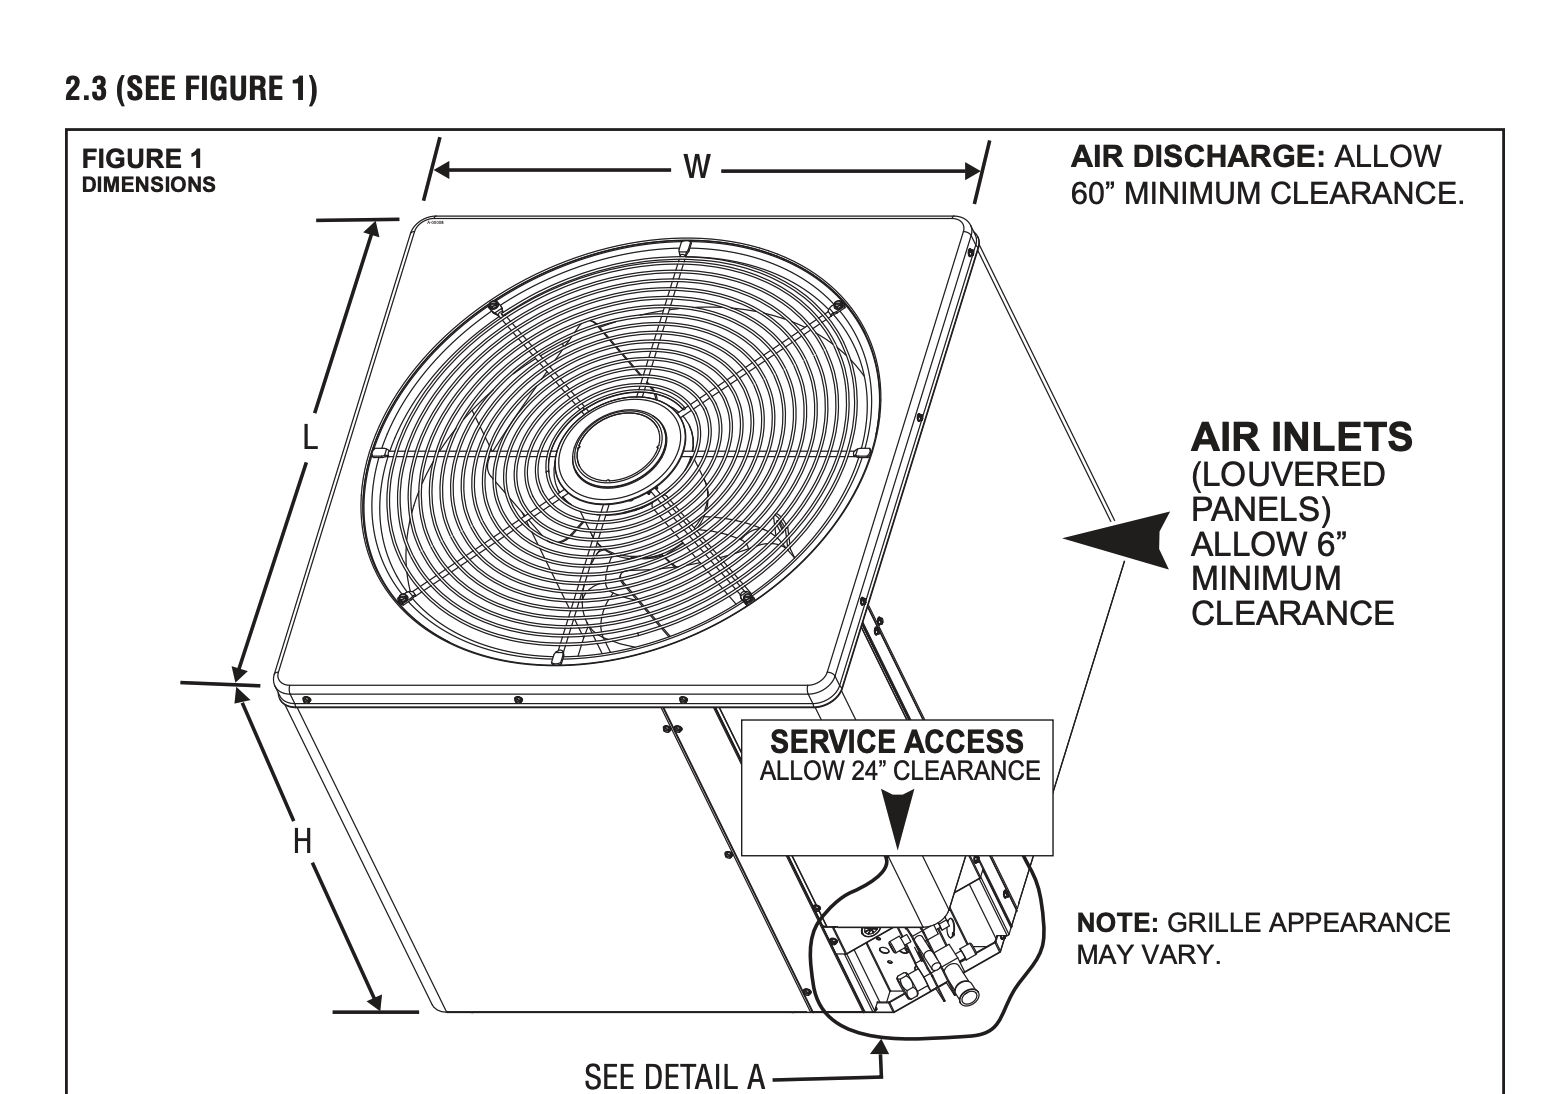
Your exterior condensing unit’s location makes or breaks system longevity. Install it within 50 feet of the evaporator coil with minimal elevation changes—exceeding these distances requires complex refrigerant line sizing that DIY attempts always get wrong. Ensure 36 inches of clearance around all sides for airflow; placing units against walls or under eaves causes overheating shutdowns during summer peaks. Roof installations need vibration isolators to prevent compressor damage from wind, while ground-level units require elevated platforms to avoid flood damage.
The Hidden Cost of Improper Line Sets
Refrigerant lines must be brazed by EPA 608-certified technicians—not compression fittings—to prevent micro-leaks. Slope lines slightly downward toward the condenser to ensure oil return. Any kinks or sharp bends restrict refrigerant flow, causing premature compressor failure. Never let contractors hide these lines inside walls; future service access requires exposed, insulated piping.
Foundation Preparation: Leveling and Curb Installation Non-Negotiables
Your cooler’s stability starts with a foundation capable of supporting 5+ tons when fully loaded. A 4-inch reinforced concrete slab is mandatory—not wood subfloors—which must be level within 1/8 inch across the entire area. Before panel assembly, install a prefabricated curb pan with integrated drainage; this aluminum or polymer base creates the thermal break between ground and insulation. Secure it with masonry anchors, then apply silicone sealant along the slab edge to block moisture intrusion. Skipping this step invites mold growth and structural rot within 12 months.
Why You Need Interior Framing for Shelving Support
Never mount heavy shelving directly to panel skins—they’ll buckle under load. Build a robust 2×4 interior frame along all walls before final panel sealing. This wood structure distributes weight safely and provides anchor points for equipment. Use treated lumber to resist moisture, but ensure it doesn’t compress the panel insulation. This hidden framework is why professional installations handle 1,000+ lb pallets without deformation.
Step-by-Step Wall Assembly: Achieving Vapor-Proof Panel Seals
Panel installation follows a precise sequence starting from a corner. Set the first panel on the curb, then connect subsequent units by engaging the tongue-and-groove edges before tightening cam-locks with a rubber mallet. Visually inspect each seam—light shouldn’t penetrate any joint. After assembling three walls, insert the ceiling panel from inside the structure using a lift; never drop it from above. Finalize with interior screws through panel skins into your framing every 16 inches for hurricane-grade stability. Rushing this process causes hairline gaps that manifest as frozen floors months later.
Critical Weatherproofing for Outdoor Units
Outdoor coolers require aluminum trim caps over all exterior seams and corners. Apply food-grade silicone sealant to every joint before installing trim—this prevents rain infiltration that rots interior framing. Top the structure with a sloped metal roof cap to shed water; flat roofs guarantee leaks within one season. Never use standard construction caulk—only NSF-certified sealants rated for food environments.
Refrigeration Line Connection: EPA-Certified Steps Only
Connecting refrigerant lines demands specialized certification you likely don’t possess. Licensed technicians perform three non-negotiable steps: brazing copper lines with nitrogen purge to prevent oxidation, pulling a deep vacuum below 500 microns to remove moisture, and charging with precise refrigerant weight (never “topping off” by pressure). Any shortcut here introduces acids or moisture that destroy compressors within months. Verify your contractor uses micron gauges—not just pressure readings—for vacuum verification; this single step prevents 90% of early system failures.
Why Evaporator Placement Affects Temperature Uniformity
Mount the evaporator coil unit high on the rear wall with 12 inches of clearance above. This positioning creates optimal cold air circulation—installing it too low causes “cold pockets” near the floor while upper shelves stay warm. Never block the coil with stored items; leave 18 inches of clearance in front. During commissioning, test temperature variance at multiple heights; professional installations maintain ±1°F consistency throughout.
Mandatory Permits and Professional Installation Landmines
Attempting DIY installation triggers immediate red flags with inspectors. Every jurisdiction requires building permits, mechanical permits, and health department sign-offs before operation. Your contractor must provide stamped engineering drawings showing compliance with ASHRAE 15 safety standards and local energy codes. Most critically, refrigerant handling requires EPA Section 608 certification—using unlicensed technicians voids insurance and risks $10,000+ fines per violation. Never pay a contractor who suggests “we’ll handle permits later”; failed inspections force costly disassembly.
The Contractor Checklist You Must Verify
Demand proof of three certifications before signing: state mechanical contractor license, EPA 608 universal certification, and liability insurance covering $1M in property damage. Ask for recent walk-in cooler project references—call them to confirm no post-installation issues. Avoid contractors who quote based solely on square footage; professional bids include heat load calculations and panel thickness specifications. This due diligence prevents 80% of project disasters.
Final Note: A properly built walk-in cooler pays for itself through lower energy bills, reduced food waste, and years of trouble-free operation. Prioritize precision in panel sealing and refrigerant handling over upfront cost savings—these elements determine longevity. Schedule quarterly maintenance checks for coil cleaning and door gasket inspections to prevent 70% of common failures. If expanding your cold storage, consult an ASHRAE-certified designer first to future-proof your investment. Remember: when you learn how to build a walk-in cooler correctly, you’re not just installing equipment—you’re safeguarding your business’s core operations.