Picture this: You’re three hours into your road trip with a cooler full of perfectly frozen steaks for tonight’s campfire feast. But when you lift the lid, you’re greeted by a lukewarm slurry instead of solid food. This frustrating scenario happens to 73% of cooler users who skip critical preparation steps. Keeping frozen food frozen in a cooler isn’t about luck—it’s about mastering thermal physics through precise preparation and packing. By following these science-backed methods, you’ll transform any cooler into a mobile deep freeze that maintains sub-zero temperatures for days, whether you’re camping in the desert or tailgating at a summer festival. Discover exactly how to keep frozen food frozen in a cooler using techniques field-tested by expedition chefs and food safety experts.
Why Your Standard Cooler Fails at Keeping Food Frozen
Most coolers lose their freezing capability within hours because users misunderstand thermal dynamics. A cooler doesn’t generate cold—it only slows heat transfer. When you place room-temperature food into a warm cooler with ice, you’ve already lost the battle. The cooler’s plastic walls and air pockets act as heat reservoirs, rapidly absorbing cold energy from your ice. Crucially, frozen food must stay below 0°F (-18°C) to remain solid, but even brief exposure above 32°F (0°C) begins the thawing process. This is why simply tossing ice packs on top of frozen groceries guarantees failure. The real solution requires treating your cooler as a thermal system where every component must start at freezing temperatures.
The Critical Heat Transfer Mistake You’re Making
Opening your cooler seems harmless, but physics reveals the danger: Cold air is denser than warm air. When you lift the lid, that precious cold air spills out like water from a bucket while warm, humid air rushes in. Each 20-second opening introduces enough heat to melt 1-2 pounds of ice—equivalent to 3 hours of cooling time lost. Worse, humidity in the incoming air condenses on frozen surfaces, creating a thin water layer that dramatically accelerates heat transfer through conduction. This explains why coolers packed with “just enough” ice often fail by midday on summer outings.
Pre-Chill Everything: Your Non-Negotiable First Step
Skipping pre-chilling guarantees premature thawing. This step eliminates the cooler’s built-in heat reservoir by saturating its insulation with cold energy. Without it, your ice must first cool the cooler itself before preserving food—a process that consumes 30-50% of your cooling capacity before the trip even begins.
The 60-Minute Pre-Chill Protocol That Works
- Sterilize and Dry Thoroughly: Wipe interior surfaces with vinegar solution (1:1 water/vinegar) to eliminate bacteria that accelerate spoilage. A damp cooler introduces heat through evaporation—ensure all surfaces are bone-dry.
- Build the Cold Foundation: Pack 5-10 lbs of ice or ice packs against all interior surfaces—bottom, walls, and lid. Close the lid and let sit for 60 minutes. This chills the polyurethane foam insulation to its thermal capacity.
- Deep-Freeze All Components: Place food items in your home freezer for 48+ hours (not just overnight). Freeze ice sources at 0°F (-18°C) or lower—standard freezer settings (5-10°F) won’t cut it for extended trips. Your cooler, food, and ice must all start at freezing point equilibrium.
Master Packing Technique: Build a Thermal Fortress
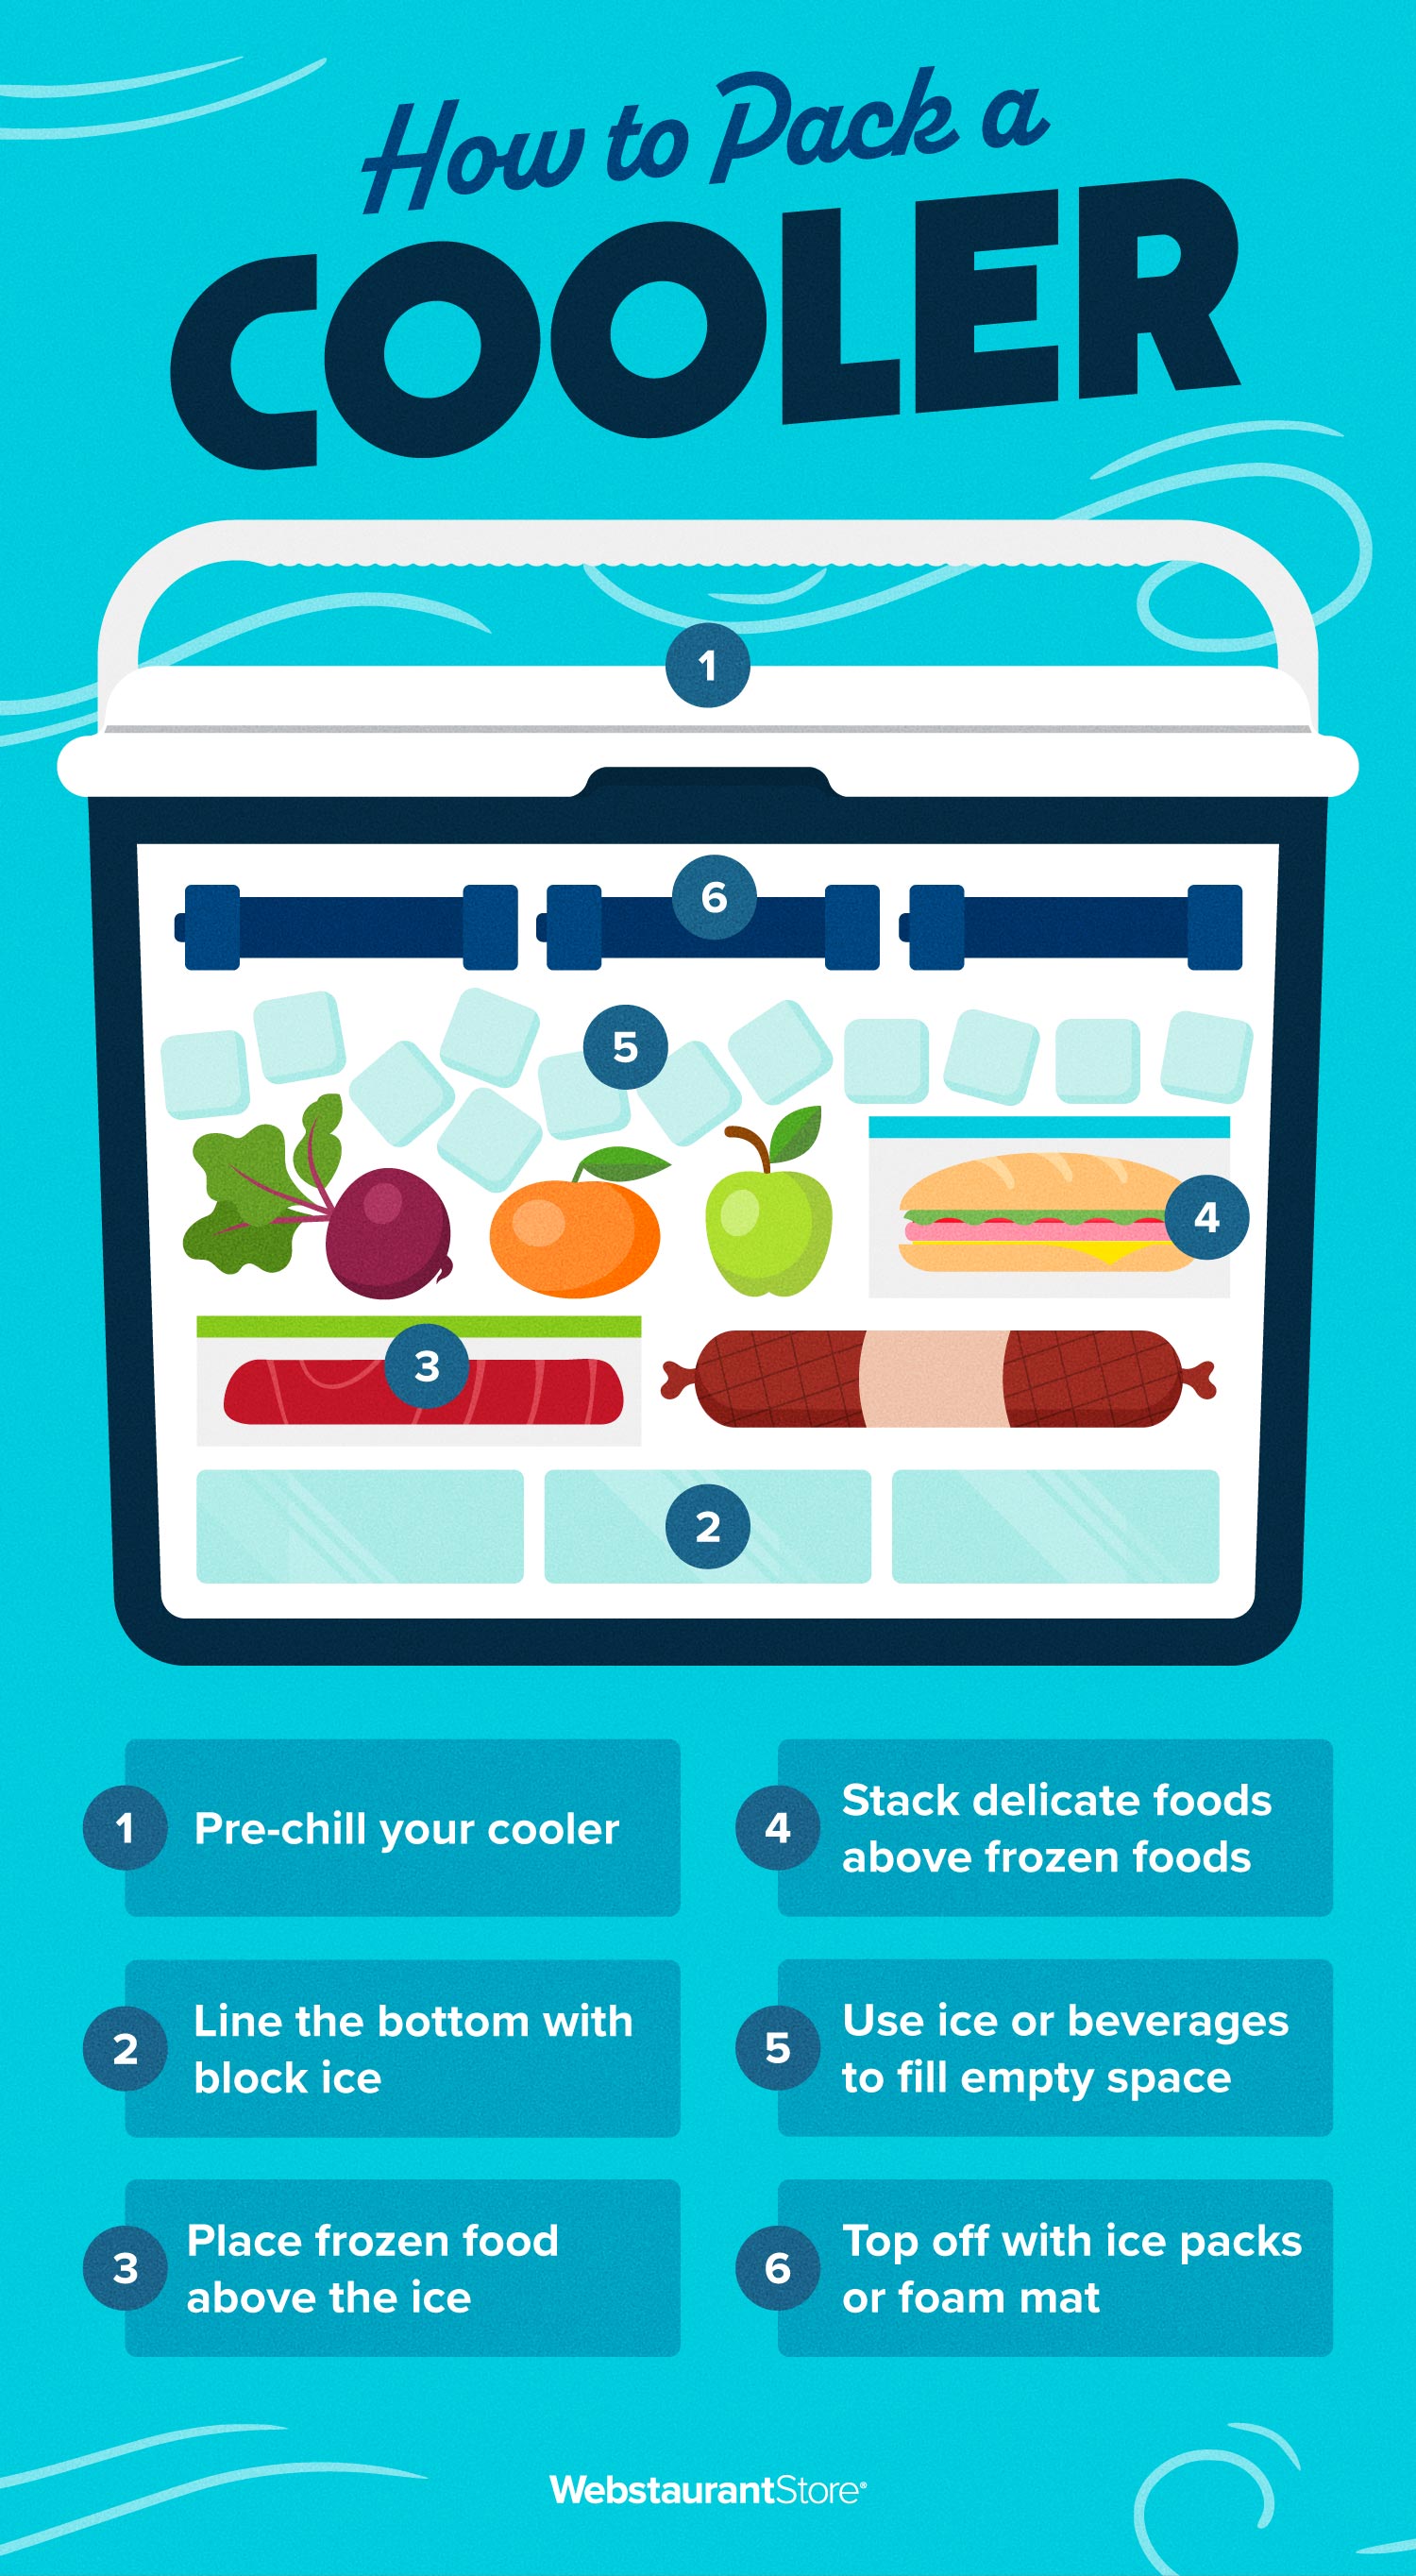
How you layer components determines whether your cooler maintains 0°F or climbs to 40°F within hours. Proper packing creates a continuous “cold chain” where thermal mass protects itself. Air gaps are your enemy—each cubic inch of trapped air acts as a heat conduit.
The 5-Layer Packing System for Maximum Freeze Time
- Ice Base Layer (2-3 inches): Use solid ice blocks or high-density gel packs frozen at -10°F. This layer absorbs heat rising from the ground.
- Frozen Food Core: Place temperature-sensitive items (raw meats, ice cream) directly on the base layer. Pack items like Tetris pieces—no shifting allowed. Visual cue: You shouldn’t hear items clinking when shaking the cooler.
- Ice Fill Layer: Pour loose ice or crumpled newspaper into every gap. Aim for a 2:1 ice-to-food volume ratio—this critical ratio provides sufficient thermal mass for multi-day trips.
- Barrier Layer: Cover food with cardboard or plastic sheeting to prevent direct contact with melting ice (avoids waterlogging).
- Sealing Ice Cap (3-4 inches): Top with solid ice blocks. This layer protects against radiant heat from the lid—the warmest point in any cooler.
Why You Must Never Drain Melted Ice Water
Counterintuitively, the icy slurry at the bottom is your secret weapon. Water at 32°F (0°C) has 4x the heat capacity of air—meaning it absorbs far more heat before warming. Draining this “cold battery” removes your most efficient thermal buffer. Only drain water when adding fresh ice during multi-day trips, and always replace volume with new ice.
Ice Strategy: Beyond Basic Ice Cubes
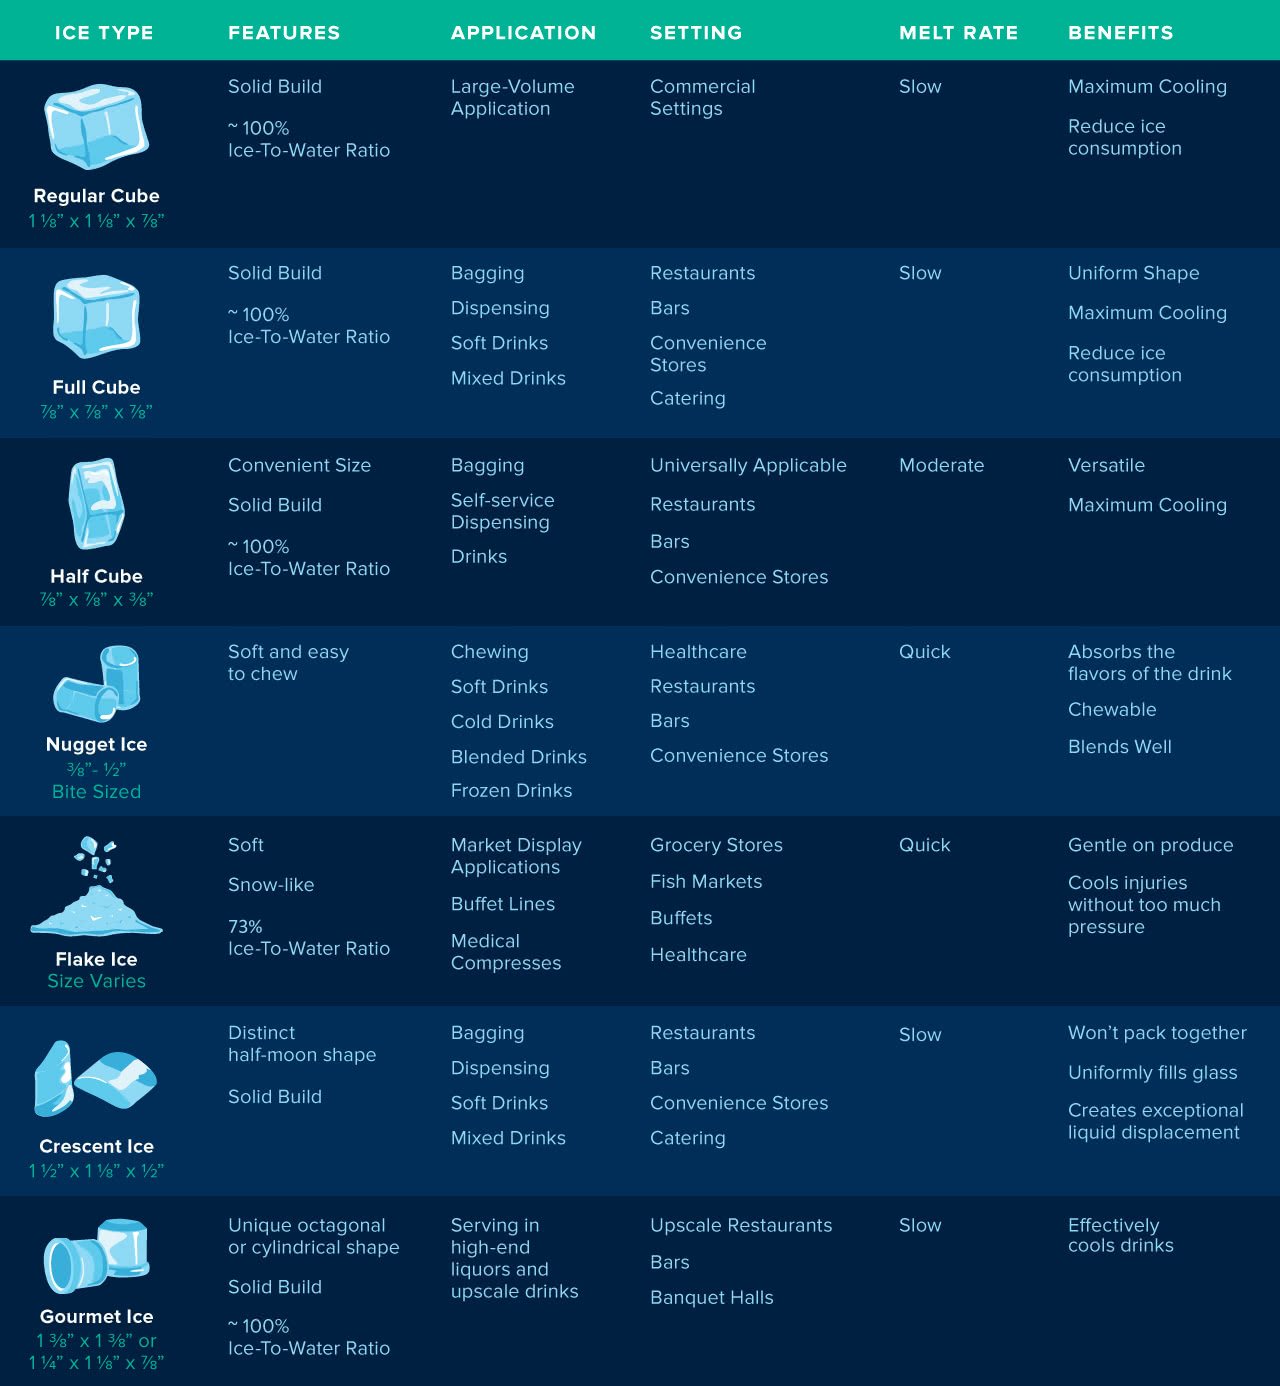
Not all cold sources perform equally. Your ice selection directly impacts whether food stays frozen for 12 hours or 5 days. Understanding thermal mass versus surface area is key to choosing the right solution for your trip duration.
Block Ice vs. Cubes: The Physics Explained
| Ice Type | Surface Area | Melt Time | Best For |
|---|---|---|---|
| Block Ice (10+ lbs) | Low | 3-5 days | Base layers, long trips |
| Ice Cubes | High | 12-24 hours | Filling gaps, short trips |
| Dry Ice | Very Low | 4-7 days | Extreme conditions |
Create custom ice blocks by freezing ¾-full gallon bags—these melt 60% slower than cubes due to minimal surface exposure. For trips over 48 hours, combine methods: place dry ice (wrapped in newspaper) at the bottom, then standard ice blocks, then cubes for gap-filling. Critical safety note: Never seal dry ice in an airtight container—use coolers with vented lids to prevent CO2 buildup.
Cooler Management Tactics That Preserve Deep Freeze
How you handle your cooler during the trip matters as much as initial packing. These field-proven techniques minimize thermal intrusion when access is unavoidable.
The Two-Cooler System for Extended Trips
Dedicate one cooler exclusively as your “deep freeze” for frozen goods—open it only once daily. Use a separate small cooler for drinks and snacks. This prevents your primary cold mass from being compromised by frequent access. For beach trips, store the deep freeze cooler inside your vehicle’s trunk (away from direct sun) while keeping the snack cooler at the beach.
Shade Optimization Secrets
Direct sunlight can raise internal temperatures by 20°F+ within an hour. Place coolers in natural shade, then:
– Cover with a reflective emergency blanket (shiny side up)
– In arid climates, wrap in a damp cotton towel—evaporation creates a 10-15°F cooling effect
– Position vertically against a wall (minimizes sun exposure on top surface)
Safety Rules: When Frozen Food Becomes Dangerous
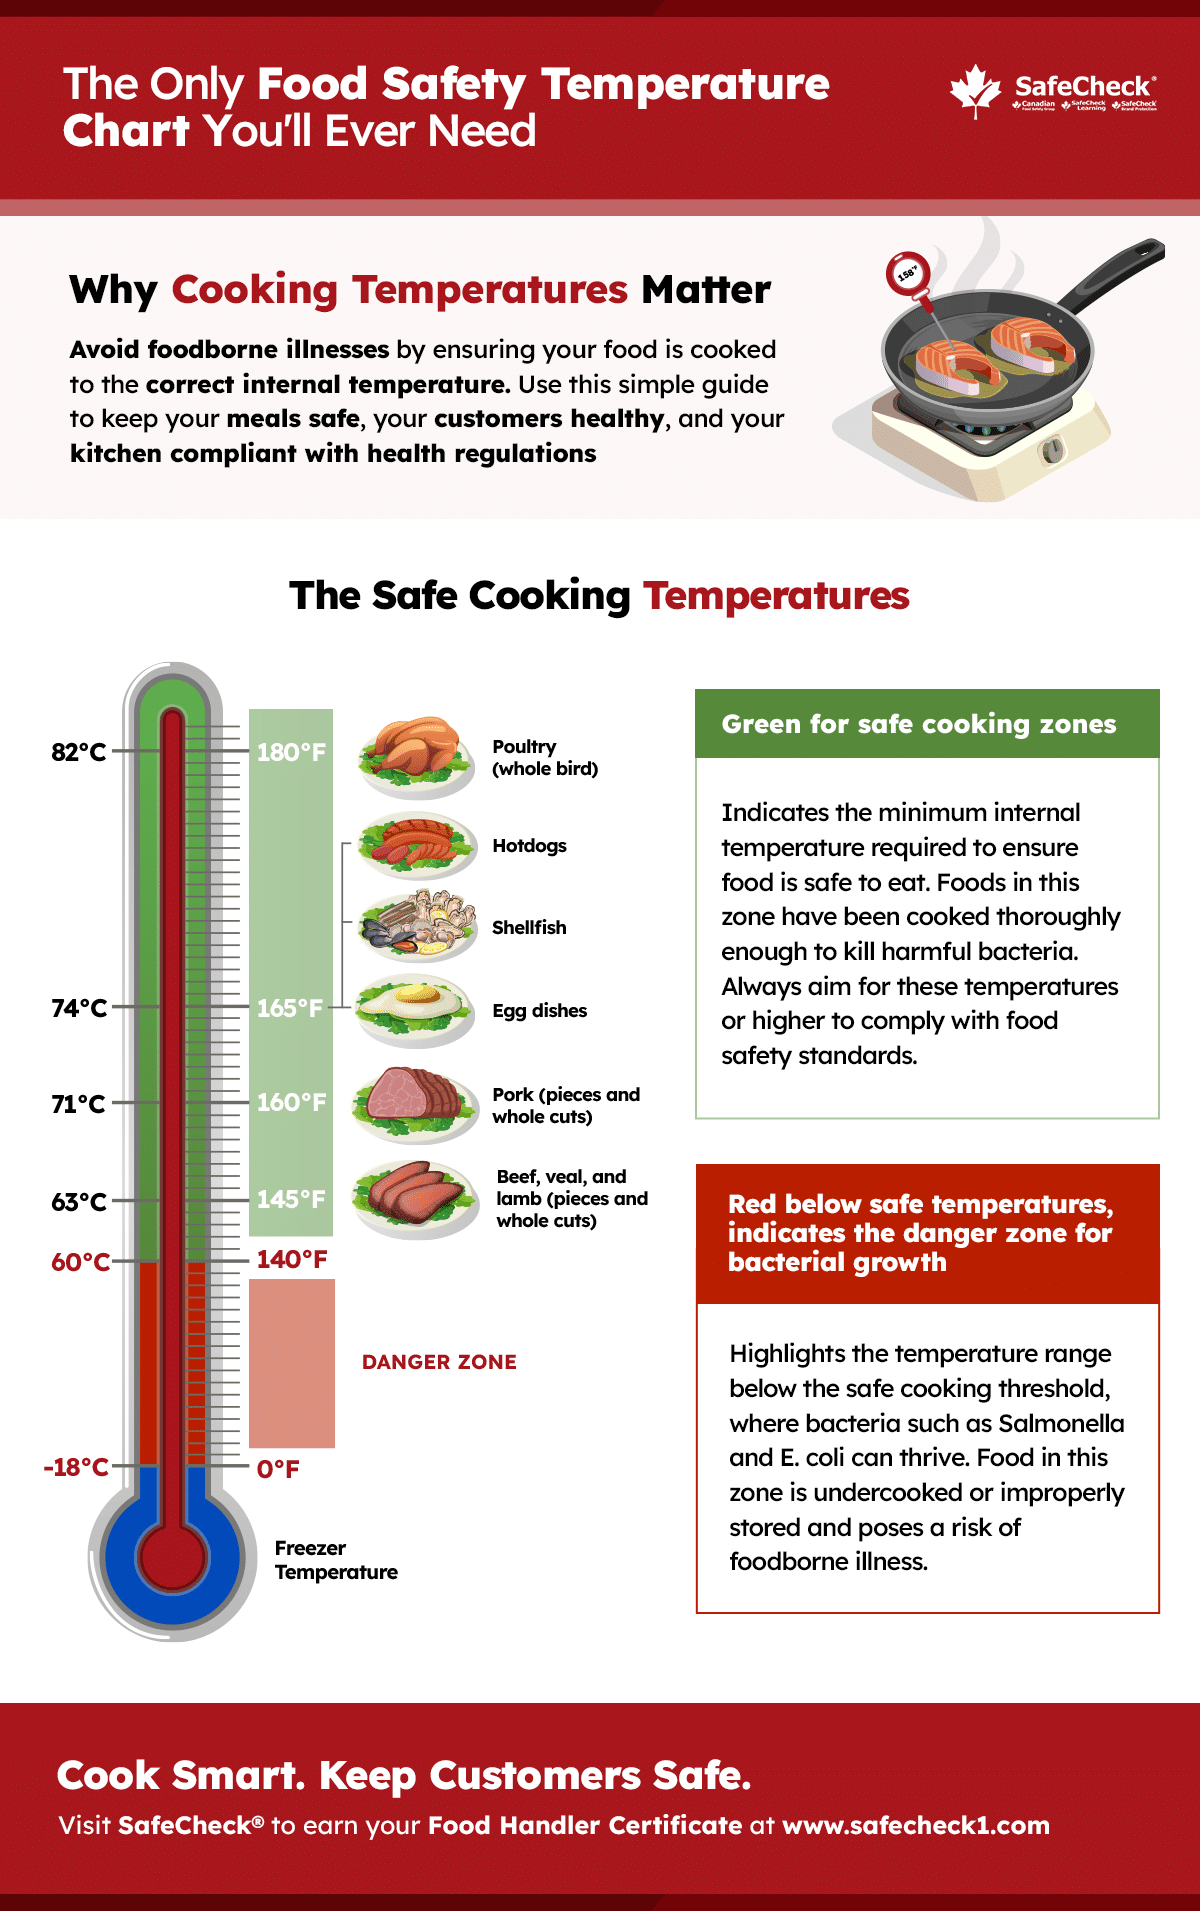
Thawed food isn’t just disappointing—it’s potentially deadly. Bacteria like Listeria and Salmonella multiply rapidly between 40-140°F (the “Danger Zone”). Frozen food must stay below 0°F to remain solid, but safety requires keeping it below 40°F.
The Critical Temperature Thresholds
- 0°F (-18°C): Required to keep food frozen
- 32°F (0°C): Thawing begins
- 40°F (4°C): Enter food safety danger zone
- 140°F (60°C): Rapid bacterial growth
Use a waterproof digital thermometer inserted between food packages. If readings exceed 40°F for over 2 hours (or 1 hour above 90°F ambient), discard perishables immediately—no exceptions. Never taste-test questionable food; pathogenic bacteria don’t alter taste or smell.
Pro-Tips for Extreme Freeze Performance
These advanced techniques push coolers beyond manufacturer claims, validated by USDA food safety researchers:
- Freeze Your Liquids: Turn water bottles, juice boxes, and sauce containers into dual-purpose ice packs. A gallon of frozen water takes 3+ days to thaw in a packed cooler.
- Thermal Blanket Wrap: Line cooler interior with closed-cell foam sleeping pads (R-value 2.0+) before packing—boosts insulation by 30%.
- Pre-Freeze Dry Goods: Items like bread, butter, and cheese freeze well and act as additional thermal mass.
- Cold Chain Verification: Place temperature-sensitive stickers ($5 online) on food packages—irreversible color change confirms exposure above 40°F.
Final Note: By implementing these precise techniques—starting with a fully pre-chilled system, maintaining a 2:1 ice-to-food ratio, never draining cold water, and limiting lid openings—you’ll keep frozen food safely below 0°F for 3-5 days in moderate conditions. Remember that cooler performance depends 70% on your packing method, not the brand. For your next adventure, treat your cooler like a thermal engineer: every degree matters, every gap counts, and every opening has consequences. When you arrive with rock-solid food ready for the grill, you’ll understand why mastering how to keep frozen food frozen in a cooler transforms outdoor dining from risky to remarkable.