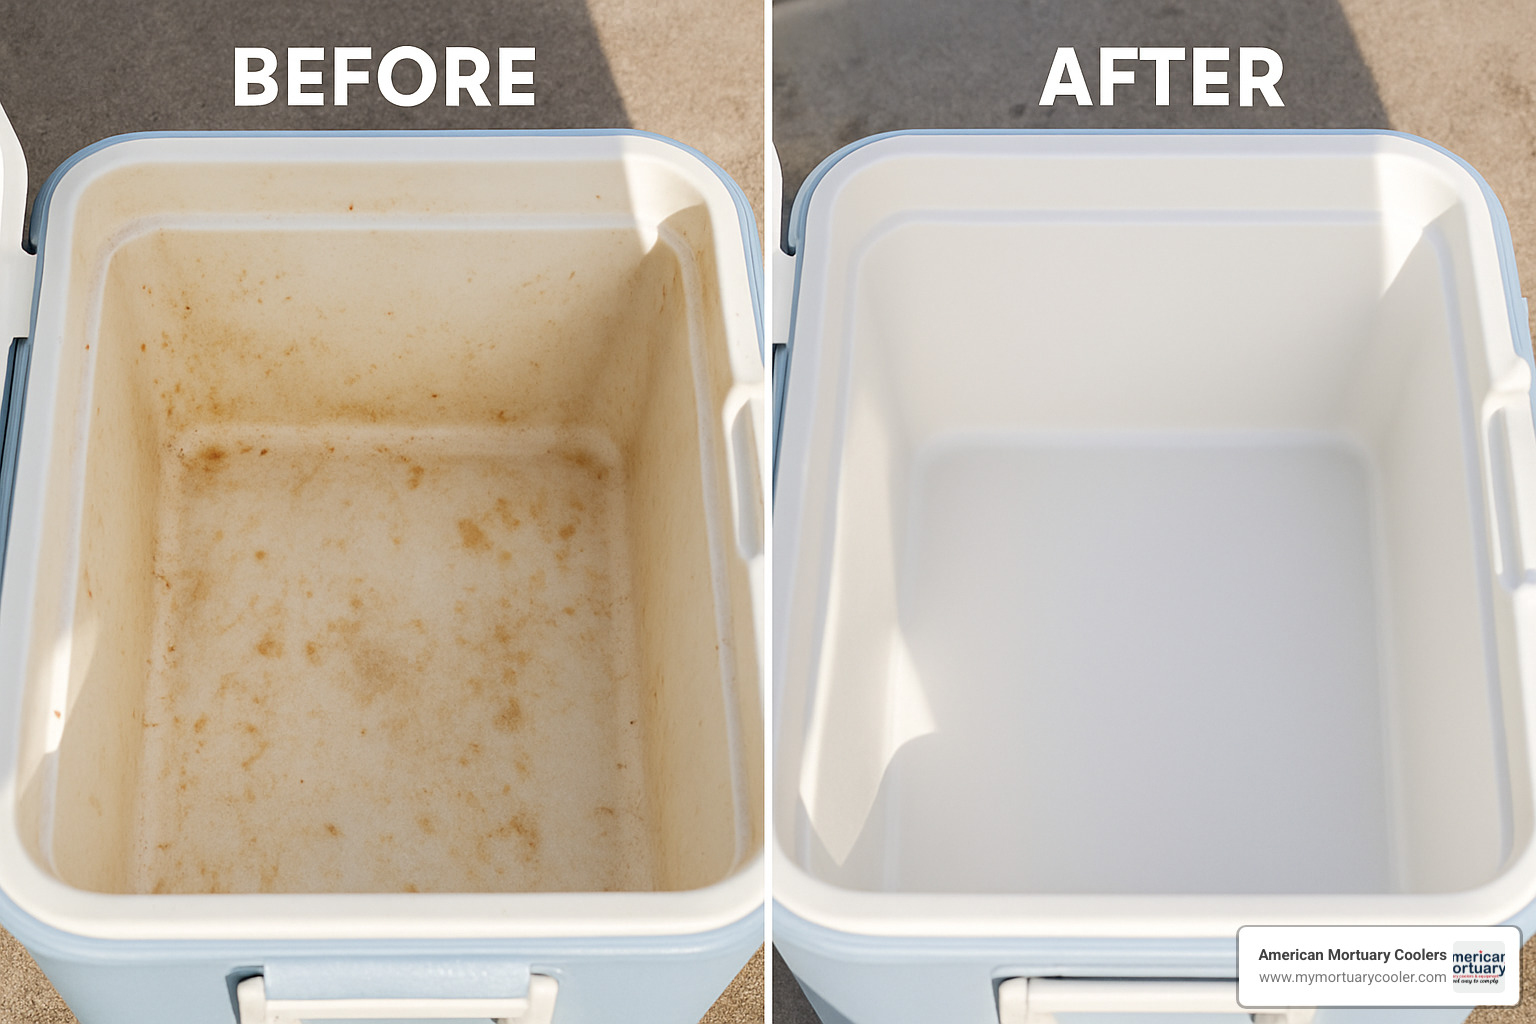
That Yeti Tundra or Hopper you rely on for weekend adventures has become a breeding ground for mystery odors and stubborn stains. Leftover fish guts, spilled craft beer, and melted ice have transformed your premium cooler into a science experiment. This isn’t just about unpleasant smells—it’s a sanitation hazard. Bacteria thrive in damp, neglected coolers, potentially contaminating your next picnic or camping trip. The good news? A properly cleaned Yeti cooler can last decades. Forget quick rinses that miss hidden mold in the drain tube or lid gasket. This guide delivers a battle-tested deep-cleaning method proven to eliminate odors at their source, restore freshness, and protect your investment. You’ll learn exactly how to sanitize every crevice without damaging your cooler’s rotomolded plastic.
Gather These 5 Critical Supplies Before Cleaning Your Yeti
Skipping proper prep guarantees a half-cleaned cooler. You’ll waste time hunting for supplies mid-scrub while mold spores multiply in damp corners. This 2-minute setup prevents frustration and ensures every inch gets sanitized.
Grab These Specific Cleaning Tools (No Dish Soap Substitutes)
- Non-abrasive essentials only: Soft microfiber cloths (paper towels scratch), a dedicated soft-bristled brush (old toothbrush works), and rubber gloves. Never use steel wool or abrasive pads—they create micro-scratches where bacteria hide.
- Exact cleaning solutions: Distilled white vinegar (not apple cider), baking soda, and household bleach (only for severe mold). Skip lemon juice—it can degrade rubber seals over time.
- Pro tip: Keep a labeled spray bottle solely for cooler cleaning. Mix vinegar solutions once to avoid measurement errors during your rush to clean post-trip.
Create a Mold-Killing Workspace in 60 Seconds
Working indoors traps moisture and fumes. Your setup must prioritize ventilation and drainage:
1. Move outside immediately: Place your cooler on concrete or dirt—not grass where moisture seeps back in.
2. Remove drain plug FIRST: Unscrew it completely before emptying. This prevents standing water in the hidden tube beneath.
3. Propping technique: Tip the cooler 45 degrees against a fence or wall. Gravity pulls water from the drain channel—90% of users miss this critical drainage step.
Deep Clean Your Yeti in 4 Steps (Without Damaging It)

A rushed wipe-down spreads bacteria. This method targets the three high-risk zones: lid gasket, drain tube, and floor seams where grime hides.
Step 1: Blast Hidden Debris From the Drain Tube (3-Minute Fix)
- Why this fails 80% of users: They rinse the main chamber but ignore the 3-inch drain tube. Trapped gunk here causes 90% of recurring smells.
- Do this: Insert a bottle brush into the drain hole. Rotate it while pouring lukewarm water through the tube. Repeat until water runs clear. Hot water warps plastic—use only lukewarm.
- Warning: Never force a stiff brush—it can crack the tube. Use gentle, circular motions.
Step 2: Scrub the Lid Seal—The #1 Mold Hotspot
- Find the invisible threat: Run your finger along the rubber gasket. If it feels slimy or has black specks, mold is embedded.
- Scrub correctly: Dip an old toothbrush in vinegar. Lift the gasket flap and scrub underneath where it meets the lid. Pay special attention to hinge corners. Do not pull the gasket out—it can tear.
- Pro tip: After scrubbing, wipe with isopropyl alcohol on a cloth. This kills residual spores without leaving residue.
Step 3: Sanitize the Interior With Vinegar (Skip Bleach If Possible)
- Why vinegar beats bleach: Bleach degrades plastic over time and requires dangerous rinsing. Vinegar neutralizes odors and kills mold without toxicity.
- Perfect ratio: Mix 1 cup distilled white vinegar with 1 gallon lukewarm water. Pour into cooler.
- Critical dwell time: Let solution sit 15 minutes—no less. Then scrub walls with baking soda paste for stains. Rinse ONLY after vinegar sits—premature rinsing wastes its power.
Step 4: Bone-Dry Storage Setup (Prevents 100% of Mustiness)
- The deadly mistake: Putting away a “damp-dry” cooler. Moisture in seams regrows mold in 48 hours.
- Do this: Wipe interior with dry microfiber towels. Prop lid open with a rolled towel. Place in direct sunlight for 4+ hours. Check the drain tube interior with a flashlight—it must feel bone-dry.
- Time-saver: In humid climates, run a fan blowing into the open cooler for 2 hours. Never store indoors until fully dry.
Eliminate Fishy Smells From Your Yeti Cooler Permanently
That lingering salmon odor means bacteria survived your last clean. Standard rinses miss deep-set oils in the plastic.
Neutralize Fish Residue in 20 Minutes
- Create the solution: 2 cups baking soda + 1 gallon warm water. Add ½ cup vinegar (it will fizz).
- Soak critical zones: Pour mixture into cooler. Focus extra solution under the lid seal and into the drain tube.
- Wait 20 minutes—no scrubbing: The baking soda-vinegar reaction breaks down oils. Rinse thoroughly with plain water.
- Final test: Smell the drain plug. If fishy, repeat with double baking soda.
Why Activated Charcoal Beats Baking Soda for Stubborn Odors
- Baking soda absorbs surface smells; charcoal pulls deep odors from plastic pores.
- Do this: Place ½ cup activated charcoal in a mesh bag inside the closed, dry cooler for 72 hours. Never use coffee grounds—they leave new odors.
Fix Black Mold Spots on Your Yeti Lid Gasket
Visible mold means your last clean missed hidden moisture. Act fast before spores spread.
Kill Mold Without Damaging Rubber Seals
- Safety first: Work outside with gloves. Mix 1 part bleach to 9 parts water in a spray bottle (never pour bleach directly).
- Target only mold: Spray solution only on affected gasket areas. Let sit 5 minutes—no longer (bleach degrades rubber).
- Scrub gently: Use a toothbrush dipped in the solution. Lift the gasket to reach undersides.
- Triple-rinse: Wipe with clean water 3x. Residual bleach causes future mold growth.
- Seal protector: Once dry, rub gasket with 303 Aerospace Protectant to prevent cracking.
⚠️ Critical warning: Never mix bleach and vinegar—it creates toxic chlorine gas. Always rinse bleach completely before using vinegar.
Prevent Musty Smells With This 60-Second Post-Trip Habit
Your cooler smells bad because you skipped this step after your last outing. It takes less time than unloading gear.
The 3-Step “Parking Lot Protocol”
- Empty immediately: Dump ice/water before driving home. Heat + moisture = bacteria explosion.
- Rinse in sink: Use lukewarm water (not hose pressure) to clear debris. Focus on drain tube.
- Air-dry in car: Prop lid open with cooler tilted. Sun through the windshield dries it faster than garage storage.
Pro tip: Keep a microfiber towel in your trunk. Wipe the interior dry during your drive home—most odors start from trapped moisture.
Seal Leaks by Cleaning Your Yeti Drain Plug Properly
Water pooling under your cooler means the plug isn’t sealing. Dirty threads are the culprit 95% of the time.
Restore a Watertight Seal in 5 Minutes
- Remove plug completely: Unscrew and pull out the rubber O-ring.
- Scrub threads: Use vinegar on a toothbrush to clean grooves on the plug and the cooler’s drain hole.
- Inspect O-ring: Check for cracks or stiffness. Lubricate with food-safe mineral oil if dry.
- Reassemble dry: Screw plug in only when all parts are bone-dry. Hand-tighten—overtightening cracks threads.
Leak test: Fill cooler with water. Wait 1 hour. If leaks persist, replace the O-ring (Yeti sells them for $5).
Store Your Yeti Cooler Correctly for Long-Term Freshness
Storing a “clean” cooler damp causes mustiness within weeks. Proper storage prevents 100% of odor issues.
Follow This Foolproof Storage Method
- Never close the lid: Prop it open 2 inches with a rolled towel. Closed lids trap humidity.
- Place odor absorbers INSIDE: Toss in an open box of baking soda or activated charcoal pouch.
- Store upright: Never stack heavy items on it—this warps the lid seal.
- Check quarterly: Wipe down if condensation forms in humid climates.
Pro tip: Store in a closet—not a garage. Garages experience temperature swings that pull moisture into plastic.
Final Note: Your Yeti cooler’s lifespan hinges on one habit: never storing it damp. By spending 60 seconds air-drying it after each trip and performing this deep clean twice yearly, you’ll prevent 99% of odor issues. That post-adventure rinse isn’t optional—it’s what separates coolers that smell fresh for a decade from those that become toxic hazards. Ready for your next trip? Grab that vinegar bottle and give your Yeti the deep clean it deserves. Your future self (and your picnic guests) will thank you.