Tired of cramming meat, produce, and beverages into overflowing refrigerators? A home built walk in cooler transforms how you store food—giving hunters space for game quarters, homesteaders room for harvests, and small businesses professional-grade cold storage at a fraction of commercial costs. Unlike expensive pre-fab units, a DIY walk-in cooler puts you in control of sizing, insulation, and refrigeration while avoiding $10,000+ price tags. But one critical mistake—like skipping the vapor barrier—can turn walls into mold traps within months. This guide cuts through the complexity with battle-tested steps for building a reliable, energy-efficient cooler in your garage or basement. You’ll learn why R-7 spray foam outperforms fiberglass, how CoolBot tricks turn AC units into sub-40°F systems, and why your floor insulation matters more than you think.
Most DIYers underestimate thermal bridging—the invisible heat leaks that sabotage cooling. Professional consultation for refrigerant handling isn’t optional; EPA regulations require certified technicians for split systems. Ignoring this risks fines and refrigerant leaks. Yet with meticulous vapor sealing and proper refrigeration sizing, your home built walk in cooler will outlast store-bought units while cutting energy bills by 30%. Let’s build it right the first time.
Calculate Your DIY Walk-In Cooler Size: Hunting Quarters vs Home Brewery Needs
Your cooler’s footprint hinges on exactly what you’ll store. Hunters preserving deer quarters need 30-40 sq ft (a 5×8 layout), while home brewers storing 10 kegs require 50+ sq ft (6×8 minimum). Measure every item’s dimensions—don’t guess—and add 15% for airflow clearance around pallets or shelves. Commercial kitchens often need 10×10 ft to accommodate NSF-certified shelving, but residential builds thrive at 6×8 ft. Crucially, verify your location first: that “perfect” garage corner might be 7 inches too narrow for standard door swing clearance. Sketch your layout with tape on the floor—this prevents costly rebuilds when framing hits obstructions.
How to Avoid Oversizing Your Walk-In Cooler Capacity
Undersized units run constantly and fail to reach target temps, but oversized models short-cycle, causing temperature swings that spoil food. Match BTU capacity to your cubic footage: a 6x8x8 ft cooler (384 cu ft) needs 6,000-8,000 BTU. For every 50°F ambient temperature rise (e.g., unconditioned garage in summer), add 20% cooling capacity. Use this formula:
Total BTU = (Cubic Feet × 0.035) + (Door Openings × 150) + (Lighting × 45)
Where door openings = estimated daily entries, and lighting = wattage of interior fixtures.
Basement vs Garage: Choosing Your Walk-In Cooler Location
Interior locations like basements offer stable 55-65°F ambient temps, reducing refrigeration strain by 25% compared to garages. But basements demand waterproofing inspections—any moisture intrusion destroys insulation. Garages provide easier electrical access but require insulating against 100+°F summer heat. Never install in sheds without foundation-leveling; a 1/4-inch floor slope prevents door sealing. Prioritize locations within 15 feet of a 20-amp circuit for refrigeration units. And always leave 24 inches of clearance around condenser units—crowding them causes overheating shutdowns.
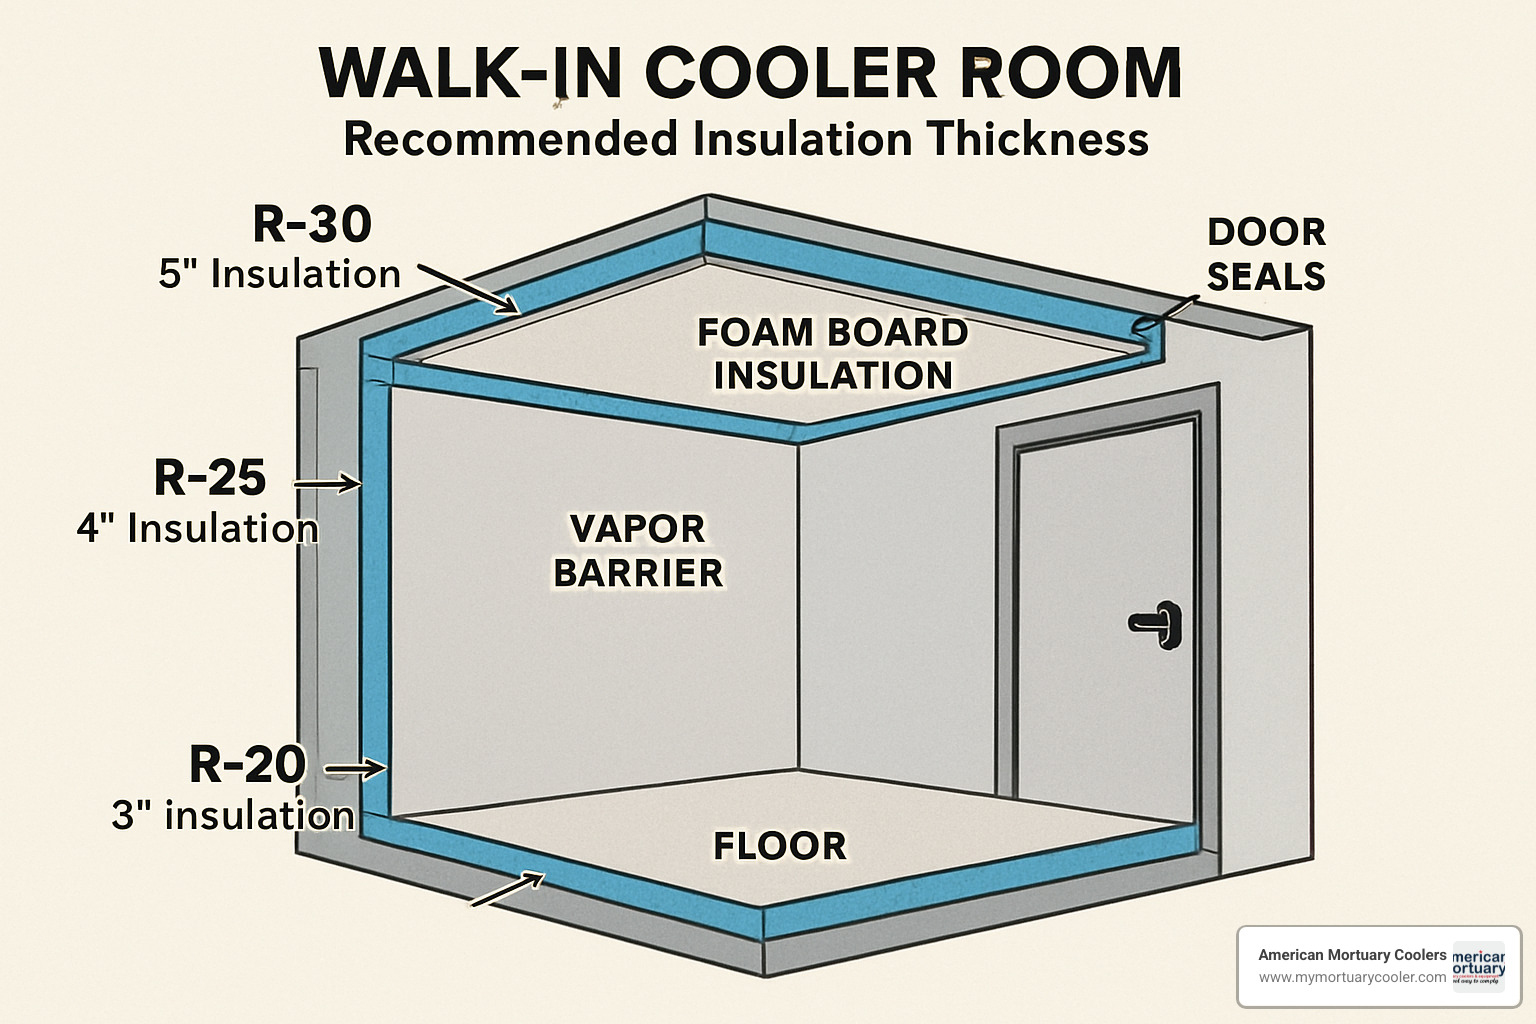
Spray Foam vs Rigid Board: Insulation Choices for Home-Built Coolers

Spray foam delivers R-6.5 to R-7 per inch—critical for hitting 35°F temps—while rigid polystyrene maxes at R-5. But foam’s real advantage is eliminating thermal bridging. In 2×6 walls, compressed fiberglass batts lose 30% R-value at studs, but spray foam seals every gap. For DIYers, 2-inch rigid polyisocyanurate boards (R-10) layered over 2×4 studs beat single-layer foam for cost efficiency. Never compress insulation; a 5.5-inch batt in a 5.5-inch cavity loses R-3. Always install rigid boards with staggered seams and foil tape—gaps wider than 1/8 inch create condensation highways.
Why Your Insulation Must Cover the Entire Floor
Ground heat transfer accounts for 40% of cooler energy loss. Build a subfloor: lay 2-inch rigid foam (R-10) over a level concrete slab, seal seams with foil tape, add a 6-mil poly vapor barrier, then cap with 3/4-inch pressure-treated plywood. Skipping this step? An uninsulated floor on concrete slab will leak 5°F hourly in summer—forcing your compressor into overtime.
Vapor Barrier Installation: Sealing Every Seam to Prevent Wall Mold
The vapor barrier must face the warm side (your cooler’s interior) to block humidity. One unsealed electrical box penetration invites moisture that rots framing within a year. Use 6-mil polyethylene sheeting taped with butyl rubber tape—duct tape fails below 40°F. Overlap seams by 6 inches and wrap continuously from floor to ceiling. Test your seal: run a hair dryer along seams with a smoke pencil; visible smoke pull means reseal. This step takes 3 extra hours but prevents $2,000 in mold remediation later.
2×6 Framing Techniques for Stable DIY Walk-In Cooler Walls
2×6 studs create space for R-21+ insulation—vital for sub-40°F operation. Double-stud corners prevent thermal bridging, and header beams over doors must be 2×12 to support ceiling weight. Before raising walls, level the floor platform within 1/8 inch over 10 feet; a warped base guarantees door sealing failures. Use construction adhesive on sole plates—it stops vibration leaks that compromise seals. Crucially, frame walls 1 inch shorter than ceiling height; this allows foam expansion without buckling panels.
Door Construction: Magnetic Seals and Cam-Locking for Tight Closure
Your door is the weakest thermal link—accounting for 60% of heat gain if poorly built. Use 2-inch rigid foam core wrapped in stainless steel, not hollow-core commercial doors. Magnetic gaskets (like refrigerator seals) outperform rubber strips by 40% in cold retention. Install a cam-action latch that pulls the door inward with 50+ lbs of force—standard handles won’t compress gaskets fully. Test seal integrity with a dollar bill: close the door on it at multiple points; if you slide it out easily, reposition the gasket.
CoolBot vs Split System: Refrigeration Options for Home Use
CoolBot pairs with $300 window AC units to hit 35°F for under $500—ideal for DIYers. It overrides thermostat limits using a temperature probe, but maxes out at 1,000 sq ft. For larger coolers, split systems (evaporator coil indoors + condenser outdoors) deliver commercial reliability. However, brazing copper lines and charging refrigerant requires EPA 608 certification. Never attempt this yourself; improper charging voids warranties and risks toxic leaks. Budget $1,200+ for professional split system installation—skimping here causes 70% of DIY cooler failures.
How to Size Your Refrigeration Unit Correctly
A 6x8x8 ft cooler needs 7,200 BTU minimum. Add 1,000 BTU per daily door opening and 45 BTU per watt of lighting. For example:
– 384 cu ft × 0.035 = 13,440 BTU
– + (5 daily openings × 150) = 750 BTU
– + (100W lights × 45) = 4,500 BTU
Total: 18,690 BTU → Round up to 2-ton (24,000 BTU) unit
Undersizing causes constant running and compressor burnout.
Electrical Setup and Final Sealing: Critical Steps Before First Use

Run 12/2 NM-B cable to a dedicated 20-amp GFCI circuit before insulating walls. Install vapor-proof, gasketed LED fixtures rated for 0-100°F operation—standard bulbs crack in cold. Seal wire penetrations with silicone caulk rated for -40°F. For refrigerant lines, use foam pipe insulation wrapped in vapor barrier tape; exposed copper lines sweat and drip water. Finally, apply non-toxic silicone sealant to all interior panel seams—this creates an airtight envelope that cuts energy use by 22%.
Top 5 DIY Walk-In Cooler Mistakes That Waste Energy
Why Skipping Floor Insulation Doubles Cooling Costs
An uninsulated concrete floor acts like a radiator in summer, leaking 25°F hourly. This forces compressors to run 3x longer, spiking electricity bills. The fix? A $200 subfloor with R-10 rigid foam pays for itself in 8 months.
How Poor Door Seals Waste 60% of Cooling Effort
Gaps wider than 1/16 inch let in humid air that freezes coils. Check seals monthly with the dollar bill test. Pro tip: Apply food-safe silicone lubricant to gaskets every 6 months—they harden and crack in cold temps.
Ignoring Vapor Barrier Continuity Behind Outlets
Electrical boxes are vapor barrier killers. Cut polyethylene sheeting 2 inches larger than box openings, then tape tightly over box flanges. Never staple through vapor barriers—use tape exclusively.
Undersizing Refrigeration for Ambient Temperature Swings
Garage temps hitting 110°F in summer require 30% more cooling capacity than basement installations. Always size for worst-case ambient temps, not averages.
Using Standard Drywall Instead of FRP Panels
Moisture warps drywall, creating mold traps. Fiberglass-reinforced plastic (FRP) panels resist impacts, sanitize easily, and meet food safety codes. Budget $3/sq ft for 1/4-inch FRP—cheap insurance against contamination.
Maintaining Your Home-Built Walk-In Cooler for Long-Term Efficiency
Wipe down walls weekly with a 1:10 bleach-water solution to prevent mold. Check door gaskets quarterly for cracks—replace every 3 years. Defrost evaporator coils monthly if humidity exceeds 60%. Most importantly, monitor temperature logs; a 5°F swing indicates failing seals or undersized refrigeration. With these steps, your home built walk in cooler will deliver decades of reliable service. Always consult local codes for electrical and refrigerant work—your safety and investment depend on it.