Your CPU cooler silently battles heat buildup 24/7, but dust accumulation turns it into a thermal insulator within months. When pet hair, carpet fibers, and desk debris clog those delicate fins, your processor overheats—triggering sudden crashes, performance throttling, and potentially permanent hardware damage. I’ve seen gamers lose $500 CPUs because they ignored this simple maintenance task. This guide delivers the exact steps to safely deep-clean your CPU cooler in under 30 minutes, restoring optimal cooling without risking static damage or thermal paste mishaps. You’ll learn professional techniques for dislodging stubborn grime, preventing fan motor damage during cleaning, and applying thermal paste like a seasoned builder—ensuring your system stays cool under heavy loads for years.
Essential Safety Steps and Tools for CPU Cooler Cleaning

Skipping safety protocols risks frying your motherboard with static discharge or damaging delicate heatsink fins. Before touching a single screw, verify your workspace meets these critical requirements.
Non-Negotiable Safety Checklist:
– Kill all power sources: Shut down your PC, flip the PSU rocker switch to “O,” and unplug the power cable. Laptops require complete shutdown plus removal of the battery if possible.
– Neutralize static electricity: Touch bare metal on your case frame for 10 seconds before handling components. An anti-static wrist strap clipped to the case is ideal for repeated maintenance.
– Work smart: Lay your tower horizontally on a non-carpeted surface with bright lighting. Never clean over carpets—dust will immediately reattach to components.
Precision Tools You Actually Need (Avoid These Common Mistakes):
– ✅ Compressed air can held upright: Tilting releases propellant that freezes and cracks components. Electric dusters like Metro DataVac are superior for continuous blasts.
– ✅ 91%+ isopropyl alcohol: Lower concentrations leave moisture residue. Use with coffee filters (not paper towels) for streak-free thermal paste removal.
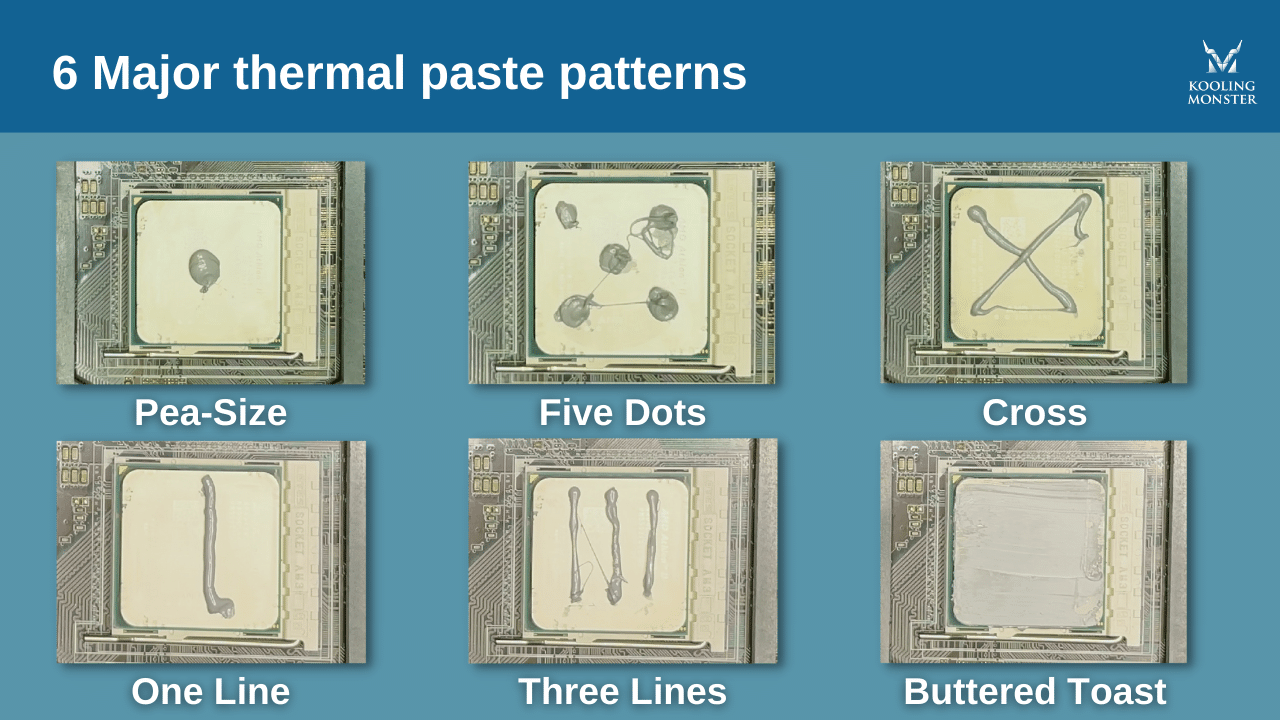
– ✅ Pea-sized thermal paste: Arctic MX-4 or Thermal Grizzly Kryonaut—never spread manually. Excess paste oozes onto motherboard traces causing shorts.
– ❌ Household cleaners: WD-40 or glass cleaner corrodes thermal pads and leaves conductive residues.
– ❌ Toothpicks for fan holding: They snap inside bearings. Use a plastic spudger or your fingernail to immobilize fan blades during air blasts.
Step-By-Step CPU Cooler Deep Cleaning Process
Follow this sequence to avoid missing critical steps that cause reassembly failures. The entire process takes 20-35 minutes depending on dust severity.
Unplugging Cables and Removing the CPU Cooler
Critical Pre-Removal Step: Take a phone photo of all motherboard headers—especially the 4-pin CPU_FAN connector—before disconnecting anything. One misplaced cable prevents booting.
- Disconnect fan power: Gently unclip the CPU cooler’s fan cable from the CPU_FAN header. For RGB coolers, disconnect addressable headers first.
- Break the thermal paste seal: Rotate the cooler 15-20 degrees side-to-side while applying slight upward pressure. This breaks the adhesive bond without stressing the CPU socket.
- Lift straight up: Never twist sharply during removal—you risk bending delicate motherboard pins. Support the cooler’s weight as you lift it clear.
- Separate fan from heatsink: Most coolers use plastic clips or 1-2 screws. Remove these to clean components individually.
⚠️ Troubleshooting Tip: If the cooler won’t budge after rotation, unplug the fan cable and power on the system for 10 seconds. Heat softens the thermal paste, making removal easier.
Deep Cleaning Heatsink Fins and Fan Blades
Heatsink Cleaning Protocol (Most Critical Step):
– Hold fins vertically over a trash can. Blast air from the back toward the front—opposite normal airflow—to eject trapped debris.
– For baked-on dust, use a soft-bristle brush (like a clean makeup brush) to loosen grime between fins. Never bend fins—they reduce surface area for heat transfer.
– Extreme cases: Submerge the metal heatsink (not fan!) in warm soapy water. Scrub gently with a toothbrush, rinse with distilled water, then dry for 48 hours. Speed up drying with compressed air blasts followed by a 200°F oven bake for 15 minutes.
Fan Cleaning Without Motor Damage:
– Immobilize the hub: Press a plastic spudger against the fan motor housing to prevent spinning. Unchecked rotation generates back-EMF voltage that can fry your motherboard.
– Use 3-second air bursts angled at the blade bases where dust accumulates. For oily residue, dampen a coffee filter with alcohol and wipe blades from center outward.
– Visual checkpoint: Spin the fan manually after cleaning—it should rotate freely for 5+ seconds with no grinding noise.
Applying Thermal Paste Like a Professional
Reusing old paste is the #1 cause of post-cleaning overheating. Follow this foolproof method:
- Remove all old paste: Dampen a coffee filter corner with 91% alcohol. Wipe CPU surface in straight lines (not circles) until mirror-smooth. Repeat for cooler base plate.
- Apply new paste: Squeeze a single grain-of-rice-sized dot dead-center on the CPU IHS. Modern CPUs spread paste automatically during mounting—larger amounts cause pump-out and electrical shorts.
- Mount immediately: Place the cooler within 60 seconds before paste dries. Tighten mounting screws in diagonal sequence (e.g., top-left → bottom-right → top-right → bottom-left) in quarter-turn increments. Final torque: snug plus 1/8 turn.
Reassembly and Critical Post-Clean Test
Reinstallation sequence:
1. Reattach fan to heatsink using original clips/screws
2. Align cooler mounting brackets with motherboard holes
3. Reconnect CPU_FAN cable to motherboard header—this is non-optional for booting
4. Secure side panels without pinching cables
Power-on verification:
– Enter BIOS immediately after powering up (press Del/F2).
– Confirm CPU temperature reads 30-45°C at idle—if above 50°C, reseat the cooler.
– Run Prime95 for 10 minutes while monitoring temps in HWMonitor. Load temps should stay below 80°C for most CPUs.
Fatal Mistakes That Destroy CPUs During Cleaning
Avoid these irreversible errors even seasoned builders make:
- Forgetting the CPU_FAN reconnect: Modern motherboards block booting entirely without this connection. Double-check before closing the case.
- Overtightening mounting screws: Applying >15 inch-pounds of torque cracks CPU lids or warps motherboards. Tighten until resistance increases, then stop.
- Using water on fans: Moisture corrodes motor windings. Only heatsinks withstand rinsing—fans require alcohol-only cleaning.
- Ignoring thermal paste expiration: Old paste dries out within 2 years. Check tube dates—expired paste loses 30%+ thermal conductivity.
Preventing Future Dust Buildup With Smart Maintenance
A clean cooler stays effective longer with these proactive habits:
- Monthly dusting: Blow out case intakes with compressed air while the PC runs (fans spinning outward eject dust). Takes 90 seconds.
- Dust filter hygiene: Clean magnetic mesh filters weekly in smoky/dusty environments. Soak in soapy water, rinse, and air-dry completely.
- Case airflow tuning: Set intake fans to 70% speed and exhausts to 100%—this creates positive pressure that blocks dust infiltration.
- Thermal paste refresh cycle: Replace paste every 18 months. Degraded paste causes 5-10°C temperature spikes even with clean fins.
Monitor your success with Core Temp: Idle temps should stabilize at 30-40°C, and heavy gaming/workloads must stay below 85°C. If temps creep up faster than before, inspect for bent heatsink fins or insufficient paste coverage. By dedicating 20 minutes annually to this process, you’ll extend your CPU’s lifespan by years while avoiding thermal throttling during critical tasks. Your cooler isn’t just a heat sink—it’s the guardian of your entire system’s stability. Treat it right, and it’ll keep your processor running cool when you need it most.