Nothing ruins a scorching summer day faster than a sputtering swamp cooler that blows warm, musty air. Proper evaporative cooler maintenance prevents exactly this nightmare while extending your unit’s lifespan by 5+ years. When you skip routine care, mineral scale chokes water flow, dried pads create fire hazards, and mold turns your cooler into a stench factory. This guide delivers actionable, model-specific maintenance steps you can implement immediately—no HVAC degree required. You’ll learn exactly how to service critical components before summer heat hits, prevent the dreaded “fish tank smell” during operation, and avoid frozen, cracked units come spring thaw. Follow this roadmap to keep your cooler delivering crisp, efficient air all season long.
3 Evaporative Cooler Parts That Fail Without Proper Maintenance

Your swamp cooler’s lifespan hinges on three components most homeowners ignore until disaster strikes. The squirrel cage blower’s pillow block bearings make that piercing squeal when dry—a sure sign they need 30-weight non-detergent oil immediately. Spin the cage by hand after removing the belt; if it grinds or resists, bearings require replacement. Equally critical is the drive belt: check for cracks or glazing weekly, and ensure it deflects exactly ½ inch when pressed. An overtightened belt strains the motor, while a loose one slips, cutting cooling power by 30%. Finally, the submersible pump’s intake screen clogs silently with mineral scale. If pads stay dry despite water in the reservoir, pull the pump and scrub its net filter—this simple fix solves 60% of “no cooling” emergencies.
Why Green Aspen Pads Beat Foam Every Time
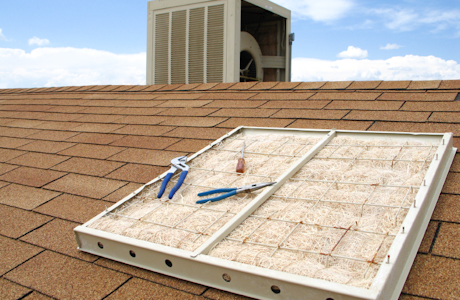
Ditch blue foam pads immediately—they trap stagnant water and breed algae within weeks. Green corrugated aspen paper pads are the industry standard for reliable evaporative cooler maintenance. Install them with the smoother side facing inward so water trickles evenly down vertical channels. A snug fit is non-negotiable: gaps as small as ½ inch let hot air bypass the pads, slashing efficiency. Never layer pads (like aspen over foam), as this restricts airflow and creates mold incubators. Replace pads every spring—they’re cheap ($15-$25) but vital. If yours feel gritty with mineral deposits mid-season, swap them out; calcified pads can’t absorb water properly, causing dangerous dry spots that overheat the unit.
Clearing Clogged Water Distribution in 5 Minutes
Uneven water flow over pads is the #1 cause of poor cooling. When distribution tubes (the “spider” manifold) clog with calcium, dry patches form on pads. Here’s how to fix it:
1. Power down the unit at the main switch
2. Remove the top access panel to expose distribution tubes
3. Insert a straightened paperclip into each tube orifice to dislodge debris
4. Flush with vinegar solution if mineral deposits persist
5. Test flow by running the pump briefly—water must sheet evenly across all pad surfaces
A steady trickle—not a gush—is ideal. Heavy flow wastes water; weak flow creates dry zones that reduce cooling by 40%. Check this weekly during peak season.
Spring Startup Checklist: 7 Critical Steps for Peak Performance
Skipping pre-season maintenance causes 70% of summer breakdowns. Dedicate 90 minutes before temperatures hit 80°F to avoid emergency repairs later. This evaporative cooler maintenance ritual prevents the most common startup failures.
Sanitize Pads and Reservoir with Precision
/how-to-clean-a-water-cooler-5080453-04-7335c84887fa46808880ebe8fc31893b.jpg)
Never install new pads without sanitizing first—residual microbes cause instant odors. After scrubbing the reservoir with a 50/50 vinegar-water solution:
– Add 1 cup household bleach to the clean water reservoir
– Run the pump for 15 minutes to circulate the solution
– Drain completely before installing pads (bleach residue damages media)
– Refill with fresh water and reinstall pads
This step eliminates the “fish tank smell” before it starts. If you smell chlorine during operation, you’ve overdosed—flush immediately.
Belt and Bearing Service That Prevents Catastrophic Failure
A seized bearing can destroy your blower wheel in hours. During spring startup:
– Lubricate pillow block bearings with 3-4 drops of 30-weight oil while spinning the cage
– Check belt tension—it should deflect ½ inch with finger pressure
– Inspect pulley alignment—misaligned pulleys shred belts in weeks
If squealing persists after oiling, replace bearings immediately. Pro tip: Loosen the belt tensioner bolt, nudge the motor slightly, and retighten to align pulleys perfectly.
Weekly Evaporative Cooler Maintenance That Prevents Costly Repairs
Most owners only act when problems strike—but consistent weekly care stops 90% of failures. These 10-minute routines take less time than your morning coffee.
Combat Mineral Scale with Smart Water Management
Hard water turns your cooler into a concrete monument within months. Implement this evaporative cooler maintenance trio:
– Install a $12 inline sediment filter on the water supply line
– Add water treatment tablets weekly (never bleach during operation)
– Run a purge cycle every 4-8 hours if your unit has an automatic drain
Without these, scale builds on cooling fins, insulating them from airflow. When scale thickens past 1/8 inch, efficiency plummets—you’ll feel the difference in warmer output air.
Pad Inspection Protocol That Avoids Fire Risks
Dry, calcified pads can ignite blower motors—check them biweekly:
1. Power down the unit
2. Feel pads 6 inches from the bottom—they should be damp, not soggy
3. Look for white mineral crust or crumbling edges
4. Replace immediately if pads feel stiff or show gaps
Aspen pads typically last one season. If yours disintegrate mid-summer, hard water is the culprit—add a scale inhibitor tablet next time.
Winterizing Your Evaporative Cooler: Avoid Costly Spring Repairs
Skipping winterization causes $300+ repairs 80% of the time. Frozen water cracks reservoirs, and damp pads rot blower wheels. Complete these steps before temperatures drop below 40°F.
Drain and Purge Water Lines Like a Pro
Residual water is public enemy #1 for winter damage. Do this:
– Turn off the water supply at the saddle valve
– Drain the reservoir completely using the drain plug
– Blow out lines with an air compressor (attach to the disconnected water line)
– For stubborn lines, add non-toxic RV antifreeze to prevent freezing
Leave the drain plug out all winter—this vents moisture and prevents corrosion. If you skip line purging, ice expansion will split plastic tubing by January.
Pad Removal and Covering Tactics That Prevent Mold
Never store pads in the unit—they’ll rot into a slimy mess. After removal:
– Scoop sediment from the dry reservoir pan
– Vacuum debris from cooling fins and pump housing
– Lubricate bearings one last time
– Cover with a breathable canvas cover (never plastic—it traps moisture)
This prevents the mold explosion that causes 95% of spring odors. If you smell decay when uncovering next year, you missed this step.
Diagnose and Fix 4 Common Evaporative Cooler Problems in Under 30 Minutes
When your cooler acts up, skip the $150 service call. These field-tested evaporative cooler maintenance fixes resolve most issues instantly.
Stop Squealing Noises Before Bearing Failure
That ear-splitting screech means pillow block bearings are seizing. Do not run the unit—this can destroy the blower wheel. Immediate action:
1. Power off at the main switch
2. Remove the belt and spin the cage by hand
3. If stiff or grinding, apply 30-weight oil directly into bearing ports
4. If noise persists, replace bearings (a $25 part)
Ignoring this for more than 48 hours risks catastrophic motor failure.
Rescue a “No Cooling” Emergency in 15 Minutes
When output air feels warm:
✅ First check water flow—are pads fully saturated?
✅ Clear clogged distribution tubes with a paperclip
✅ Clean the pump intake screen (located inside the reservoir)
✅ Verify belt tension—a slipping belt reduces airflow by 50%
80% of “no cooling” cases trace to one of these four issues. If pads stay dry despite pump operation, the distribution manifold is blocked—address this immediately to prevent pad fires.
Final Note: Consistent evaporative cooler maintenance saves $200+ annually in energy costs while doubling your unit’s lifespan. Stick to the spring startup ritual, weekly pad inspections, and meticulous winterization—and you’ll avoid 95% of common failures. Always keep new aspen pads and a bottle of 30-weight oil on hand; when cooling stops, these are your first-response tools. For persistent issues, consult your model’s manual for capacitor or pump replacement specifics—most parts cost under $40 and install in 20 minutes. Your cooler isn’t complicated; it just demands predictable care. Treat it right, and it will deliver dry, crisp air for 15+ seasons.