Your camping cooler failing mid-trip means spoiled steaks, warm sodas, and ruined s’mores—wasting money and adventure. Learning how to keep a cooler cold while camping transforms this frustrating reality into reliable cold retention that lasts from setup to teardown. Most campers treat coolers like simple ice boxes, but physics dictates that strategic preparation and packing are non-negotiable for multi-day trips. This guide reveals field-tested methods used by expedition leaders to maintain 35°F temperatures for 7+ days, turning your cooler into a precision cold-storage system rather than a melting disappointment.
Forget haphazard ice dumping. The difference between lukewarm lunches and perfectly chilled drinks hinges on harnessing cold air’s natural behavior and minimizing thermal transfer. You’ll discover why pre-chilling is your most overlooked weapon, how to build an unbreakable “cold sink,” and why your ice choice could double your cooler’s lifespan. By the end, you’ll pack like a pro—saving hundreds in wasted food and ensuring every meal stays safely below 40°F.
Why Your Cooler Fails by Day Two (And How to Fix It)
Most campers unknowingly sabotage their cooler with three critical errors: packing room-temperature items, using insufficient thermal mass, and ignoring cold air physics. When you toss warm drinks into a 70°F cooler, your ice immediately fights the container’s heat instead of preserving food—a massive energy drain. The solution starts 24 hours pre-trip with aggressive pre-chilling. Fill your empty cooler with sacrificial ice the night before departure, drain the meltwater, and pack immediately while the interior remains near freezing. This simple act preserves 30% more ice longevity by eliminating the “heat battery” effect.
The Cold Air Sinks Principle You’re Ignoring
Cold air naturally pools at the bottom of your cooler, creating a temperature gradient where the base stays significantly colder than the lid. Most campers place perishables haphazardly, burying day-one snacks under day-three steaks. Instead, treat your cooler like a refrigerator on its side: coldest items belong at the bottom where temperatures stay most stable. This vertical strategy prevents warm air pockets that accelerate spoilage—especially crucial for raw meats and dairy.
How to Test Your Cooler’s Thermal Weakness
Before trusting it in the wilderness, conduct a simple gasket test: close the lid on a dollar bill at multiple points around the rim. If you slide it out easily, heat is seeping in. For rotomolded coolers (Yeti, RTIC), replace worn gaskets annually; for budget models, apply petroleum jelly to create a temporary seal. Always store coolers upright during transport to maintain gasket compression—never lay them on their side.
Pre-Chill Everything: The 24-Hour Game Changer
:max_bytes(150000):strip_icc()/pre-chill-cooler-hack-GettyImages-868309646-3x2-1-0ff719e9b4d34de7968ee0e2c24209fe-2x1-6d82d0836ce141a892675d17dbb7c25a.jpg)
Skipping pre-chilling wastes 40% of your ice capacity cooling the cooler itself instead of your food. This isn’t optional—it’s the foundation of how to keep a cooler cold while camping. Begin 24 hours pre-trip: chill the empty cooler with cheap bagged ice overnight, then drain and dry it. Simultaneously, refrigerate all food and drinks for 12+ hours—partially freeze non-carbonated liquids like juice boxes or water bottles to create additional “cold batteries” that melt slowly.
Why Frozen Water Bottles Beat Ice Cubes
Replace half your ice with gallon jugs or 2-liter bottles frozen solid. They melt 3x slower than cubes due to lower surface-area exposure and serve dual purposes: as cooling agents initially, then as drinking water once thawed. Pro tip: fill bottles 90% full to prevent cracking, and label them “MEAT ICE” or “DRINK LATER” to avoid confusion during packing.
The Sacrificial Ice Hack for Critical Trips
For expeditions exceeding 5 days, add a layer of dry ice (handled with gloves!) beneath your cold sink. A 5-pound block keeps items frozen for 48+ hours in bear country where freezers are unavailable. Critical safety note: Never seal dry ice in an airtight cooler—ventilate your vehicle during transport and never store it near sleeping areas due to CO₂ buildup risks.
Packing Like a Pro: The Cold Sink Method Step-by-Step
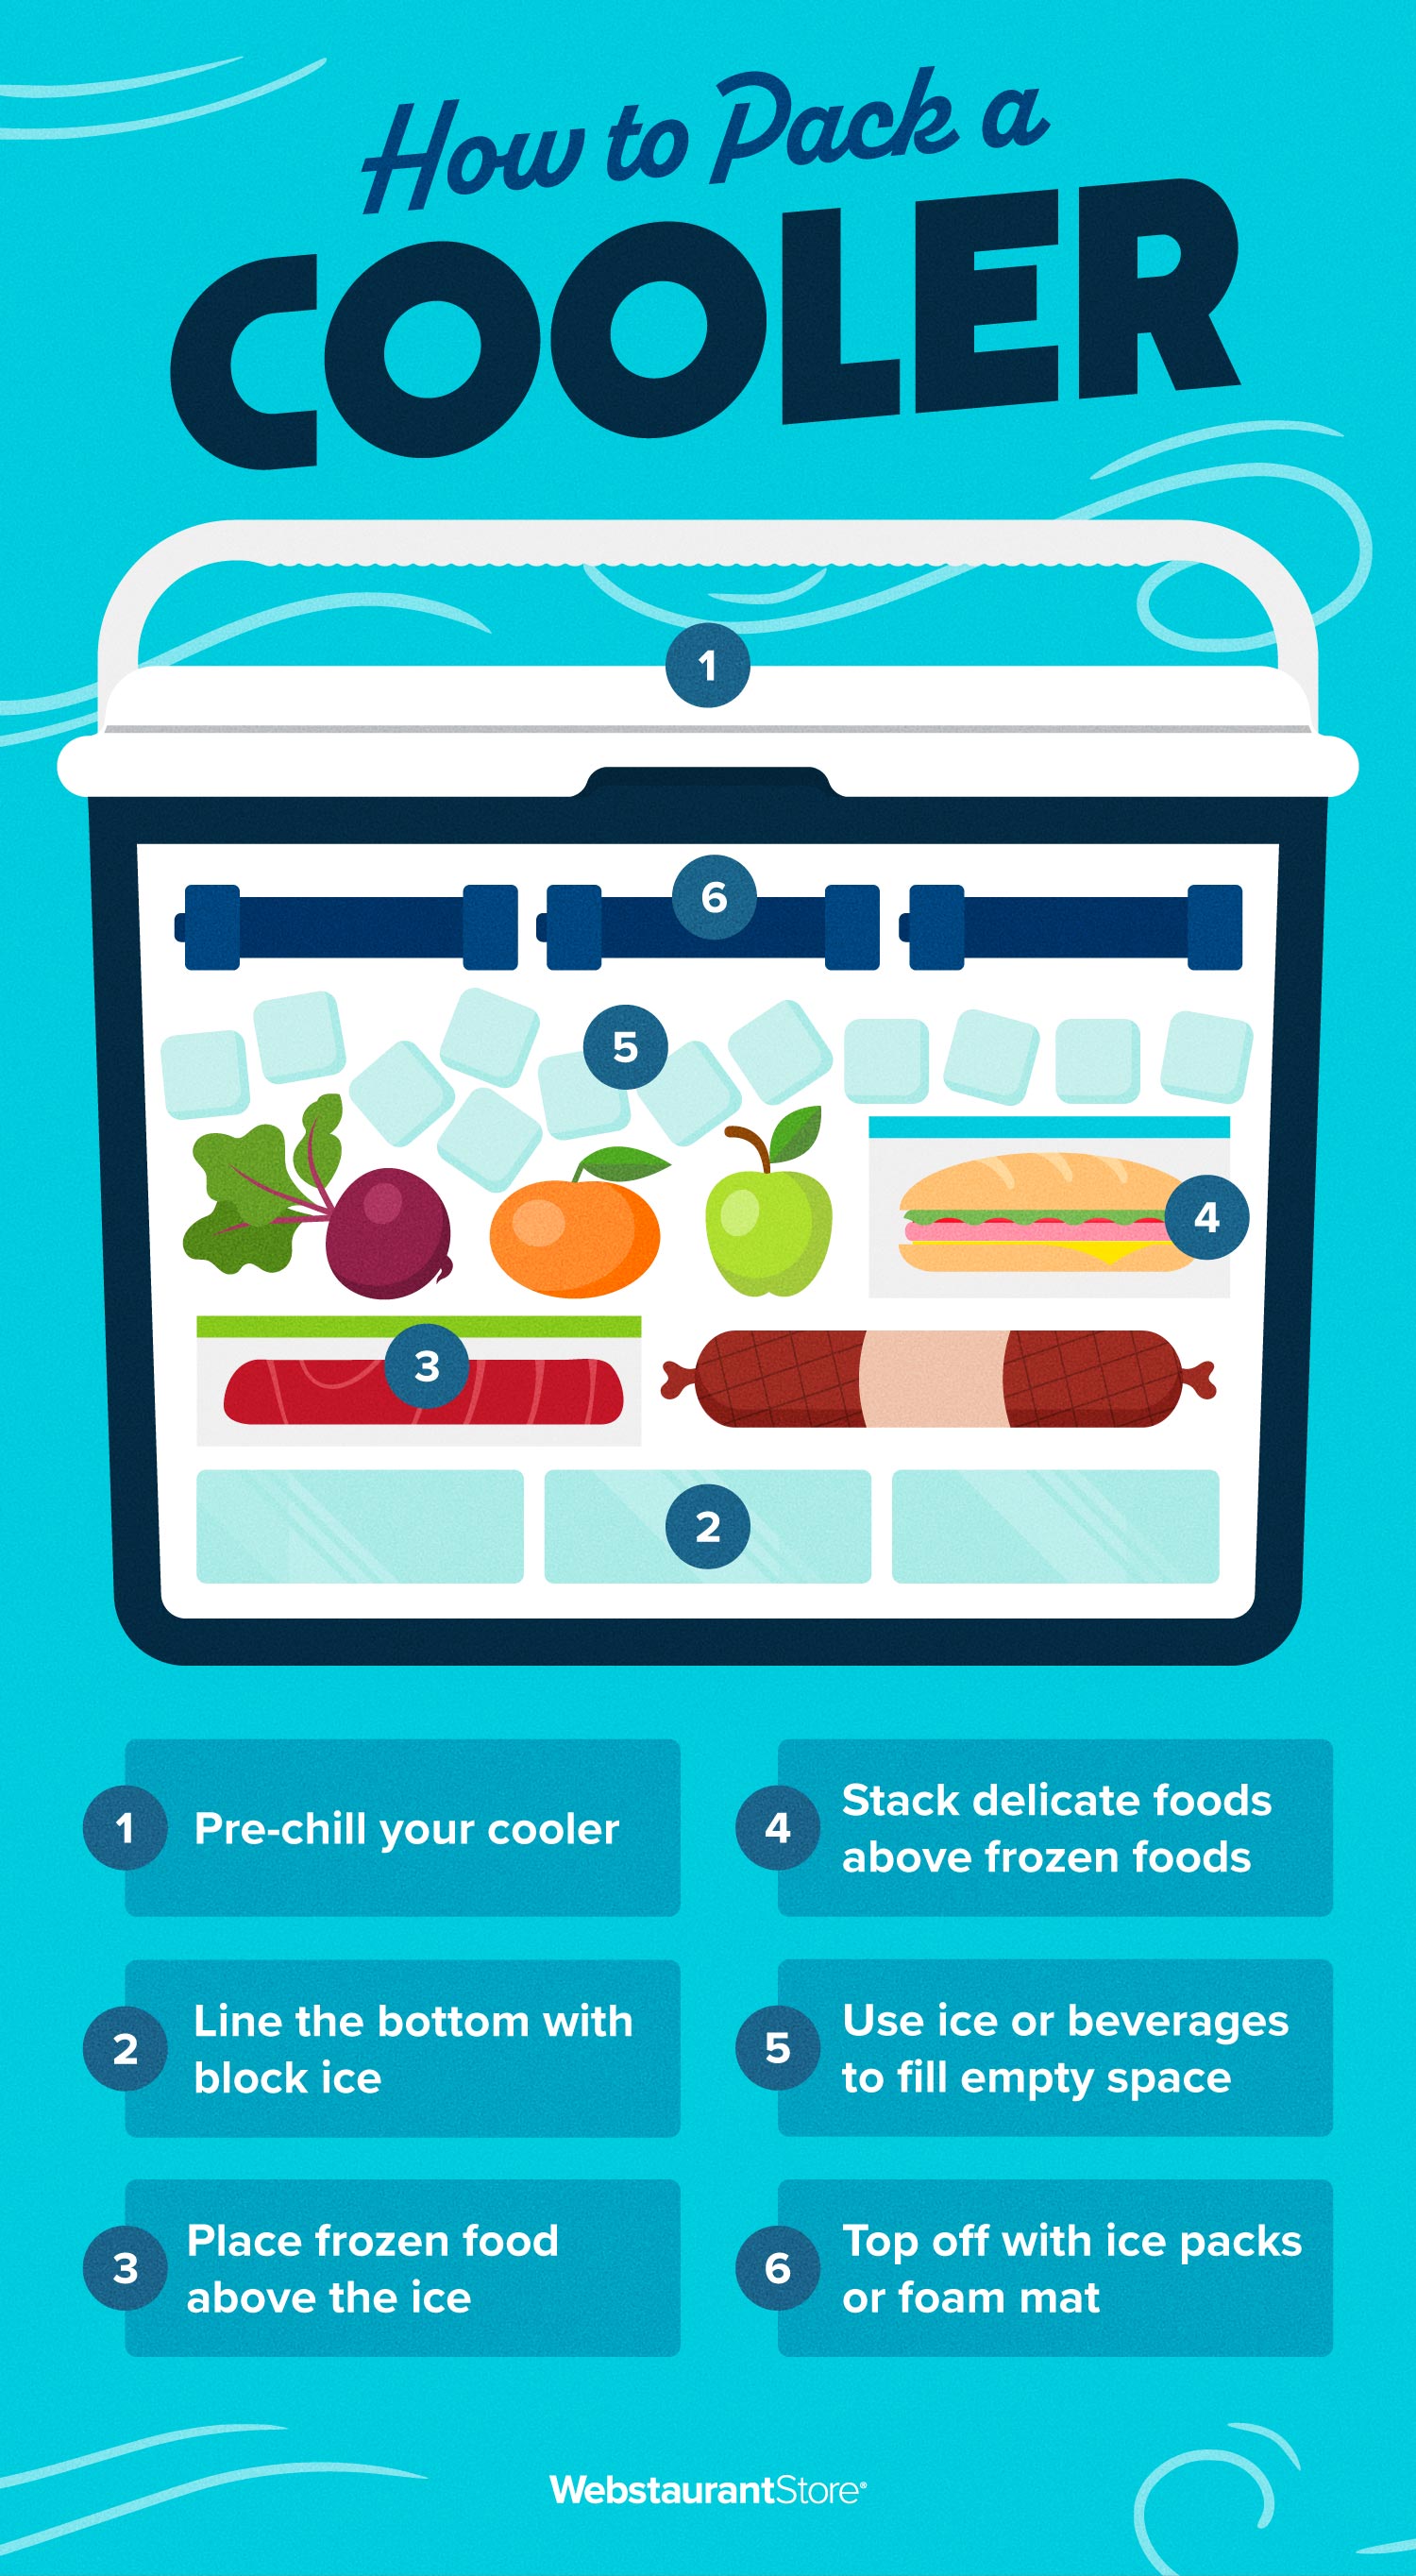
This technique exploits cold air physics to create self-sustaining cold retention. Start by lining your pre-chilled cooler’s walls vertically with frozen water bottles—this “cold jacket” shields contents from radiant heat. Then build your thermal foundation: a 3-inch base of block ice (homemade in storage bins) or frozen gel packs at the bottom. This isn’t just ice—it’s your primary cold battery.
Bottom Layer: Your Cold Battery Foundation
Place raw meats, frozen steaks, and day-four provisions directly on the cold sink inside sealed containers. Double-bag poultry to prevent cross-contamination, and position items flat—not stacked—to maximize contact with the coldest surface. This layer should feel near-freezing to the touch when packed.
Middle and Top Layer Strategy
Above the cold sink, layer dairy and pre-cooked meals in the middle zone where temps hover around 35°F. Reserve the top 20% for day-one drinks and veggies—these items warm fastest but spoil slowest. Fill every air gap with crumpled newspaper or bagged ice cubes; empty spaces let warm air circulate like a convection oven. Finish with a thick towel soaked in cold meltwater draped over contents—it creates evaporative cooling that drops surface temps by 10°F.
Ice Selection: Longevity Champions vs. Quick Melters
Not all ice performs equally. Block ice (homemade in plastic bins) melts 5x slower than cubes due to minimal surface exposure—making it essential for how to keep a cooler cold while camping beyond 48 hours. For trips under 3 days, reusable ice packs work well but avoid gel varieties that freeze at higher temps than water. Dry ice excels for freezing-only needs but requires careful handling: wear insulated gloves, store in ventilated coolers, and place it on top of food (not beneath) since cold air sinks.
Why You Should Never Use Bagged Ice Alone
Supermarket ice cubes melt rapidly and create excessive water that dilutes your cold sink. Reserve them only for filling tiny gaps between bottles—never as primary coolant. Instead, freeze your own “ice bricks” by filling clean milk jugs 75% full (allowing expansion room) and freezing upright for 48 hours.
Operational Discipline: The Human Factor
Every cooler opening invites warm air that takes 15+ minutes to re-stabilize. Implement the 30-second rule: know exactly what you need before lifting the lid. For groups, designate one person to retrieve all items during each opening. Critical upgrade: use a $20 soft-sided cooler exclusively for drinks—this reduces main cooler openings by 80%, extending ice life by 2-3 days. Place this “sacrificial cooler” in direct sun while keeping your food cooler in deep shade.
Shade and Elevation Tactics That Work
Never set your cooler on hot ground—use a wooden pallet or foldable camp table to break thermal contact. Drape a reflective emergency blanket over it during peak sun hours, securing corners with rocks. In bear country, store coolers in vehicle trunks (not tents!) and wipe exteriors with vinegar to mask food odors.
Troubleshooting Warm Spots and Rapid Melt
If ice vanishes in 24 hours, your cooler likely has a compromised seal or wasn’t pre-chilled. Test gaskets by closing the lid on tissue paper—if it pulls out smoothly, heat is infiltrating. For warm spots on one side, rotate the cooler 180 degrees in the shade; this often reveals hidden sun exposure. If food hits 45°F+ by day three, add frozen water bottles immediately and drape a wet towel over the unit—evaporative cooling can drop temps 15°F within an hour.
When to Drain Meltwater
Keep drain plugs closed to maintain a cold water bath (which insulates better than air) unless water exceeds 45°F. Use a thermometer to check: if temps rise, drain slowly while adding fresh ice to the top layer. Never dump all meltwater at once—that removes crucial thermal mass.
Pre-Departure Cooler Checklist
- [ ] Cooler pre-chilled 24 hours with sacrificial ice and drained
- [ ] All food/drinks refrigerated 12+ hours (partially frozen where safe)
- [ ] Block ice or frozen bottles form 3-inch cold sink base
- [ ] Walls lined with frozen water bottles as “cold jacket”
- [ ] Raw meats double-bagged at bottom; day-one items on top
- [ ] Zero air gaps filled with crumpled newspaper or ice cubes
- [ ] Wet towel or Reflectix sheet covers top layer before closing
- [ ] Separate drink cooler packed and shaded
Mastering how to keep a cooler cold while camping turns thermal physics into your secret weapon. By building a dense cold sink, eliminating air pockets, and guarding against human error, you’ll enjoy crisp salads and icy beers even on weeklong trips. Remember: a cooler’s job isn’t to cool—it’s to preserve cold. Start with everything already chilled, and you’ve won half the battle. For your next trip, test one new technique—like frozen water bottle walls—and watch ice last twice as long. Your future self, sipping a cold drink at sunset, will thank you.