Nothing beats the refreshing relief of a properly operated air cooler on a sweltering day—especially when you harness water’s natural cooling power correctly. Unlike energy-guzzling air conditioners, evaporative coolers (often called swamp coolers) slash electricity bills by up to 80% while pumping out crisp, moist air through simple water evaporation. But if your unit’s blowing lukewarm air or leaking puddles, you’re likely missing critical water-handling steps. This guide cuts through the confusion with actionable steps to maximize cooling power, prevent mineral buildup, and extend your unit’s lifespan. You’ll learn exactly how to use air cooler with water for 20°F temperature drops, avoid common pitfalls like clogged pads, and maintain peak performance all season.
Position Your Air Cooler for Maximum Cross-Ventilation
Your air cooler’s effectiveness lives or dies by its placement—no amount of water can compensate for poor positioning. Place the unit on a solid, level surface that won’t buckle under 30+ pounds of water weight, then measure exactly 3 feet (1 meter) from walls, furniture, and curtains. This gap ensures unobstructed airflow through the rear intake vents where dry air enters. Crucially, never seal the room—evaporative cooling requires fresh air exchange. For true cross-ventilation, position the cooler directly in front of an open window or door. Simultaneously open an exit point (like a window on the opposite side of the room) to create a wind tunnel effect. Hot indoor air gets pushed out while the cooler draws in dry outdoor air, accelerating evaporation. In enclosed spaces, humidity builds rapidly, turning your cooler into a costly fan.
Why Window Placement Doubles Cooling Power
When you align the cooler with an open window, dry external air (below 60% humidity) flows through water-saturated pads. The evaporation process absorbs heat from the air, dropping temperatures by 15–20°F. Without this airflow path, humidity climbs past 70%, crippling cooling capacity. Test your setup: if damp air lingers near the unit after 10 minutes, relocate it closer to an exhaust point.
Avoid These Deadly Placement Mistakes
• Blocking intake vents with curtains or shelves cuts airflow by 50%
• Using in high-humidity zones like bathrooms where evaporation fails
• Ignoring weight limits—wet tanks can crack weak surfaces like plastic tables
Fill and Enhance Your Water Tank for Instant Cooling
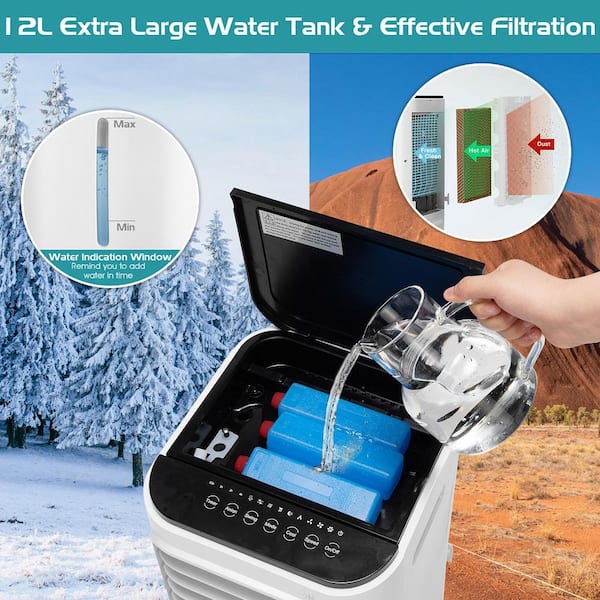
Never skip pre-chilling your water—this single step delivers the deepest temperature plunge. Remove the tank (typically at the rear or side) and fill it with cold tap water up to the MAX fill line. For immediate cooling boosts, add two frozen 16oz water bottles or commercial ice packs. The ice lowers the water’s starting temperature, so evaporation begins colder, producing air up to 20°F below ambient. Avoid loose ice cubes unless your manual explicitly allows them; jagged edges can crack pump housings during operation. If you have hard water, always use distilled or filtered water—mineral deposits from tap water will clog pads within weeks, slashing airflow by 40%.
Ice Strategies That Actually Work
• Pre-frozen bottles: Nestle upright in the tank to avoid pump contact
• Ice packs: Place flat on the water surface for even cooling
• Cold water baseline: Start with refrigerated water for 5–10°F extra drop
Hard Water Damage Prevention
In areas with limescale-heavy water, mineral buildup turns pads into concrete within months. Distilled water reduces descaling by 90% compared to tap water. When refilling, never mix water types—switching between hard and soft water accelerates scaling.
Activate Smart Settings for Targeted Cooling
Plug your unit into a grounded outlet (never use extension cords), then power on. Skip “Cooling Mode” blindly—your settings must match conditions. On dry, scorching days (90°F+), select Turbo Mode with oscillation to push ice-chilled air across the room. Humidity above 50%? Switch to Fan-Only Mode to circulate air without adding moisture. For overnight use, engage Sleep Mode—it reduces pump activity to a whisper while maintaining 65°F airflow. Always set the timer to shut off 30 minutes before you wake; this prevents dampness buildup while saving energy.
Critical Setting Adjustments You’re Missing
• Oscillation angle: Point vents toward seating areas, not walls
• Fan speed: Start on High for 15 minutes, then drop to Medium for steady cooling
• Timer sync: Program shutdown 20 minutes before humidity peaks at noon
Boost Cooling Power with Water Temperature Hacks
Water temperature directly controls your cooler’s output—warmer water means weaker evaporation. Pre-chill water overnight in your fridge for instant 10°F drops at startup. On extreme heat days, combine ice packs with a vinegar rinse: add ½ cup white vinegar to the tank before filling with cold water. The vinegar dissolves early mineral deposits while the ice delivers frosty air. Never pour boiling water into the tank—it warps plastic components. Check water levels hourly in 100°F+ heat; low water triggers automatic shutoffs that interrupt cooling cycles.
Three Water Mistakes That Sabotage Performance
- Using room-temperature water: Cuts cooling capacity by 30%
- Ignoring tank sensors: Low-water alarms mean pads aren’t saturated
- Adding salt or additives: Corrodes pumps and voids warranties
Perform Daily Pad and Pump Maintenance
Rinse cooling pads every 48 hours—this prevents bacterial slime that blocks airflow. With the unit unplugged, remove pads and hose them under lukewarm water until runoff runs clear. Shake out excess water and reinstall while slightly damp. Empty the water tank daily; stagnant water breeds Legionella bacteria within 24 hours. Wipe the tank interior with a vinegar-dampened cloth to stop mold at the source. For pumps, listen for grinding sounds—a sign of mineral clogs. Flush the system monthly: fill the tank with 50% vinegar/50% water, run for 30 minutes, then rinse thoroughly.
Quick-Clean Pad Routine (Under 5 Minutes)
- Power off and unplug the cooler
- Slide out cooling pads (usually behind rear grille)
- Rinse vertically under faucet—never scrub pads
- Shake vigorously to dislodge trapped dust
- Air-dry completely before reinserting
Fix These 4 Water-Related Failures Immediately
Weak airflow almost always means clogged cooling pads—mineral deposits from hard water restrict evaporation. Replace pads annually if using tap water, or every 2 years with distilled water. If the pump hums but no water flows, the intake is blocked: remove the tank, locate the pump filter (usually at the base), and clear debris with a toothpick. Leaking pools under the unit? Tighten the drain plug or replace cracked hoses—never operate with leaks as water damages floors and electronics. When cooling power fades despite full water, run a vinegar descaling cycle; mineral-coated pads won’t absorb water properly.
Emergency Pump Unclogging Protocol
• Unplug unit and remove water tank
• Locate pump (typically at tank base)
• Use tweezers to extract hair/debris from intake screen
• Flush with vinegar solution before reassembly
Store Your Cooler to Prevent Off-Season Damage
End-of-season care prevents 70% of next-year failures. Before storing, drain all water from the tank, pump, and lines. Run the fan on High for 60 minutes without water to dry pads completely—damp pads breed mold in storage. Wipe the tank with a 1:10 bleach-water solution to kill lingering bacteria, then rinse. Store the unit upright in a dry place with pads removed; sealed plastic bins trap moisture and encourage rust. In spring, descale the entire system with vinegar before first use—this removes winter-hardened minerals that reduce cooling by 25%.
Pre-Season Startup Checklist
- Inspect pads for mold—replace if discolored
- Clean tank with vinegar rinse
- Test pump with water before full operation
- Verify all vents swing freely
Using an air cooler with water correctly transforms it from a noisy fan into a precision cooling tool. By positioning for cross-ventilation, pre-chilling water with ice packs, and descaling monthly with vinegar, you’ll achieve 20°F temperature drops even in 100°F heat. Never skip daily tank rinses—this prevents bacterial growth that turns your cooler into a health hazard. When storage season arrives, dry every component thoroughly to avoid moldy surprises next summer. For immediate relief, combine ice packs with distilled water and oscillation mode; you’ll feel the difference within 10 minutes. Ready to conquer the heat? Implement these water-focused steps today and transform your air cooler into an efficient, long-lasting cooling powerhouse.