You’ve replaced your evaporative cooler pump three times this summer, and it’s still failing. That hot, dry air blasting from your unit isn’t just uncomfortable—it’s a sign your pump is starving. Without consistent water flow over the cooling pads, your “swamp cooler” becomes nothing more than an expensive fan. This frustrating cycle of repeated pump burnouts usually stems from an unaddressed root cause, not the pump itself. In this guide, you’ll discover exactly why new pumps fail within weeks and learn a proven repair process that solves the underlying issue—so your cooler delivers reliable, refreshing air all season long.
Most homeowners make the critical mistake of swapping pumps without diagnosing why the first one failed. Mineral scale from hard water, electrical gremlins, or debris clogs destroy even brand-new pumps in days. By the end of this guide, you’ll confidently diagnose electrical faults, eliminate scale buildup, and implement preventive measures that extend pump life by years. Let’s stop the replacement cycle and get your cooler working properly.
Why Your New Evaporative Cooler Pump Fails Within Weeks
Replacing your evaporative cooler pump only to have it burn out again points to one uncomfortable truth: you’re treating the symptom, not the disease. Understanding these specific failure triggers is the only way to break the cycle.
Mineral Scale Buildup Strangling Your Pump
Hard water minerals silently murder pumps by coating critical components. When calcium and magnesium deposits accumulate on the impeller blades or inside the pump housing, the motor labors against increased resistance. You’ll notice this as a humming sound without water movement, followed by a burnt-wire smell. Critical visual cue: Check the pump inlet for gritty, chalky deposits or a stiff impeller that won’t spin freely by hand. Scale buildup is the #1 cause of repeat failures in regions with hard water—don’t skip descaling before installing a new pump.
Electrical Gremlins Sabotaging Your Pump
A pump that dies instantly or lasts only days often has voltage issues. An under-voltage supply (below 110V for standard 120V pumps) forces the motor to overwork, while intermittent power from a faulty relay or loose connection creates damaging surges. Pro diagnostic move: Use a multimeter to test voltage while the pump is running. Fluctuations beyond ±5V or readings below 105V will cook new pumps rapidly. Look for corroded wire nuts at the pump connection—green oxidation indicates resistance that generates deadly heat.
Debris Starving Your Pump of Water
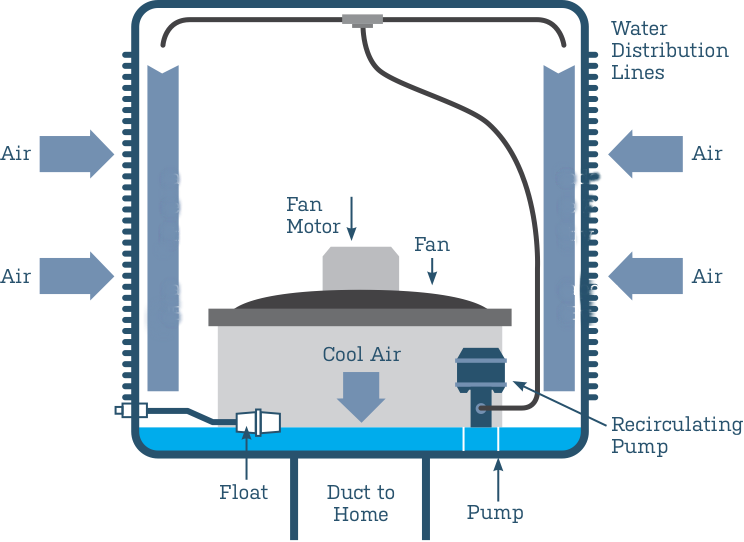
A clogged inlet screen or reservoir sediment turns your pump into a dry-running disaster. Without water for cooling and lubrication, the motor overheats in under 60 seconds. This explains why you might see clear water in the reservoir but no flow to the pads—the pump inlet is blocked. Check this first: Remove the pump and inspect the bottom screen. If it’s packed with algae, sand, or pad fibers (common after winter storage), no new pump will survive. Never reinstall a pump without verifying unobstructed water intake.
Essential Pre-Repair Safety and System Checks

Before touching a single tool, kill power at the circuit breaker. Evaporative coolers combine high-voltage electricity and standing water—a lethal mix if mishandled. Confirm power is off using a non-contact voltage tester at the pump wires. One shortcut here risks electrocution; this step is non-negotiable.
Gather These Critical Tools
- Replacement pump (match voltage exactly—115V vs. 230V)
- 1:1 white vinegar/water solution (for descaling)
- Multimeter (to test voltage and continuity)
- Needle-nose pliers (for debris removal)
- Bucket/towels (for water spillage)
- New wire nuts (if connections show corrosion)
Verify Water Supply Integrity
A malfunctioning float valve is the silent killer behind 40% of repeat pump failures. With power OFF, manually lift the float arm. Water should stop filling immediately. If it overflows, mineral deposits are jamming the valve—clean it with vinegar or replace it. Time-saving tip: Run your cooler for 10 minutes with the reservoir cover off. If water level drops below the pump inlet, address the fill system before pump replacement.
Step-by-Step Pump Diagnostic and Repair Protocol
Follow this sequence to identify and eliminate the root cause—not just install another doomed pump.
Clean the Entire Water Path Before Power-On
Why this comes first: Installing a new pump into a dirty system guarantees repeat failure. Allocate 30 minutes for this critical step:
1. Drain the reservoir completely using a shop vac or siphon pump
2. Scrub the sump with a stiff brush and vinegar solution to remove algae/slime
3. Remove and soak the pump inlet screen in vinegar for 15 minutes
4. Flush distribution tubes by disconnecting them and running vinegar through the lines
5. Replace the water filter (if equipped) with a new one
Pro tip: Pour 2 cups of vinegar into the dry reservoir, reinstall the pump temporarily, and run the unit for 10 minutes to descale internal passages. Drain and rinse thoroughly before final reassembly.
Test Electrical Supply Like a Pro
Voltage test procedure (with power ON at breaker):
1. Set multimeter to AC voltage (200V range)
2. Insert probes into pump wire nuts (black to black, white to white)
3. Turn cooler to “pump only” mode
4. Critical threshold: Readings must stay between 110V-125V. Below 108V? Call an electrician—your circuit is overloaded.
Connection inspection:
– Disconnect power and inspect wire nuts. Green corrosion? Cut back wires and use new connectors.
– Check the pump relay for burnt contacts (pitted metal surfaces). Replace if damaged.
Repair or Replace the Pump Based on Findings
If the impeller spins freely and voltage is stable:
1. Install the new pump with dielectric grease on terminals
2. Ensure inlet tube is debris-free and submerged
3. Fill reservoir to 1-inch above pump inlet
If the impeller was seized (but voltage is good):
1. Soak the old pump in vinegar for 24 hours to dissolve scale
2. Manually rotate the impeller daily during soak
3. If it spins freely after soaking, reinstall—it may recover
Never reinstall a pump that smells burnt or shows melted windings. These indicate permanent electrical damage requiring replacement.
Prevent Repeat Failures With These Maintenance Tactics

A properly maintained evaporative cooler pump should last 3-5 years. Implement these habits to avoid annual replacements.
Hard Water Defense System
- Install an inline sediment filter ($15) on the water supply line
- Add a water softener tablet to the reservoir monthly during peak season
- Flush the system with vinegar every 4-6 weeks in hard water areas
Seasonal Shutdown Protocol
- Drain all water from the reservoir and lines
- Remove and clean the pump inlet screen
- Store the pump indoors (prevents freeze damage)
- Cover the unit to keep out rodents and debris
Critical mistake to avoid: Never leave water sitting in the cooler during storage. Stagnant water breeds algae that clogs systems before summer even starts.
When to Call an HVAC Professional Immediately
Stop DIY repairs if you encounter:
– Voltage readings below 105V or above 125V at the pump
– Burnt wiring in the control panel (not just at the pump)
– A pump that fails within 48 hours of a verified clean installation
– Uncertainty about electrical safety procedures
Cost reality check: Professional diagnosis typically costs $75-$150—less than three failed pumps. An HVAC tech can identify relay failures, capacitor issues, or circuit problems invisible to homeowners.
Replacing your evaporative cooler pump repeatedly is a costly symptom of deeper system issues. By methodically addressing mineral scale, electrical faults, and water starvation points before installing new hardware, you’ll achieve a permanent fix. Start with a full system descaling, verify stable voltage, and ensure unobstructed water flow—these three steps resolve 90% of chronic pump failures. Implement seasonal maintenance using vinegar flushes and inline filters to extend pump life dramatically. When done correctly, your evaporative cooler will deliver efficient, cool air for years without another unexpected shutdown. If electrical issues persist after these steps, call a professional—your safety and long-term savings depend on it.