Your swamp cooler suddenly turns into a leaky mess overnight, flooding your patio or garage floor with murky water. That constant gurgling sound means your float valve has failed – the most common culprit behind swamp cooler overflow disasters. This critical component regulates water levels, and when it sticks open, you’re wasting hundreds of gallons while risking electrical hazards and structural damage. Ignoring this issue guarantees higher water bills and potential mold growth from persistent leaks. But here’s the good news: replacing a float valve is a straightforward DIY fix that takes under 30 minutes with basic tools. By the end of this guide, you’ll confidently diagnose valve failure, install a new unit, and prevent future headaches – saving you $150+ in service calls.
Most homeowners discover float valve problems when they find puddles around their cooler or hear non-stop water flow. Unlike complex HVAC repairs, this fix requires no special certifications. You’ll work with simple mechanical parts that haven’t changed in decades, making universal replacement valves compatible with 95% of residential swamp coolers. Before we begin, ensure you’ve turned off both the water supply and electrical power – water and electricity are a dangerous mix near these units. Let’s get your cooler running efficiently again.
Why Your Swamp Cooler Float Valve Fails and How to Spot It
Swamp cooler float valves fail primarily due to mineral buildup from hard water, causing three distinct problems that demand immediate attention. Understanding these failure modes helps you confirm the valve is the true culprit before starting repairs.
Constant Water Running? Here’s Why It Happens
When water never stops flowing into your reservoir, the float valve can’t seal properly. This usually occurs because mineral deposits jam the valve seat or the float arm gets stuck in the “open” position. You’ll notice continuous overflow from the drain pipe even when the cooler is off. Critical warning: If left unaddressed, this can dump 50+ gallons hourly onto your roof or foundation. Check if the float ball moves freely – if it’s waterlogged or coated in white scale, replacement is unavoidable.
Intermittent or No Water Flow: Common Causes
If your cooler runs dry despite water supply, the valve may be stuck closed. Hard water crystals often clog the inlet orifice, while a corroded float arm prevents downward movement. Try gently jiggling the float – if water suddenly flows, mineral deposits are blocking the mechanism. Never force the arm; this usually bends it permanently. For coolers in hard water areas, this failure mode indicates you need both valve replacement and an inline filter installation.
Visible Leaks from the Valve Body: What It Means
Drips around the valve housing signal worn internal seals or cracked plastic components. Unlike overflow issues, these leaks originate directly from the valve assembly rather than drain pipes. Place a dry towel under the unit – if it’s soaked within minutes, the valve body is compromised. This often happens after winter freezes when trapped water expands and cracks the housing. If you spot milky residue around connections, that’s dissolved minerals forcing their way out through failing seals.
Essential Safety Steps Before Replacing Your Swamp Cooler Float Valve
Skipping these preparations risks electrical shock or flooding your home – take 5 minutes to do this right before touching any tools.
Power and Water Shutdown Protocol
Immediately turn off the swamp cooler at both locations: First, flip the unit’s dedicated circuit breaker (not just the wall switch). Second, locate the inline water shutoff valve – usually a small quarter-turn ball valve on the 1/4″ copper or plastic supply line near the cooler. Turn it clockwise until fully closed. Pro tip: Place colored tape on this valve after repair so you never waste time hunting for it during future emergencies. Verify water is off by briefly opening the cooler’s drain plug – only residual water should drip out.
Tools and Parts Checklist for Float Valve Replacement
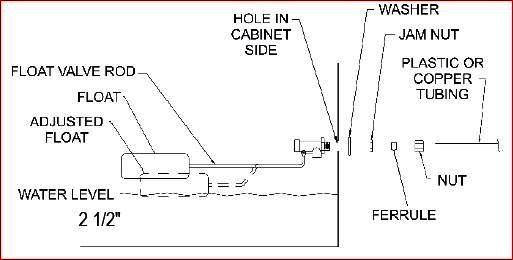
Gather these items before starting: Channel-lock pliers (for stubborn plastic nuts), adjustable wrench (for copper lines), replacement float valve kit (universal models like Mastercool 35770 fit most coolers), Teflon tape, bucket, and microfiber towels. Critical note: Match your old valve’s thread size – most residential units use 1/2″ NPT threads. If your cooler has a plastic supply line, keep a spare compression fitting on hand in case the nut cracks during removal. Never reuse old rubber washers; they lose elasticity and guarantee future leaks.
Draining Your Swamp Cooler and Removing the Faulty Float Valve
Working on a dry reservoir prevents slips and tool damage while giving you clear visibility of components.
Completely Emptying the Reservoir Pan
Position a 5-gallon bucket under the main drain valve (typically at the pan’s lowest point). Open the valve fully and let water drain – this takes 5-10 minutes for standard 20-30 gallon reservoirs. Expert shortcut: Remove the drain plug if accessible for faster emptying. Use shop towels to soak residual water, especially around the valve base where scale accumulates. For stubborn mineral deposits, scrub the pan with a vinegar-water solution (1:1 ratio) before proceeding – this prevents debris from jamming your new valve.
Disconnecting the Water Supply Line Safely
Place folded towels under the valve connection point to catch drips. Grip the valve’s inlet fitting firmly with your wrench while loosening the supply line nut with channel-locks – this prevents twisting stress on internal parts. Common mistake: Turning both pieces simultaneously, which strips threads. If the line is plastic, apply gentle pressure until you feel resistance before applying full force. Once disconnected, cap the supply line end with a spare nut to prevent accidental spraying later.
Extracting the Old Float Valve Assembly
Locate the large plastic retaining nut securing the valve to the reservoir wall (usually 1-1.5″ diameter). Hold the valve body steady inside the pan while unscrewing this nut counterclockwise from outside. Warning: If the nut spins without loosening, the valve body is rotating internally – insert a screwdriver through the float arm hole to lock it in place. After removal, inspect the mounting hole for cracks; hairline fractures mean you’ll need epoxy repair before installing the new valve. Discard all old washers and O-rings – reusing them causes 70% of “new valve” leaks.
Installing a New Float Valve: A Step-by-Step Walkthrough
Precision installation prevents the most common post-repair failures – take time to seal threads properly and avoid overtightening.
Preparing the New Valve for Installation
Wrap Teflon tape clockwise around the valve’s male threads (3-4 full revolutions), stretching it slightly as you wind for maximum compression. Key detail: For plastic valves, apply pipe sealant paste instead – tape can tear during installation. Ensure the float arm moves freely through its full range before insertion. If your kit includes a rubber gasket, lubricate it with petroleum jelly to prevent pinching during tightening.
Securing the Valve in the Reservoir Wall
Insert the valve from inside the pan, threading the retaining nut onto the shank from outside. Hand-tighten until the gasket compresses, then give exactly 1/4 turn with pliers. Critical check: The valve must sit perpendicular to the pan wall – any tilt causes binding. If your cooler has an overflow tube port, align it downward before final tightening. Over-tightening cracks plastic pans instantly; stop when resistance increases noticeably.
Reconnecting Water Lines and Overflow Tubes
Reattach the supply line to the valve inlet, hand-tightening the nut before giving one firm quarter-turn with pliers. For copper lines, replace the ferrule if dented. Secure the overflow tube (if equipped) by pushing it fully onto the valve’s secondary port until it clicks. Pro verification: Blow through the overflow tube – you should feel air resistance when the float is raised, confirming proper internal valve function.
Adjusting and Testing Your New Swamp Cooler Float Valve
Skipping these tests guarantees callbacks – validate performance before declaring the job done.
Setting the Correct Water Level with Float Arm Bending
Slowly open the water supply while watching the reservoir. When flow stops, measure the water level – it should be 1.5 inches below the pan’s top edge. Adjustment technique: With water off, bend the metal float arm upward in 5-degree increments to raise the level (for insufficient fill) or downward to lower it (for overflow risk). Never bend near the pivot point – stress fractures cause sudden failures. Re-test after each adjustment until the valve shuts off precisely at the target level.
Checking for Leaks and Valve Shut-Off Performance
With water running, inspect three critical zones: the valve-body-to-pan seal, supply line connection, and overflow tube joint. Place dry paper towels under each point – any dampness means re-tightening. Troubleshooting tip: If water trickles after shut-off, the valve seat is dirty – disassemble and rinse the internal plunger with vinegar. Persistent leaks mean the replacement valve is defective; swap it immediately rather than chasing false fixes.
Running a Full Operational Test
Power up the cooler and let it run for 20 minutes. The float should cycle 2-3 times as water evaporates. Final validation: Turn off the unit and wait 30 minutes – the water level should remain stable with zero overflow. If the pump struggles to start, the level is too low; if overflow resumes, the arm needs further downward adjustment. Only when both static and dynamic tests pass is your repair complete.
Preventing Future Float Valve Failures: Maintenance Tips
A $10 valve replacement becomes unnecessary if you implement these simple preventative measures.
Annual Cleaning to Avoid Mineral Buildup
Drain and scrub your reservoir every spring using a shop vac and nylon brush. Pro method: Fill the pan with 2 gallons of white vinegar, run the pump for 15 minutes, then rinse thoroughly. This dissolves scale before it jams valves. Replace the float annually if you have hard water – it’s the cheapest insurance against summer breakdowns.
Winterizing Your Swamp Cooler in Freezing Climates
Before first frost, disconnect the water supply line and blow compressed air through all fittings to remove trapped moisture. Critical step: Tilt the cooler backward to drain residual water from the valve housing – frozen water expands and cracks plastic housings instantly. Store the float assembly indoors if temperatures drop below 20°F.
When to Replace Internal Valve Seals Instead of the Whole Unit
For minor leaks after installation, disassemble the valve and replace the rubber washer (usually included in kits). Shortcut: Soak the old washer in hot water for 5 minutes to restore elasticity if replacement parts are unavailable. However, if the valve body shows cracks or the float is damaged, full replacement is mandatory – temporary fixes fail catastrophically.
Replacing a swamp cooler float valve transforms a water-wasting disaster into reliable cooling with minimal effort. By following these steps, you’ve not only fixed today’s leak but also gained the confidence to handle future maintenance. Remember: Annual reservoir cleaning and float inspections prevent 90% of failures, especially in hard water areas. Keep that replacement valve kit in your garage – with these skills, you’ll never pay for emergency service calls again. Your cooler, wallet, and patio will thank you all summer long.