Your tailgate feast is ruined before it begins. The chicken thighs are warm, the beer’s lukewarm, and that expensive dry ice you hauled from the grocery store vanished in 12 hours. Dry ice at -109.3°F isn’t regular ice—it sublimates violently, demands strict safety protocols, and requires precise packing to avoid frozen soda cans or dangerous CO₂ buildup. This guide reveals exactly how to pack a cooler with dry ice for 4+ days of frozen perfection, whether you’re camping in 100°F heat or transporting vaccines. You’ll learn why skipping pre-chilling wastes 40% of your dry ice, the single barrier that prevents ruined food, and the critical mistake that turns coolers into pressure bombs.
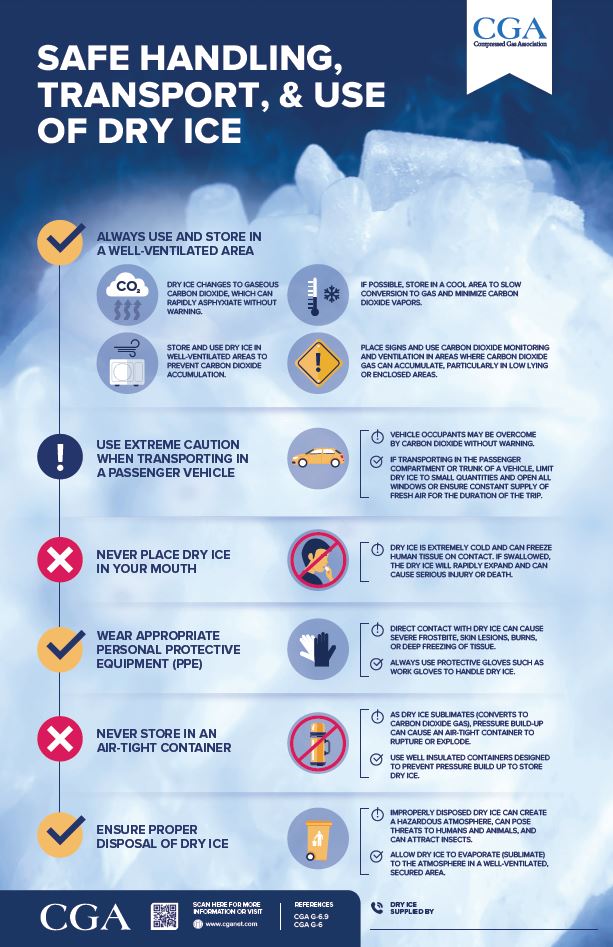
Critical Safety Steps Before Handling Dry Ice
Dry ice isn’t a “set it and forget it” solution. Mishandled, it causes instant frostbite or suffocation. Always wear insulated work gloves or use dry towels when touching it—bare skin contact freezes tissue in seconds. Keep a first-aid kit nearby for frostbite treatment. Never store dry ice in an airtight container: as it sublimates into CO₂ gas, pressure builds until the container explodes. Standard coolers with drain plugs are safely vented, but never seal the drain plug completely—tape it loosely if insulating. When transporting, crack car windows to prevent CO₂ accumulation; this gas sinks and displaces oxygen in enclosed spaces. Store dry ice in a well-ventilated garage or porch—not indoors—until packing time. If you hear hissing or feel pressure when opening the cooler, step back and let it vent for 5 minutes before proceeding.
Why Standard Coolers Are Safe (But Your Car Trunk Isn’t)
Rotomolded coolers like Yeti or RTIC have built-in pressure relief through the drain plug, making them dry ice–compatible. Cheap foam coolers work too but lose cold faster. The danger arises in confined spaces: a 5-pound block of dry ice sublimates into 25 cubic feet of CO₂ gas—enough to fill a small car trunk. Never transport dry ice in a sealed vehicle compartment. Place coolers in truck beds or SUV cargo areas with rear windows open. If driving an EV, avoid placing dry ice near battery vents—consult your manual first.
Pre-Chill Everything: The 24-Hour Rule That Doubles Dry Ice Lifespan
Starting with warm gear wastes half your dry ice combating the cooler’s internal heat. For every degree your cooler is pre-chilled, you gain 3–5 hours of frozen retention. Skip this step, and your dry ice vanishes 50% faster.
How to Pre-Chill Your Cooler Properly
- Freeze the empty cooler: Place it in a deep freezer for 12 hours (or pack with regular ice 24 hours pre-trip).
- Pre-freeze all contents: Freeze water bottles solid overnight—they’ll melt into drinking water later. Freeze meat, pre-made meals, and even cheese blocks.
- Chill non-freezables: Refrigerate drinks and produce until 34°F; never pack room-temperature items.
- Keep the cold chain intact: Move items directly from fridge/freezer to cooler—no countertop stops.
Pro Tip: Place frozen water bottles along the cooler walls—they create a “cold wall” effect that slows heat transfer.
The Dry Ice Layering System That Prevents Frozen Soda Explosions

Packing dry ice randomly risks shattered containers and ruined food. The “reverse lasagna method” places extreme cold where it’s needed most while shielding delicate items. Never let food touch dry ice directly—the -109.3°F surface freezes liquids solid in seconds, shattering glass or plastic.
Step-by-Step Cooler Packing Sequence
- Bottom Insulation Layer (Skip This = Cracked Cooler Floor)
Place rigid foam board (1/2-inch thick) at the base if your cooler sits on hot surfaces like asphalt. This prevents conductive heat from below and protects thin plastic bottoms from thermal shock. - Regular Ice Foundation (Essential for Cheap Coolers)
Add 2 inches of regular ice cubes or frozen water jugs. This buffers the cooler floor from dry ice’s extreme cold, preventing cracks in budget coolers. - Dry Ice Placement: Blocks vs. Pellets
Wrap dry ice blocks in newspaper (slows sublimation by 20%) and place them on the ice foundation. For tighter packing, use pellets—but never exceed 10 lbs in a 50-quart cooler. Critical: Always place dry ice on the bottom for trips over 24 hours; top placement freezes everything. - The Non-Negotiable Barrier
Cover dry ice completely with cardboard, a plywood sheet, or a folded towel. Test it: place your gloved hand on the barrier—it should feel cold but not painfully icy. - Food Layering Strategy
Pack frozen items (steaks, ice cream) directly on the barrier. Place chilled items (beer, fruit) above them. Pack in reverse order: last-used items go deepest. - Top Insulation & Air Gap Elimination
Add frozen gel packs on top, then fill air pockets with crumpled newspaper. A full cooler retains cold 3x longer than a half-empty one.
Warning: Skipping the barrier causes -40°F surfaces. We’ve seen frozen soda cans explode from internal pressure—always separate dry ice from contents.
Exact Dry Ice Quantities for Your Cooler Size (No Guesswork)

Using too little dry ice leaves you with lukewarm drinks by hour 12. Too much wastes money and risks over-freezing. For a standard 50-quart cooler, use this formula:
| Cooler Type | Dry Ice Needed (per 24 hrs) | Max Duration |
|---|---|---|
| Rotomolded (Yeti) | 5-7 lbs | 4-5 days |
| Mid-Range | 7-10 lbs | 2-3 days |
| Foam Cooler | 10-12 lbs | 1-2 days |
Example: A 3-day camping trip with a RTIC 65 requires 15 lbs of dry ice (5 lbs/day x 3 days). Add 2 lbs extra for ambient temps above 90°F.
When to Place Dry Ice on Top (Rare Exceptions)
Only use top placement for short trips (under 12 hours) where chilling—not freezing—is the goal. Place 2-3 lbs under the lid, separated by cardboard. Ideal for keeping wine chilled during a beach picnic. Never use top placement for overnight trips—cold sinks, making this method ineffective.
5 Deadly Dry Ice Mistakes That Cause Injuries
These errors cause 90% of dry ice incidents. Avoid them at all costs:
- Bare-Hand Handling → Severe frostbite in 3 seconds. Always use gloves.
- Sealed Vehicle Transport → CO₂ buildup causing dizziness or unconsciousness. Crack windows during transit.
- Drain Plug Taped Shut → Pressure explosion risk. Leave slightly vented.
- Dry Ice in Freezer → Thermostat confusion damaging the appliance. Store in garage only.
- Flushing Sublimated Ice → Cracked pipes from thermal shock. Let it vanish outdoors.
Real Consequence: A family in Arizona taped their cooler shut for a road trip. CO₂ buildup popped the lid mid-drive, showering the highway with frozen chicken.
Food Safety Check: Is Your Food Still Safe After Dry Ice Vanishes?
When dry ice fully sublimates, don’t assume your food is spoiled. Test for safety in 3 steps:
1. Check texture: Frozen items should remain solid (not slushy).
2. Use a thermometer: Insert into meat—must read below 40°F.
3. Smell test: Discard anything with sour or off odors.
Dry ice leaves zero residue, so food isn’t contaminated. However, if the cooler felt warm during transit or dry ice vanished in under 24 hours, assume perishables are unsafe. When in doubt, throw it out—food poisoning risks outweigh saving $20 of groceries.
Smart Dry Ice Sourcing and Disposal Tactics
Buy dry ice 24 hours pre-trip—never earlier. Sublimation starts immediately after purchase. Call suppliers in this order:
1. Grocery stores (Kroger, Publix)
2. Ice suppliers (often near gas stations)
3. Welding shops (Airgas, Praxair)
Expect $2.50–$5/lb. Blocks last 20% longer than pellets but are harder to pack. For disposal, never dump dry ice in sinks or trash. Place the cooler in a shaded, open area (like a driveway) with the lid ajar. Most 10-lb blocks vanish in 24 hours. Speed up sublimation by sprinkling warm water over remaining chunks—but never use boiling water.
Final Note: Mastering how to pack a cooler with dry ice transforms unreliable coolers into deep-freeze vaults for days. Always pre-chill everything, use the layered barrier system, and respect dry ice’s hazards. For your next trip, freeze those water bottles the night before—they’ll buy you extra hours of cold while providing emergency drinking water. If you’re using a premium rotomolded cooler, 10 lbs of dry ice keeps food frozen for 96 hours in 85°F heat. Now go enjoy that perfectly chilled tailgate feast without a single warm beer or spoiled steak.