Tired of sky-high electricity bills every summer but still sweating through the heat? Learning how to make a swamp cooler delivers an energy-efficient solution that can drop indoor temperatures by 15-30°F in dry climates. Unlike traditional air conditioning that uses refrigerants and consumes massive energy, evaporative coolers harness water’s natural cooling power through evaporation—slashing your cooling costs by up to 80%. This guide walks you through exactly how to make a swamp cooler that effectively cools spaces up to 700 square feet using affordable, readily available materials. You’ll discover why this DIY project pays for itself in just one summer while providing reliable comfort when humidity stays below 60%.
Selecting the Right Materials for Your DIY Swamp Cooler

Choosing Your Cooling Media Based on Climate
Your swamp cooler’s efficiency depends heavily on selecting appropriate cooling media for your local humidity levels. In extremely dry conditions (below 30% humidity), basic aspen pads provide 60-70% efficiency at minimal cost—perfect for desert regions where you can expect 25-30°F temperature drops. For areas with moderate dryness (30-50% humidity), upgrade to 6-inch cellulose rigid pads delivering 85-90% efficiency and 15-20°F cooling. Avoid swamp coolers entirely if your humidity regularly exceeds 60%, as they’ll provide less than 5°F of relief. Measure your local wet-bulb temperature with a psychrometer to determine your maximum possible cooling potential before starting your project.
Essential Components Checklist
Gather these critical components before beginning your swamp cooler construction:
– Water reservoir: A 20-40 gallon plastic storage tote ($15-$30)
– Cooling pads: Aspen pads (2″ thick, $25) or cellulose rigid media (6″ thick, $45)
– Fan system: 1500-3000 CFM axial fan ($40-$80 depending on size)
– Water pump: 100-200 GPH submersible pump ($20-$35)
– Distribution system: 1/2″ PVC pipe with 1/16″ holes every 1.5″ ($10)
– Electrical components: GFCI-protected power strip, waterproof wiring ($25)
Skip expensive commercial units that cost $300-$800 when you can build an equally effective DIY swamp cooler for under $150. Pro tip: Repurpose an old plastic storage container as your housing frame to save both money and construction time.
Building Your Swamp Cooler Housing Frame
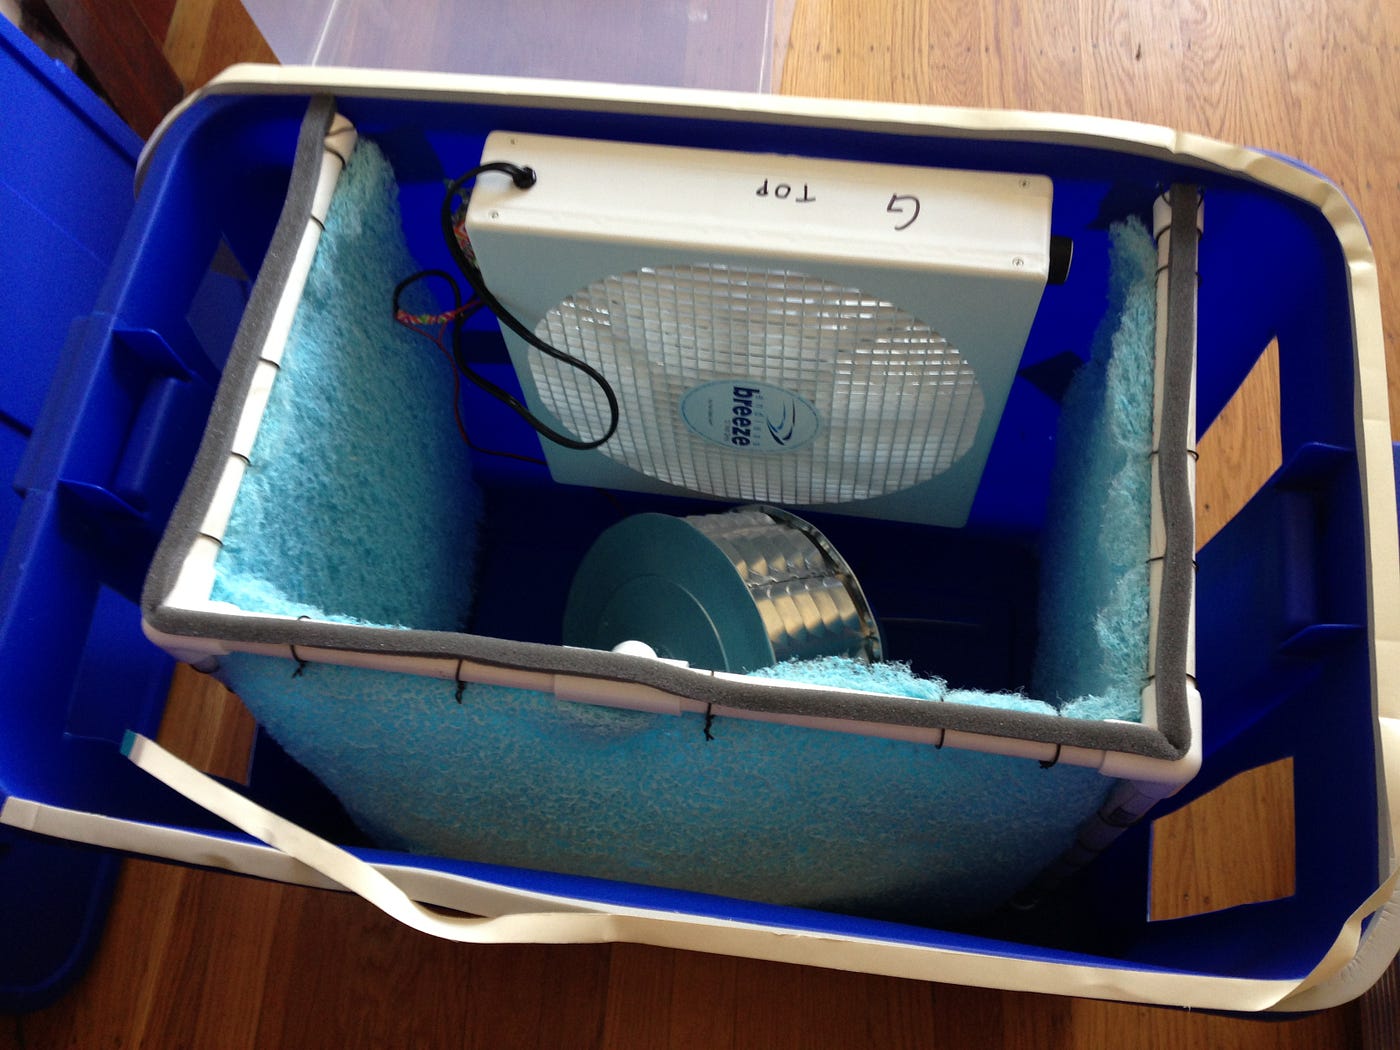
Constructing a Watertight Reservoir
Start by modifying your plastic storage tote to serve as both housing and water reservoir. Cut a rectangular opening on one side (approximately 80% of the tote’s height) where you’ll later install the cooling media. Drill a 3/4″ overflow hole near the top edge of the tote and install a PVC drain fitting with silicone sealant. Position your submersible pump on a small platform 1-2 inches above the tote’s bottom to prevent sediment intake. Test for leaks by filling with water before proceeding—fix any seepage with marine-grade silicone caulk. This reservoir must hold 5-15 gallons of water depending on your cooler size, with 2-3″ of standing water maintained by your float system.
Creating the Media Support Structure
Build a simple frame to hold your cooling pads securely in place using 1×2 lumber or PVC pipe. For cross-draft airflow (most efficient for DIY), construct a rectangular frame that fits snugly into your tote’s opening. Wrap hardware cloth around the frame to prevent pad sagging when wet. Leave a 1/2″ gap between the media and tote walls to allow even water distribution. If using rigid cellulose pads, cut them precisely to size with a utility knife—measure twice to avoid gaps where hot air could bypass the cooling media. Your media should occupy 80-90% of the intake area for maximum efficiency.
Installing the Water Distribution System
:max_bytes(150000):strip_icc()/parts-of-a-swamp-cooler-2718628-a477e6f0787b4f8bb62ddf2def31d495.png)
Setting Up the Pump and Tubing
Connect your submersible pump to 1/2″ flexible tubing that runs vertically along the inside of your housing. Secure the tubing with zip ties every 6 inches to prevent movement. At the top, attach a horizontal distribution pipe across the width of your cooling media. Drill 1/16″ holes every 1.5″ along the bottom of this pipe to create even water flow. Test your system before final assembly: fill the reservoir, power the pump, and verify water trickles evenly down the entire media surface. Adjust hole spacing if you notice dry spots—uneven saturation reduces cooling efficiency by up to 40%.
Adding Automatic Water Management
Prevent constant manual refilling by installing a simple float valve system. Mount a toilet tank float valve assembly to maintain 2-3″ of water in your reservoir. Connect the valve’s inlet to a garden hose adapter with a backflow preventer for continuous operation. Add a secondary overflow drain line sloped at 1/4″ per foot to handle excess water during heavy evaporation. For maintenance-free operation in dry climates, add 1/4 cup of bleach per 5 gallons of water monthly to prevent algae growth without damaging components.
Mounting the Fan for Maximum Airflow
Positioning Your Fan Correctly
Install your fan on the side opposite your cooling media, ensuring it blows air INTO your space (not exhausting outward). This creates negative pressure that pulls hot air through the wet pads. Seal all gaps around the fan housing with foam weatherstripping—any air bypassing the cooling media reduces effectiveness by up to 30%. For optimal performance in rooms up to 500 square feet, use a 1500 CFM fan; scale up to 3000 CFM for spaces up to 700 square feet. Never position your swamp cooler in direct sunlight, as this heats the housing and reduces cooling capacity by 15-20%.
Electrical Safety Setup
Connect both fan and pump to a single GFCI-protected power strip—this is non-negotiable for water-based cooling systems. Run wiring through waterproof conduit where it exits the housing. Install an inline switch for easy operation, but always unplug during maintenance. Position electrical components at least 6 inches above the maximum water level to prevent accidental submersion. For solar-powered operation (ideal for off-grid cooling), add a 12V DC fan and pump connected to a 100-watt solar panel with battery backup.
Testing and Optimizing Your Finished Swamp Cooler
Initial Performance Check
Fill your reservoir, power on both pump and fan, and wait 15 minutes for full media saturation. Measure inlet and outlet temperatures with a digital thermometer—you should see at least a 15°F drop in dry conditions. If cooling is insufficient, check for these common issues:
– Dry spots on cooling media (adjust water distribution holes)
– Air leaks around fan housing (reapply weatherstripping)
– Insufficient pad saturation (increase pump flow rate)
– Media thickness too small (minimum 2″ required)
Maximizing Season-Long Efficiency
For best results, operate your swamp cooler during peak heat (10 AM-6 PM) with windows open on the opposite side of your house to create cross-ventilation. Monitor indoor humidity with a hygrometer—keep it below 60% for comfort. In extremely dry conditions, add ice to your reservoir for an extra 5-8°F cooling boost. During mild evenings, switch to fan-only mode by turning off the pump to circulate fresh air without adding moisture.
Troubleshooting Common Swamp Cooler Problems
Addressing Reduced Cooling Performance
If your DIY swamp cooler stops delivering adequate cooling, first check water levels and pump operation. Mineral buildup on pads is the #1 cause of efficiency loss—flush with a 10:1 water-vinegar solution monthly. Replace aspen pads annually; cellulose pads last 5-10 years but may need cleaning. If airflow feels weak, clean fan blades and check for obstructions in the media. Remember: swamp coolers work best when outdoor humidity stays below 50%—if your local conditions change, consider supplemental dehumidification.
Preventing Water Leaks and Damage
Water damage ruins more DIY swamp coolers than any other issue. Double-check all reservoir seams before first use. Place your unit on a waterproof tray with drainage, especially if installed indoors. During operation, verify no water drips from the media—this indicates oversaturation or clogged drainage. Empty and clean your reservoir weekly during heavy use to prevent stagnant water and mineral deposits. In freezing climates, completely drain and store your swamp cooler indoors during winter to prevent cracked components.
Maintaining Your Swamp Cooler for Years of Service
Perform these simple maintenance tasks to keep your DIY swamp cooler running efficiently:
– Daily: Check water levels and pump operation
– Weekly: Clean drain pan and inspect media for dry spots
– Monthly: Flush system with vinegar solution, check float valve
– Seasonally: Replace pads if using aspen; deep clean cellulose media
Before storing for winter, completely drain all water, clean components with mild detergent, and let everything dry thoroughly. Store pads in a sealed plastic bag to prevent dust accumulation. Lubricate fan bearings with silicone-based lubricant annually. With proper care, your DIY swamp cooler will provide reliable, economical cooling for 5-10 years—making it one of the smartest home cooling investments you’ll ever make.
Final Note: This DIY swamp cooler delivers remarkable cooling power where humidity stays low, with energy consumption just 10-25% of conventional air conditioning. By following these construction steps precisely, you’ve created a custom cooling solution perfectly matched to your space and climate. Enjoy significantly lower temperatures and even lower electricity bills all summer long!