That unexpected silence from your swamp cooler followed by a complete lack of cool air is a frustrating sign no homeowner wants to see. An evaporative cooler motor repair becomes urgent when your reliable cooling system suddenly stops working, leaving you with hot, stale air during peak summer temperatures. When your unit hums but the fan won’t spin, or you hear nothing at all when turning it on, you’re likely facing a motor failure that requires immediate attention. This comprehensive evaporative cooler motor repair guide will help you diagnose common issues, replace faulty components, and get your cooling system back online—potentially saving you hundreds of dollars in service fees while avoiding the discomfort of a broken system.
Before you reach for your tools, understand that evaporative cooler motor repair isn’t just about comfort—it’s about preventing further damage. A motor that’s struggling or seized can cause additional problems with belts, pulleys, and electrical components, leading to more expensive repairs down the line. By addressing motor issues promptly with the right approach, you can extend your cooler’s lifespan and maintain efficient operation throughout the hot season. This guide covers everything from initial diagnosis to final testing, ensuring you have the knowledge to tackle your evaporative cooler motor repair with confidence.
Why Your Swamp Cooler Motor Suddenly Stops Working
When your evaporative cooler motor fails, it’s rarely random—most problems develop from specific causes that you can identify and address. The most common culprits include worn bearings that create excessive friction, electrical failures from moisture exposure, or belt issues that strain the motor beyond its capacity. Many homeowners mistakenly assume a complete motor replacement is necessary when the problem might be as simple as a seized pulley or faulty capacitor. Understanding these failure points helps you determine whether you’re facing a quick fix or a full evaporative cooler motor repair job.
How to Confirm Your Motor Has Failed
Before diving into disassembly, perform these critical checks to verify the motor is actually the problem. With the unit unplugged, try spinning the fan blade manually—if it moves stiffly or not at all, you likely have a seized motor bearing or physical obstruction. Check for obvious signs of damage like burnt wiring smells, visible scorch marks on the motor housing, or oil leaks around the shaft. Listen carefully when powering on: a humming sound without movement typically indicates a failed start capacitor, while complete silence could mean a tripped overload switch or broken power connection. These diagnostic steps prevent unnecessary work on other components when the motor is functioning properly.
Common Warning Signs Before Complete Failure
Your evaporative cooler motor often sends distress signals before completely failing. Pay attention to unusual noises like grinding, squealing, or rattling that indicate bearing wear or misalignment. Notice if the motor takes longer to start or cycles on and off frequently—this suggests overheating from excessive strain. Reduced airflow despite proper water levels often points to a weakening motor that can’t maintain proper fan speed. If you detect a burning electrical smell or see discoloration on the motor housing, these are urgent warning signs requiring immediate shutdown and inspection. Catching these symptoms early can transform what would become a major evaporative cooler motor repair into a simple maintenance task.
Essential Safety Precautions for Motor Work
Why Electrical Safety Can’t Be Overlooked
Working on evaporative cooler motors involves serious electrical hazards that demand your full attention. These units operate on 120V or 240V household current—enough to cause severe injury or death if mishandled. The damp environment around swamp coolers increases electrical risk significantly, as moisture reduces your body’s resistance to shock. Never assume the power is off based solely on the unit’s switch position; always verify at the circuit breaker and test connections with a reliable voltage tester. Skipping these safety steps might save minutes now but could cost you everything—treat every wire as live until proven otherwise with proper testing equipment.
Step-by-Step Power Shutdown Procedure
Follow this exact sequence to ensure your safety during evaporative cooler motor repair. First, locate and turn off the dedicated circuit breaker—don’t rely on the unit’s on/off switch as it may only interrupt one conductor. Use a non-contact voltage tester on the unit’s power cord to confirm no current is present. For absolute certainty, use a multimeter to test between all wire connections and ground. Only after verifying zero voltage should you proceed to remove panels or access components. Keep your voltage tester within easy reach throughout the repair process to recheck connections before touching any wires. This disciplined approach to electrical safety prevents the most common—and dangerous—mistakes during DIY evaporative cooler motor repair.
Diagnosing the Exact Motor Problem
Testing the Start Capacitor with a Multimeter
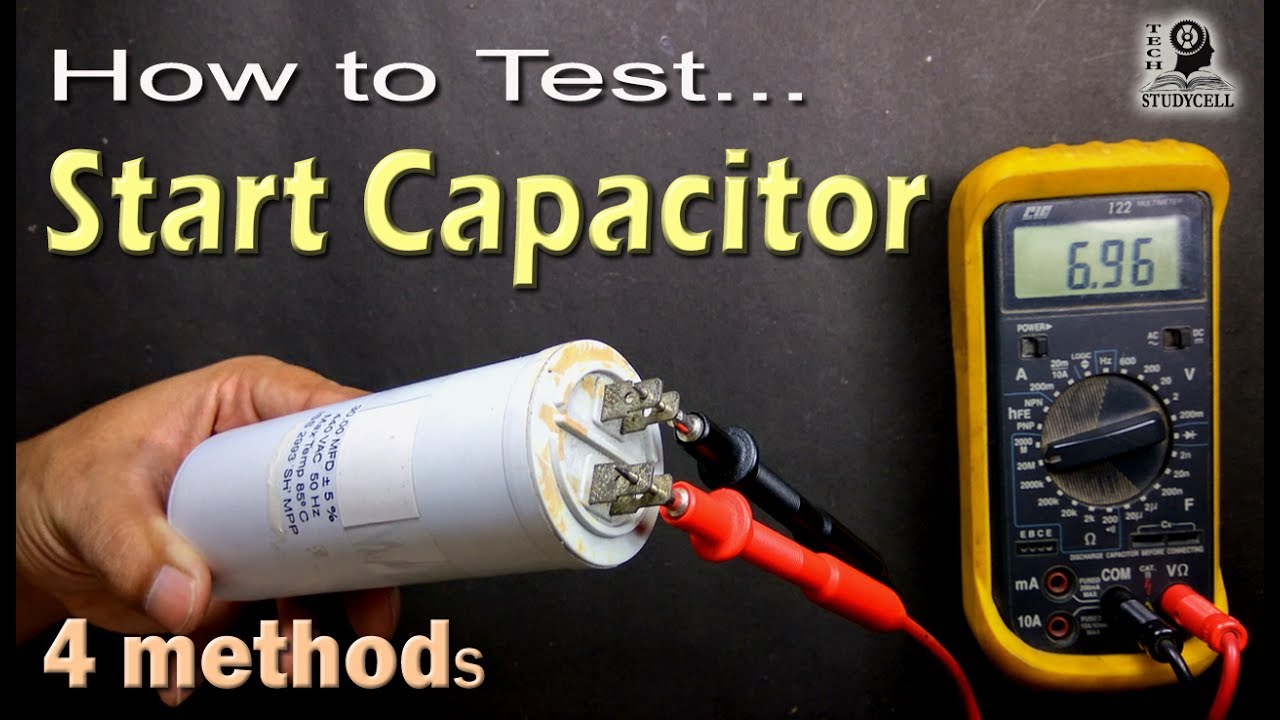
The start capacitor is frequently the culprit in evaporative cooler motor failures, especially when the unit hums but doesn’t spin. Before condemning the entire motor, test this small cylindrical component that provides the initial torque boost. First, safely discharge the capacitor by touching its terminals with an insulated screwdriver—this prevents dangerous stored energy discharge. Set your multimeter to microfarads (µF) and connect the probes to the capacitor terminals. Compare your reading to the rating printed on the capacitor; a difference of more than 10% indicates failure. Visually inspect for bulging tops or leaking electrolyte, which are unmistakable signs of a bad capacitor needing replacement. This simple $10 part often solves what appears to be a complete motor failure.
Checking for Thermal Overload Trips
Many evaporative cooler motors contain a built-in thermal overload protector that automatically shuts off power when temperatures exceed safe limits. This safety feature prevents fire hazards but can leave you without cooling during critical times. To check if this is your issue, locate the small reset button (usually red) on the motor housing. Press it firmly—if you hear a click, the overload had tripped. However, if it trips again immediately after resetting, don’t keep pressing it; this indicates an underlying problem like excessive friction, voltage issues, or internal motor failure. Allow the motor to cool completely for at least 30 minutes before attempting reset, and investigate why the overheating occurred to prevent repeated trips during your evaporative cooler motor repair.
Step-by-Step Motor Replacement Process
Properly Removing the Old Motor Without Damage
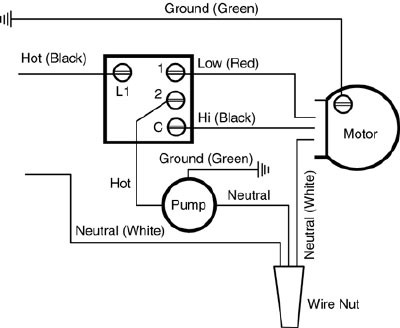
Removing your evaporative cooler motor requires careful technique to avoid damaging surrounding components. Start by photographing all wiring connections—this visual reference prevents mistakes during reinstallation. Loosen but don’t fully remove the motor mounting bolts first to release belt tension gradually. Slide the motor toward the center to slacken the belt before lifting it off the pulleys. When disconnecting wires, twist wire nuts counterclockwise while holding the wire itself to prevent strand breakage. Label each connection point with numbered tags matching your photos. Support the motor’s weight as you remove the final mounting bolts—these units are heavier than they appear and can damage wiring if dropped. This meticulous approach ensures a smooth transition to your new motor during evaporative cooler motor repair.
Installing and Aligning Your Replacement Motor
Motor alignment is the most critical yet often overlooked aspect of evaporative cooler motor repair. After positioning your new motor, temporarily secure it with mounting bolts finger-tight. Place a straight edge across both pulleys to verify perfect parallel alignment—any deviation causes premature belt wear and motor strain. Check vertical alignment by suspending a plumb bob or string between pulleys; they must occupy the same plane. Adjust the motor position incrementally until both alignments are perfect before tightening all bolts. Install the belt with proper tension—pressing down on the longest run should yield about 1/2 inch of deflection. Proper alignment during your evaporative cooler motor repair can double the lifespan of both motor and belt.
Troubleshooting After Installation
Why Your New Motor Might Not Start Immediately
Even with a perfect evaporative cooler motor repair, several issues can prevent operation after installation. First, verify all wire connections match your reference photos—reversed hot and neutral wires won’t damage the motor but will prevent operation. Check that the belt tension isn’t too tight, which can stall the motor during startup. Ensure the water pump isn’t running simultaneously if your model draws significant additional current that might trip the circuit when combined with motor startup. Test the unit’s control settings—some models have safety switches that prevent operation if water levels are low or pads are dry. These common oversights often cause panic when they’re actually simple fixes after your evaporative cooler motor repair.
Testing Motor Performance Under Load
Once running, monitor your evaporative cooler motor repair results with these performance checks. Use an infrared thermometer to measure motor housing temperature after 15 minutes of operation—anything above 175°F indicates potential problems. Listen for unusual vibrations that suggest misalignment or imbalance. Measure actual airflow with an anemometer if available; significant reduction from previous performance points to belt slippage or incorrect pulley sizing. Check for proper water distribution across pads—if the motor runs but cooling is inadequate, your issue might extend beyond the motor repair. These diagnostic steps confirm whether your evaporative cooler motor repair was truly successful or if additional adjustments are needed.
Preventing Future Motor Failures
Critical Maintenance Practices After Repair
Extend the life of your evaporative cooler motor repair with these essential maintenance habits. At season’s start, inspect and clean all motor cooling vents—dust buildup causes overheating. Check belt tension weekly during peak usage; temperature changes affect tension significantly. Lubricate motor bearings according to manufacturer specifications—over-lubrication attracts dust while under-lubrication causes premature wear. Keep the entire unit clean, as excessive moisture and mineral deposits create corrosion that damages electrical connections. These simple practices after your evaporative cooler motor repair can prevent 80% of repeat failures and double your motor’s operational lifespan.
When to Call a Professional Instead of DIY
Know your limits with evaporative cooler motor repair—certain situations demand professional expertise. If your unit uses 240V wiring, unless you’re experienced with high-voltage work, call a technician. Complex control systems with multiple relays or thermostats often require specialized diagnostic equipment. If you’ve replaced the motor twice within a year, underlying issues like voltage fluctuations or incompatible components need professional assessment. Most importantly, if you feel uncertain at any point during the process, stop and consult a professional—your safety outweighs the cost of a service call. Smart homeowners recognize when evaporative cooler motor repair crosses into territory better handled by certified technicians.