Your Cruzin Cooler suddenly stops chilling drinks right before game day, or worse—dies completely during a tailgate. That sinking feeling when your mobile bar essential becomes a $1,000 paperweight is all too real for owners. With these specialized coolers costing $800+, professional cruzin cooler repair becomes critical when DIY fixes fall short. This guide cuts through the confusion with actionable steps to diagnose battery failures, decode error lights, and navigate the official repair process—so you know exactly when to grab tools versus calling professionals. By the end, you’ll confidently decide whether your unit deserves a second life or needs replacement.
Why Your Cruzin Cooler Won’t Start (And How to Fix It Fast)
Before shipping your cooler off for expensive repairs, rule out these common culprits that cause complete power failure. Most “dead” units actually suffer from preventable electrical issues solvable in under 15 minutes.
Check the Battery: The #1 Culprit Behind Dead Coolers
Over 70% of “no power” cases trace back to battery failure—not internal damage. Start here with these critical checks:
– Inspect for physical damage: Look for bulging casings, cracks, or white/green corrosion on terminals. Never attempt repairs on swollen or leaking batteries—immediately replace them.
– Test voltage with a multimeter: A healthy 12V battery reads 12.6V-12.8V when resting. Anything below 11.5V indicates a dead cell requiring replacement. Dual-battery 24V models should show 25.2V-25.6V (under 23V means failure).
– Force a deep charge: Plug into a 12V DC source for 24+ hours. Many “dead” batteries revive after proper charging cycles. If voltage doesn’t rise after 8 hours, the battery is kaput.
Pro Tip: AGM batteries fail faster when stored below 50% charge. Always recharge after events—even if the cooler seemed “fine.”
Verify Your Power Supply: Fuses and Charger Troubleshooting
A faulty power source mimics cooler failure. Confirm these elements before assuming internal damage:
– Locate the DC input fuse: Usually near the power port. Test continuity with a multimeter—replace with exact amperage rating (typically 15-30A). Never use higher-rated fuses.
– Test your charger output: Set multimeter to DC voltage. A working 12V adapter shows 13.5V-14.4V under load. If below 12V, replace the charger.
– Check cord integrity: Squeeze along the entire DC cord while powered on. Intermittent power? Internal wire breaks require soldering or replacement.
Visual cue: If the cooler powers only when plugged into a car but not its battery, the battery is definitely dead—not a control board issue.
Cooler Runs But Doesn’t Chill? Diagnose Cooling Failures
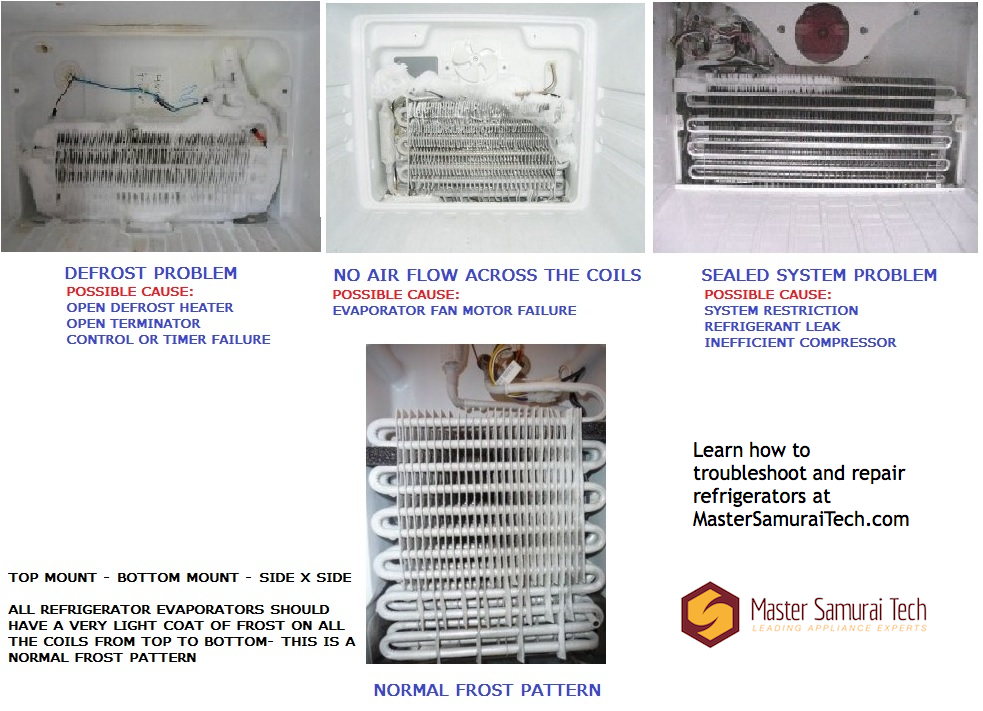
Hearing the compressor hum without cold air means refrigerant or compressor failure. Do not attempt DIY refrigerant repairs—EPA certification is legally required.
Low Refrigerant Symptoms: When to Call a Professional
Watch for these telltale signs of refrigerant leaks:
– Frost on copper lines: Visible ice near compressor connections indicates low refrigerant.
– Warm air from vents: After 30+ minutes running, interior should drop below 40°F. Use a thermometer to verify.
– Hissing sounds: A faint gas leak noise near the compressor compartment.
Critical note: Refrigerant systems are sealed units. Any leak requires professional evacuation, repair, and recharging—never top off refrigerant.
Compressor Failure Signs: Beyond DIY Repair Capabilities
If you hear clicking or buzzing without cooling:
– Check startup capacitor: A bulging or leaking capacitor on the compressor often causes failure. Replacement requires electrical expertise.
– Test for 12V at compressor: No power? Likely a faulty control board. Power present but no start? Compressor is seized.
Warning: Opening the sealed refrigerant system without certification violates EPA regulations and risks personal injury from high-pressure components.
Sudden Shutdowns: Fix Overheating and Voltage Errors
Random shutdowns during use typically stem from overheating or power fluctuations—not catastrophic failure.
Clear Air Vents to Prevent Compressor Overheating
Blocked airflow causes 40% of premature shutdowns. Ensure:
– 4+ inches of clearance around compressor vents (usually rear/side panels)
– No direct sun exposure during operation
– Dust-free condenser fins (use soft brush monthly)
Time estimate: Vent cleaning takes 5 minutes and prevents $200+ service calls.
Decode Blinking Lights: Common Error Codes Explained

Consult your manual first—these universal codes indicate specific failures:
– E1/E2/E3: Temperature sensor faults (replace sensor wiring)
– “Ot” display: Over-temperature shutdown (cool unit for 30+ minutes)
– “V” error: Voltage outside 10.5-15V range (check battery health)
Urgent action: Ignoring “Ot” errors risks permanent compressor damage from repeated overheating cycles.
Official Cruzin Cooler Repair Process: What to Expect
When DIY fixes fail, Access Mobility Repair & Rental (the sole authorized service center) handles complex repairs—but their process has critical nuances.
How to Contact Access Mobility Repair & Rental (Phone/Email)
Do not ship your cooler without confirmation:
– Call first: 336-314-8522 (repair-specific line) or 336-608-8810
– Email details: info.amrr@gmail.com with model number and symptoms
– Appointment required: No walk-ins accepted—schedule drop-off or shipping
Key insight: Mention “Cruzin Cooler” immediately—they service multiple mobility products, and specialists handle coolers separately.
Understand the $49 Diagnostic Fee and Repair Quote System
Their non-negotiable process:
1. Pay $49 non-refundable diagnostic fee upon drop-off
2. Receive detailed quote within 3-5 business days (parts + labor)
3. Pay for parts upfront before repair begins
4. Pay labor upon pickup after successful testing
Critical reality check: Older models (5+ years) often face discontinued parts. Ask “Are all components in stock for my model?” before paying the diagnostic fee.
Avoid 10-Day Pickup Deadline to Prevent Storage Fees
If you decline repairs:
– Retrieve your cooler within 10 days
– Failure to pick up results in storage fees ($15/day)
– Units abandoned over 30 days may be sold or scrapped
Pro move: Get written confirmation of the 10-day window when dropping off—don’t rely on verbal assurances.
Parts Availability Reality: Why Older Models May Be Unfixable
This is the hidden dealbreaker most owners overlook. Parts scarcity makes repairs impossible for aging units.
Check Discontinued Parts Before Paying for Diagnosis
Specific red flags:
– Compressors for pre-2018 models are frequently obsolete
– Custom control boards rarely get remanufactured
– Door seals and gaskets often discontinued after 7 years
Action step: Email the service center with your model/year before shipping. Ask: “Which parts for my [model] are currently unavailable?”
Battery Stock Status vs. Obsolete Compressors
Good news: They stock 12V AGM batteries for all models. Bad news:
– Batteries: Readily available ($80-$150)
– Compressors: $300+ with 4-8 week lead times (if available)
– Control boards: $250+ but often discontinued for older units
True story: A 2015 model owner paid $49 diagnostic, got quoted $420 for a compressor—only to learn the part was discontinued 6 months prior.
DIY vs Professional Repair: 4 Critical Decision Factors
Not all repairs deserve professional service. Use this framework:
When a $150 Battery Swap Beats a $800 New Cooler
Proceed with DIY if:
– Battery is dead (confirmed by voltage test)
– Fuses or power cords show damage
– Interior cleaning improves cooling
– Unit is under 5 years old
Source parts:
– Batteries: Amazon (Renogy 100Ah AGM) or BatteryMart
– Fuses/cords: AutoZone (exact amperage match)
– Gaskets: Measure and order generic rubber seals
Why Refrigerant Repairs Require EPA Certification (Not DIY)
Never attempt these:
– Refrigerant recharging (illegal without EPA 608 license)
– Compressor replacement (requires vacuum pumps)
– Control board soldering (ESD damage risk)
Consequence: Mishandling refrigerant risks $25,000+ EPA fines and voids all warranties.
Repair or Replace? Calculate Your Break-Even Point
The financial tipping point determines if repairs make sense.
The 60% Rule: When Replacement Makes Financial Sense
Replace immediately if:
– Repair cost exceeds 60% of new cooler price ($480+ for $800 model)
– Unit is over 8 years old
– Parts require 4+ week lead times
Repair makes sense when:
– Battery/fuse fixes cost under $200
– High-end model (e.g., Pro Series) needs $300 control board
– You have emotional attachment (custom graphics, etc.)
Emotional Attachment vs. Practical Cost Analysis
Be brutally honest:
– “Will I use this cooler 3+ more years?”
– “Does my usage justify $500 repairs?”
– “Are newer models significantly better?”
Hard truth: Repairing a 10-year-old base model often costs more than a new mid-tier unit.
Prevent Future Breakdowns: Maintenance Checklist
Extend your cooler’s life with these pro habits:
Monthly Cleaning Routine for Condenser Fins
- Unplug and remove battery
- Use soft brush to clear dust from rear/side vents
- Wipe interior with mild soap solution
- Check door seal integrity (no cracks/gaps)
Time saved: Prevents 30% of premature compressor failures.
Battery Storage Tips to Extend Lifespan
- Never store below 50% charge
- Recharge every 3 months during off-season
- Store in climate-controlled space (not garages)
- Use smart charger for long-term storage
Result: Properly maintained AGM batteries last 4-5 years versus 1-2 years for neglected units.
Final Tip: Document your cooler’s serial number and take photos before repairs. This speeds up warranty claims and verifies pre-existing conditions. If your unit is repairable, act fast—parts disappear yearly. For unfixable coolers, explore Cruzin’ Cooler’s trade-in programs through the service center. Remember: A $100 battery replacement today could save $800 tomorrow, but pouring money into obsolete hardware is a cold gamble.