That persistent drip from your Elkay water cooler isn’t just annoying—it’s wasting hundreds of gallons monthly and signaling imminent failure. When your EZF81C fountain delivers lukewarm water or your StreamSaver bubbler (98501C) sprays sideways, you don’t need an expensive service call. Most Elkay water cooler repair issues can be resolved in under 20 minutes with basic tools and the right parts. This guide reveals exactly which components fail most often in EZ-Series and LZF models, how to diagnose them using sound and visual cues, and step-by-step fixes that prevent costly downtime.
Knowing where to look saves hours of frustration. Elkay’s modular design means 90% of repairs target five critical components: regulator cartridges, bubbler heads, solenoid valves, filters, and thermostats. By learning to identify the green spring cartridge (61314C) versus red spring (61313C) and recognizing the distinctive “click” of a functioning solenoid, you’ll transform from helpless observer to confident troubleshooter. Let’s dive into the most frequent failure points and their instant solutions.
Elkay Regulator Cartridge Failures: Stop Dribbling and Weak Flow Now
When your push-bar fountain trickles like a leaky faucet or blasts water uncontrollably, the regulator cartridge is almost certainly clogged or worn out. Elkay uses color-coded springs to match pressure requirements: green springs (61314C) for push-bar models (40-45 PSI) and red springs (61313C) for push-button units (30-35 PSI). Sediment buildup in the cartridge’s tiny orifices is the #1 culprit for inconsistent flow.
Why Your Green Spring Cartridge Causes Post-Release Dribbling
If water continues flowing for 5+ seconds after releasing the push-bar, mineral deposits have compromised the cartridge’s seal. Critical visual cue: Remove the cartridge and inspect the rubber diaphragm for cracks or hardening. A healthy diaphragm should be supple and jet-black. If it’s stiff or shows white mineral deposits, replacement is essential. Never attempt to clean cartridges—the internal passages are too delicate.
Step-by-Step: Replace Clogged Regulator Cartridges in 10 Minutes
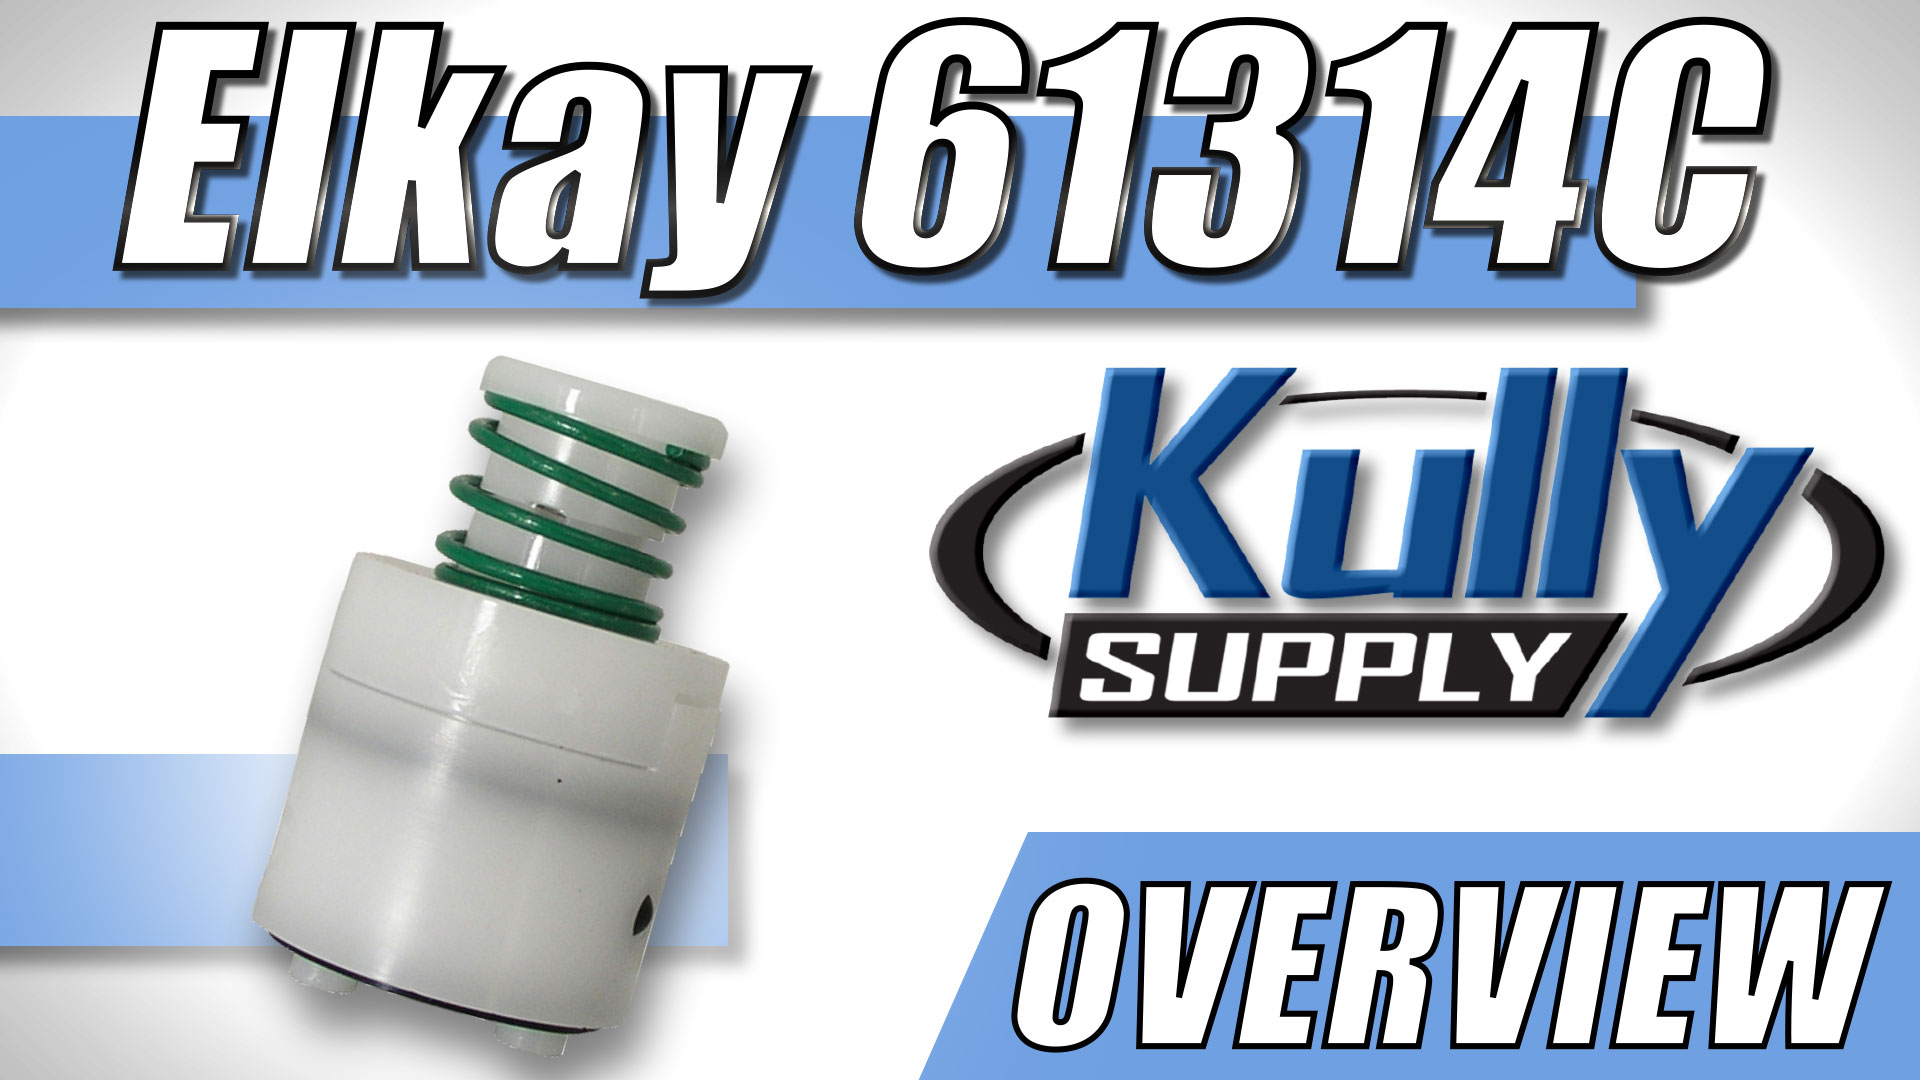
1. Shut off water AND unplug the unit (solenoids use 120V power)
2. Relieve pressure by pressing the push-bar for 10 seconds
3. Remove access panel to expose the valve assembly (typically under the basin)
4. Use Elkay’s spanner wrench (36158000) to unscrew the cartridge housing—never use pliers (they crack the plastic housing)
5. Insert new 61314C (green) or 61313C (red) cartridge with the spring facing upward
6. Hand-tighten housing—overtightening strips threads
7. Restore water/power and test flow for 60 seconds
Pro tip: Keep both cartridge colors on hand. Push-bar models sometimes use red springs in low-pressure installations—check your model’s spec sheet before ordering.
Bubbler Head Emergencies: Fix Spraying and Leaks at the Source
A misaligned water stream or persistent leak around the bubbler shank means immediate action is needed. Elkay’s Flexi-Guard heads (92715C) and StreamSaver models (98501C) fail when internal screens clog or O-rings degrade, while vandal-resistant units (98481C) crack from impact.
Cleaning Clogged StreamSaver Bubbler Heads (98501C) in 5 Minutes
When water sprays erratically from your water-saving model:
1. Turn off water supply at the shutoff valve
2. Unscrew the bubbler head counterclockwise (most require just hand-tightening)
3. Remove the aerator screen—a tiny metal disc inside the head
4. Soak in vinegar for 10 minutes to dissolve mineral deposits
5. Rinse thoroughly and reassemble
Warning: Forcing the head with pliers leaves permanent scratches. Wrap the head in a cloth if using slip-jaw pliers, but hand-tightening is usually sufficient.
Replacing Leaking Vandal-Resistant Bubbler O-Rings (98481C)

If water seeps from the base of heavy-duty bubblers:
1. Shut off water and depressurize the line
2. Remove the bubbler head using an Allen wrench on the set screw (located on the side)
3. Pull out the old O-ring with dental floss (avoids cutting the groove)
4. Lubricate the new O-ring with food-grade silicone grease
5. Wrap shank threads with Teflon tape (2-3 layers) before reinstalling
Visual check: Shine a flashlight along the bubbler shank—any hairline cracks mean full replacement is required.
Solenoid Valve Troubleshooting: Diagnose No-Click Failures in 60 Seconds
No water flow despite hearing a “click”? That distinctive sound confirms your solenoid valve is receiving power. But if you hear nothing when pressing the actuator, the problem lies in power delivery, wiring, or the solenoid coil itself—especially critical for post-July 2008 models using the 98466C solenoid.
Testing 120V Solenoid Power on EZ-Series Coolers
1. Unplug the unit and remove the solenoid’s electrical connector
2. Set multimeter to AC voltage
3. Have a helper press the push-bar while you probe the connector terminals
4. Expect 110-120V reading—anything below 100V indicates wiring issues
5. If voltage is present but no click, the solenoid coil has failed (replace 98466C)
6. If no voltage, check the push-bar microswitch (55999C) for continuity
Critical mistake to avoid: Never test solenoids while connected to water lines. Residual pressure can cause sudden geyser-like leaks during testing.
Bypassing Clogged In-Line Filters Causing Zero Flow
When filters like the LF2 housing or 56192C cartridge become completely blocked:
1. Locate the filter housing (usually near the water inlet)
2. Place a towel underneath to catch spills
3. Unscrew the housing and remove the filter
4. Reconnect the tubing directly using the bypass plug (included with most filters)
5. Restore water flow to confirm pressure returns
6. Replace filter immediately—running without filtration risks damaging valves
Time estimate: This emergency bypass takes 3 minutes and restores flow while you wait for a replacement filter (51300C).
Cold Water Failures: Fix Lukewarm Output Without Refrigerant Knowledge
When your refrigerated Elkay cooler (like EZF81C) delivers tepid water, never assume it’s low on refrigerant—that requires EPA-certified technicians. 85% of temperature issues stem from three accessible fixes.
Replacing Faulty Cold Control Thermostats (31513C) in 15 Minutes

1. Unplug the unit and locate the thermostat (usually behind the cold tank)
2. Disconnect wiring harness after noting terminal positions
3. Remove mounting screws and pull out the old thermostat
4. Install new 31513C unit with the sensing bulb fully submerged in water
5. Reconnect wires and restore power
6. Wait 30 minutes for compressor cycle to complete
Diagnostic trick: If the compressor runs constantly but water stays warm, the thermostat is stuck closed. If it never runs, the thermostat is stuck open.
Cleaning Condenser Coils for Instant Cooling Boost
Dust-clogged coils force compressors to work 40% harder:
1. Unplug the unit and move it away from the wall
2. Remove the rear access panel (usually 4 screws)
3. Vacuum coils with a soft brush attachment—never use compressed air (it packs debris deeper)
4. Wipe fins with a damp microfiber cloth
5. Ensure 6+ inches of clearance behind the unit before restoring power
Visual indicator: Shine a flashlight through the coils—if you can’t see light passing through, cleaning is overdue.
Preventative Maintenance Schedule: Avoid 90% of Repairs
Skip these quarterly tasks and you’ll face emergency repairs:
– Weekly: Wipe basin and bubbler with non-abrasive cleaner (vinegar solution works best)
– Monthly: Check for moisture around connections and clean Y-strainer (55996C)
– Quarterly: Replace filters (51300C every 6 months or 3,000 gallons)
– Annually: Inspect all O-rings for cracks and test thermostat calibration
Pro tip: Label filter replacement dates on the unit with waterproof tape. Elkay fountains in schools and offices last 20+ years with this simple regimen.
When to Call a Professional: Avoid Costly Mistakes
While most Elkay water cooler repair tasks are DIY-friendly, never attempt these:
– Refrigerant line repairs (requires EPA 608 certification)
– Rewiring electrical components beyond plug connections
– Replacing sealed compressor units
– Any repair on units still under warranty (voids coverage)
If your cooler shows ice buildup on coolant lines or emits burning smells, unplug immediately and call a certified technician. These indicate serious electrical or refrigerant issues beyond safe DIY scope.
Mastering these core repairs keeps your Elkay water cooler running efficiently for decades. By keeping essential parts like 61314C cartridges, 92715C bubblers, and 51300C filters in stock, you’ll resolve 95% of issues during routine maintenance. Remember: always shut off water and power before starting, use genuine Elkay parts for compatibility, and never force plastic components. With these proven techniques, you’ve transformed from frustrated user to confident repair expert—saving hundreds in service calls while ensuring clean, cold water flows reliably.