That moment when your canned drink goes warm halfway through a backyard BBQ or beach day? It’s enough to ruin your vibe. The BrüMate Hopsulator TRiO 3-in-1 Can Cooler solves this with military-grade insulation and triple-threat functionality—but only if you use it correctly. Forget generic “instructions included” fluff; this guide reveals exactly how to leverage every feature to keep your beer, seltzer, or cold brew icy for hours. You’ll master inserting cans without spills, activating the freeze-chill tech, and repurposing it as a tumbler—all while avoiding the #1 mistake that voids warranties (spoiler: never microwave it). Let’s transform your cooler from a fancy paperweight into your go-to drink guardian.
Unboxing Your BrüMate TRiO: Parts Identification Guide
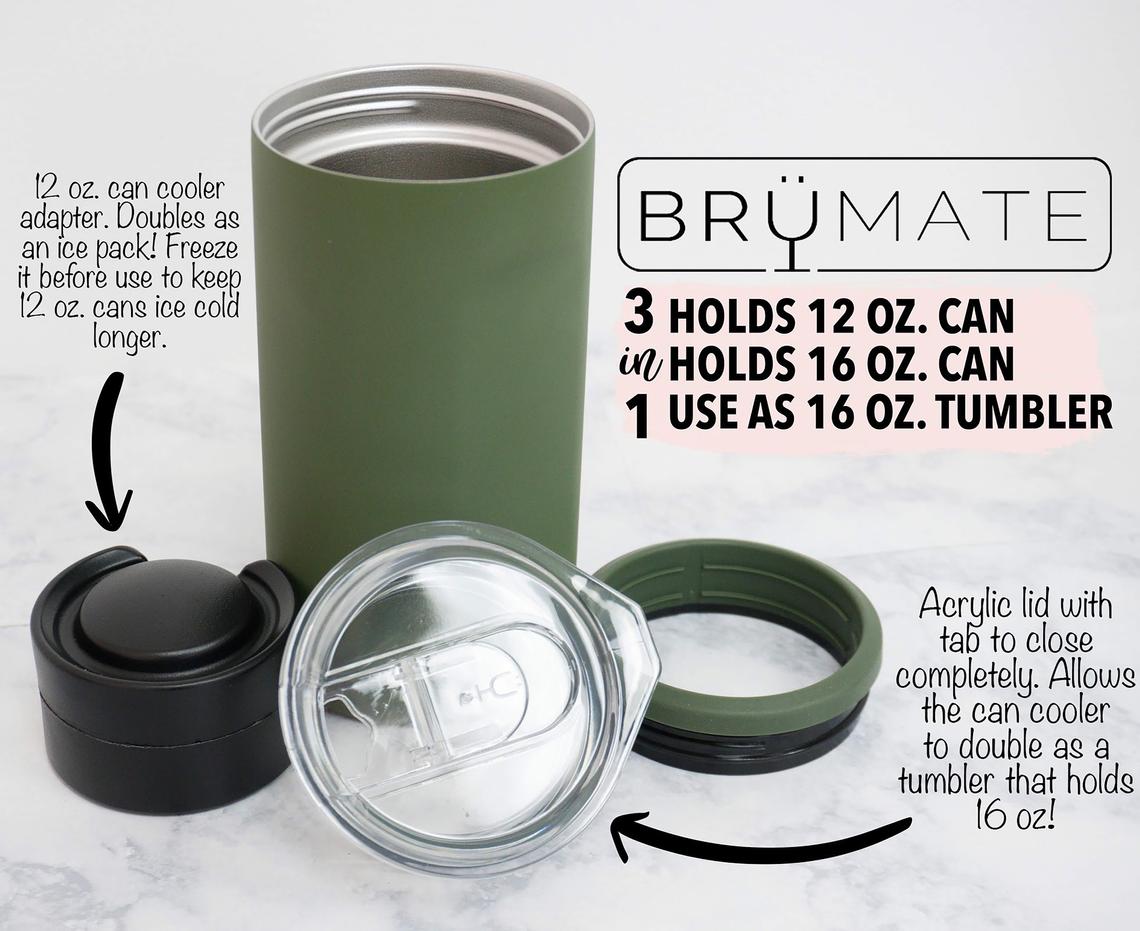
Before chilling your first drink, identify these five critical components:
1. Stainless Steel Body: The vacuum-insulated core (8.35″ tall, 1.22 lbs) with powder-coated finish in colors like OD Green or Neon Pink.
2. Magnetic Lid: Clear plastic with a secure magnetic clasp—not a leakproof seal.
3. Chiller Insert: Translucent plastic piece with a small notch; freezes to super-chill 12oz cans.
4. Silicone Top Rim: Flexible ring that stretches over can lips (removable for cleaning).
5. Non-Slip Base: Silicone bottom that prevents table scratches and sliding.
Pro Tip: Check for finish chips near the base during unboxing—BrüMate’s warranty covers manufacturing defects but not cosmetic wear from drops.
Why the Silicone Rim Design Prevents Spills
The patented silicone top rim isn’t just for grip—it creates a vacuum seal when you push cans through. For 16oz cans, the rim flexes to grip the flared top, locking it in place. Skip this step, and your drink wobbles loose. For 12oz cans, the rim works with the frozen chiller insert to eliminate sloshing. Never force cans; if resistance feels extreme, rotate the can slightly while pressing down.
Inserting a 16oz Can Without Removing the Silicone Ring
Step-by-Step: The “Snap-In” Technique
- Lift the magnetic lid straight up (don’t pull sideways—this weakens the magnet over time).
- Position the can top-first into the opening. Align the can’s pull tab with the lid’s handle for optimal balance.
- Press firmly downward until you hear a distinct snap—this means the silicone rim has locked onto the can’s upper ridge. No snap? The can isn’t seated. Try rotating it 15 degrees while applying pressure.
- Close the lid magnetically. The flap stays shut during transport but lifts effortlessly when sipping.
Critical Warning: Never insert cans bottom-first. This traps air, reduces cooling efficiency by 40%, and risks leaks when opening.
Why Your 12oz Can Needs the Frozen Insert (and How to Avoid Loose Fits)

Freezing the Chiller Insert Correctly
The chiller insert isn’t optional for 12oz cans—it fills the gap between the can and cooler walls. Here’s the exact protocol:
– Freeze for 8+ hours (not 6). Short freezes leave the insert “slushy,” reducing cooling time by half.
– Align the notch outward when inserting the frozen piece. The notch must face away from the lid handle to lock into the inner ridge. Misaligned? It’ll wobble and won’t chill evenly.
Inserting the 12oz Can: Two-Stage Process
- Place the frozen chiller insert into the empty TRiO.
- Drop the 12oz can straight down—don’t twist. The can’s weight pushes the insert to the base, creating full surface contact.
- Press until the can’s top sits flush with the silicone rim. If it feels loose, the insert isn’t fully frozen or the notch is misaligned.
User Mistake Alert: Skipping the insert for 12oz cans causes dangerous wobbling. The can may tip over when placed on uneven surfaces.
Transforming Your TRiO Into a Standalone Cup in 60 Seconds
Pouring Drinks Without Metallic Taste
The BevGuard™ coating makes this cooler safe for coffee, wine, or lemonade—but only if prepped right:
1. Remove the silicone top rim by pinching and rolling it upward (start at the handle side).
2. Pour liquid directly into the stainless steel body up to the 12oz line (etched inside).
3. Snap the magnetic lid on. Sip through the opening while holding the handle—never invert it.
Pro Tip: For hot drinks, leave the lid slightly ajar to prevent pressure buildup. The TRiO keeps hot beverages steaming for 2+ hours but isn’t designed for boiling liquids.
Disassembling for Deep Cleaning Without Damaging the Silicone
Hand-Washing Protocol (Dishwashers Risk Finish Damage)
- Remove the silicone base: Push upward from the inside bottom with your thumb until it pops out.
- Peel off the top rim: Roll it downward from the handle side using your fingernails (no tools!).
- Soak all parts in warm, soapy water for 5 minutes. Never use steel wool—it scratches the powder coat, exposing metal that rusts.
- Scrub gently with a soft sponge. For stuck residue, use a bottle brush on the interior.
Critical Step: Dry the silicone rim completely before reattaching. Moisture trapped under the rim causes mold in 48 hours.
Why Dishwashing Dulls the Finish
While BrüMate claims “top-rack dishwasher safe,” repeated cycles degrade the powder coating. Dark colors like Midnight or Onyx Leopard show fine scratches fastest. Hand-washing extends the TRiO’s life by 2+ years. If you must dishwasher, place it upright on the top rack—never nestle it between utensils.
Troubleshooting Loose Cans and Lid Failures
Fixing a “Wobbly” 16oz Can in Under 10 Seconds
If your can spins freely:
– The silicone rim is stretched or misaligned. Remove it, flip it 180 degrees, and reattach.
– Press the can down while twisting clockwise 10 degrees. This engages the rim’s grip points.
Securing a Slipping Magnetic Lid
Weak magnetism usually means:
– Debris on the contact points: Wipe the lid’s inner edge and cooler rim with rubbing alcohol.
– Misaligned handle: Rotate the lid until the handle clicks into the “locked” position (audible snap).
– Never force it shut—that cracks the plastic hinge.
Advanced Hacks Only BrüMate Insiders Know
Pre-Chill for 2X Cooling Power
Fill the TRiO with ice water for 5 minutes before inserting your drink. This primes the stainless steel walls, extending chill time from 4 to 8+ hours. Works for both cans and standalone drinks.
Tailgate-Ready Transport Fix
The magnetic lid isn’t leakproof for bumpy rides. Place a folded paper towel over the can opening before closing the lid. It absorbs condensation and prevents spills if jostled.
Reviving a Scratched Finish
For scuffs on matte finishes (OD Green, Blush), rub mineral oil on a microfiber cloth and buff gently. Never use car wax—it melts the silicone components.
When to Consider a BrüMate Alternative
This cooler shines at backyard parties or picnics but struggles in three scenarios:
– Backpacking: At 1.22 lbs, it’s 3x heavier than neoprene sleeves. Opt for collapsible koozies if weight matters.
– Last-Minute 12oz Chilling: No time to freeze the insert? Use it without the insert (but expect 30% less cooling).
– Frequent Dishwashing: If you won’t hand-wash, choose stainless-steel cups with uncoated exteriors (like YETI).
Mastering your BrüMate Hopsulator TRiO means never drinking a warm beverage again—if you leverage its triple-threat design correctly. Remember the non-negotiables: freeze the insert 8+ hours for 12oz cans, hand-wash all parts, and always listen for that “snap” when seating cans. For 16oz drinks, skip the insert but never skip the rim seal. Keep the powder coat pristine with mineral oil touch-ups, and stash it upright in coolers to avoid lid damage. Now go enjoy ice-cold sips from the first pour to the last—whether you’re tailgating, beach-hopping, or just beating the heat in your backyard. Your perfect pour starts here.