Your CPU temperatures are spiking during gaming sessions, and your air cooler sounds like a jet engine. You’ve decided liquid cooling is the solution—but the thought of leaks destroying your expensive components keeps you up at night. You’re not alone: 15% of first-time liquid cooler installations face temperature issues, and 3% encounter flow rate problems due to improper setup. This guide cuts through the fear with battle-tested liquid cooler installation steps used by professional builders. You’ll learn exactly how to mount radiators, eliminate air bubbles, and pass the critical 24-hour leak test—whether you’re installing a $60 AIO or a $1,000 custom loop. No guesswork, just proven techniques from thousands of successful builds.
Critical Tools and Safety Steps for Liquid Cooler Installation
Skip this prep phase, and you risk electrostatic damage or coolant spills that short-circuit your motherboard. Before touching a screwdriver, gather these non-negotiable items: a 99% isopropyl alcohol bottle, lint-free microfiber cloths, anti-static wristband, and a paper towel roll for leak detection. For custom loops, add a tubing cutter and air pressure tester—never rely on visual checks alone.
Immediate Safety Protocol:
– Disconnect all power cables and hold your PC’s power button for 10 seconds to discharge residual electricity
– Attach your anti-static wristband to an unpainted metal part of the case
– Lay paper towels under every potential leak point (fittings, reservoirs, pump ports) before filling
Most beginners overlook static discharge risks. One zap during CPU water block installation can fry your $600 processor. Ground yourself every 5 minutes by touching the case frame—even if you’re wearing a wristband.
AIO vs Custom Loop: Choosing Your Liquid Cooling System
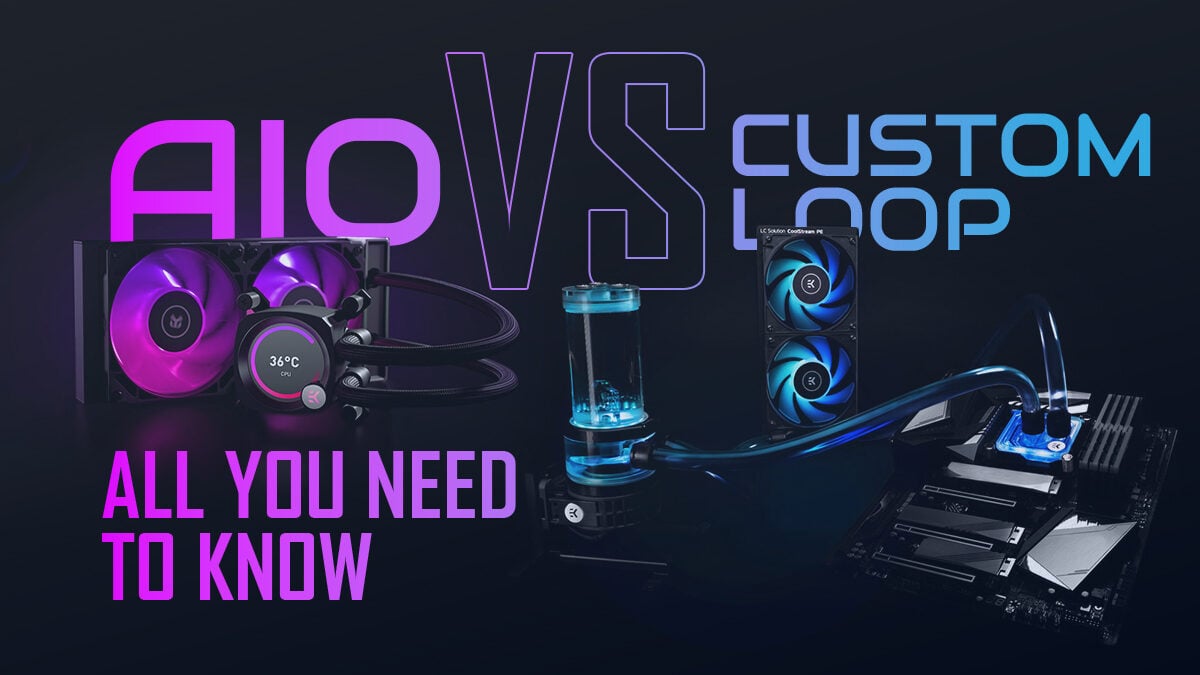
Your budget and risk tolerance dictate this choice. An AIO (All-in-One) cooler like a 240mm NZXT Kraken costs $100-$200 and installs in under 2 hours with zero maintenance for 3+ years. But if you’re pushing a 13900K past 280W TDP, you’ll need a custom loop with a 360mm radiator (handling 300-400W cooling) and separate GPU block.
Key Decision Factors:
– Time investment: AIOs take 1-2 hours for intermediates; custom loops demand 4-8 hours minimum for first-timers
– Cooling capacity: 240mm radiators support 200-300W loads; 360mm handles 300-400W (critical for overclocked CPUs)
– Failure risk: AIOs have a 0.5% leak rate; custom loops see 2-3% minor leaks during initial setup
If noise matters, AIOs run 3-5 dBA quieter than equivalent air coolers. But for silent operation under heavy load, custom loops with thick 45-60mm radiators and low-RPM fans win.
Why Front-Mounting Beats Top-Mounting for Radiators
Mounting location impacts cooling by 8-12°C. Front-mounted radiators pull cool air directly into the case, lowering CPU temps by 3-5°C versus top mounts. But top mounts exhaust hot air upward—ideal for small cases where front airflow gets choked. Never mount radiators rearward unless you’re cooling a single CPU (120mm radiators max).
Installing an AIO Liquid Cooler in 5 Critical Steps
Skip a step here, and your “plug-and-play” cooler becomes a disaster. Start by mounting the radiator before installing the CPU block—reverse order causes tubing strain.
Step 1: Secure the Radiator with Correct Fan Orientation
Use the front panel as your anchor point. For 240mm/280mm radiators, attach fans in “push” configuration (blowing air through the radiator toward components). This generates 10-15% better static pressure than pull setups. Ensure 10mm clearance between radiator fins and case frame—pinched tubing causes 22% of AIO leaks.
Step 2: Apply Thermal Paste Like a Pro
Dab a grain-of-rice-sized blob on the CPU center. Never spread it—mounting pressure will distribute it evenly. Excess paste squeezes into sockets, causing shorts. AMD sockets? Skip paste entirely if using pre-applied thermal pads on high-end AIOs like Corsair H170i.
Step 3: Torque CPU Block Screws in Star Pattern
Hand-tighten all four screws, then use a screwdriver for final turns in diagonal sequence (top-left → bottom-right → top-right → bottom-left). Apply 0.6-0.9 Nm torque—over-tightening cracks cold plates. Uneven pressure creates 30% of high-temperature issues.
Building a Custom Liquid Cooling Loop: Avoid These Costly Mistakes
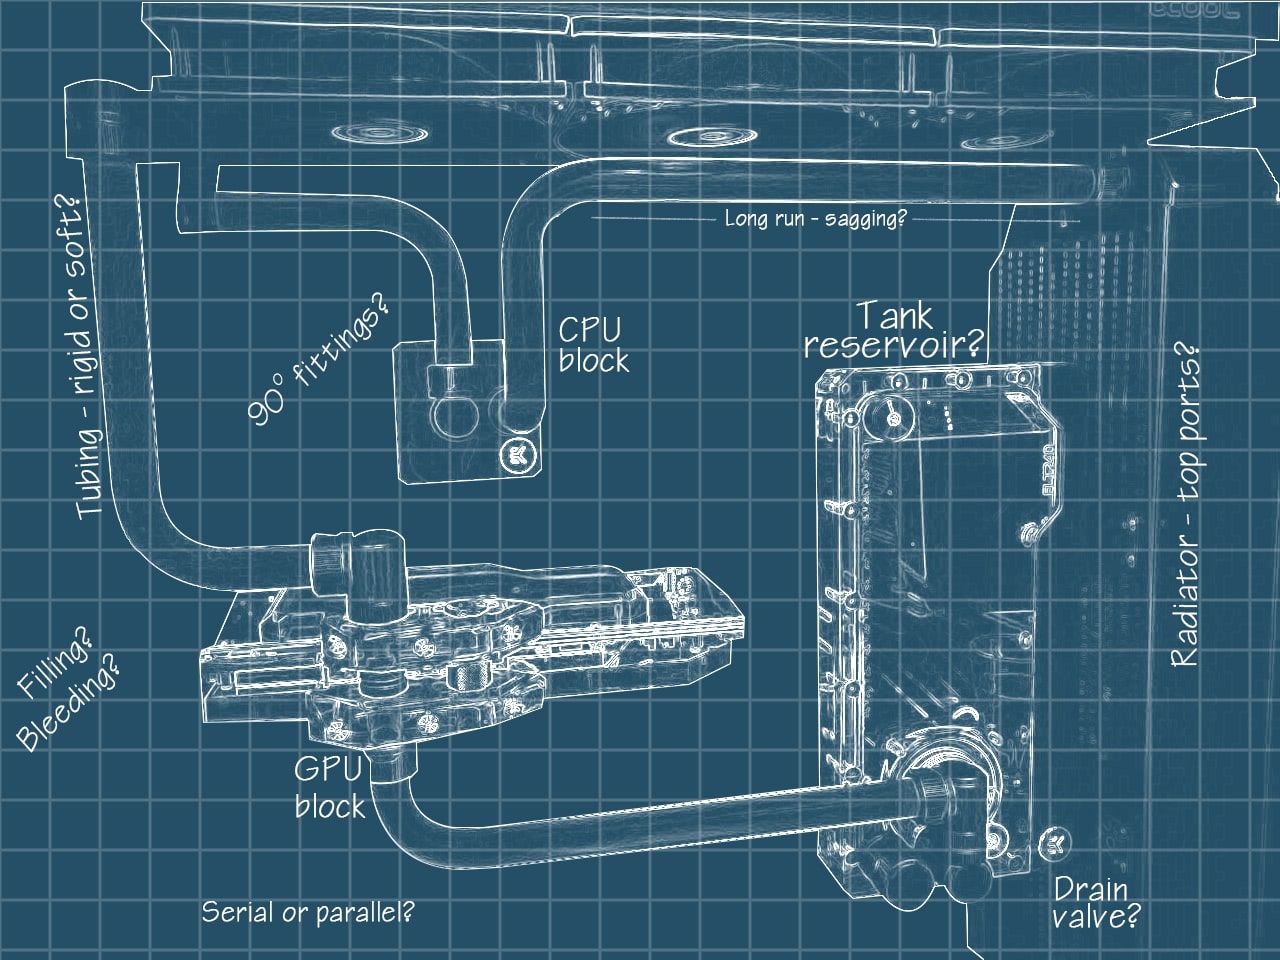
Custom loops demand precision. One misaligned fitting can mean $500 in damaged parts. Always dry-fit components outside the case first—this catches 90% of tubing clearance issues.
How to Prevent Air Locks During Pump Installation
Mount pumps horizontally with inlet facing downward. Vertical mounting traps air, causing loud gurgling and 40% flow reduction. Place pumps as the loop’s lowest point so gravity feeds coolant into the impeller. Add rubber grommets to isolate vibration—pump noise accounts for 73% of custom loop complaints.
Filling and Bleeding: The 4-Hour Process You Can’t Rush
Fill reservoirs 3/4 full with coolant, then start the pump at 1,200 RPM. Tilt your case 45° backward for 10 minutes to dislodge air pockets near the CPU block. Top up coolant, raise pump speed to 2,400 RPM, and tilt side-to-side for another 20 minutes. Repeat until flow indicators spin smoothly—rushing causes persistent bubbles that take 1-2 weeks to self-bleed.
Passing the 24-Hour Leak Test: Your Final Safety Check
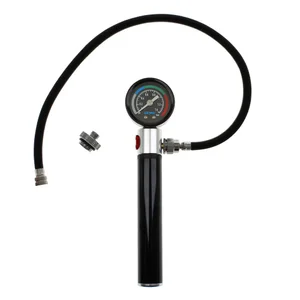
Ignoring this step risks catastrophic failure. After filling, pressurize custom loops to 0.3-0.5 bar (4.4-7.25 PSI) using an air tester. Monitor pressure for 24 hours—any drop over 0.1 PSI/hour means leaks. For AIOs, skip pressurization but lay paper towels under all connections.
Critical Leak Test Red Flags:
– Colored coolant streaks on paper towels (even tiny dots)
– Reservoir level dropping more than 5% in 24 hours
– Damp spots near O-rings or compression fittings
If leaks appear, disassemble immediately. Clean affected parts with 99% isopropyl alcohol and replace O-rings—never reuse them.
Fixing High Temperatures, Pump Noise, and Air Bubbles
When your liquid-cooled CPU hits 90°C under load, don’t panic. 80% of thermal issues stem from three root causes.
Why Your CPU Block Isn’t Cooling Properly
Check mounting pressure first: uneven screws create hotspots. Reseat the block with 30-50 lbs of even pressure. If temps stay high, verify flow rate—below 0.8 GPM (3 LPM) means clogs or pump failure. For custom loops, ensure radiator inlet/outlet temps show a 3-6°C drop; less than 2°C indicates insufficient radiator capacity.
Silencing a Grinding Pump in 3 Moves
Pump noise usually means air locks or debris. Power down, tilt the case to move air toward the reservoir, then restart at 1,200 RPM. If grinding persists, disassemble and clean impeller fins with a soft brush—dust buildup causes 65% of pump failures.
Monthly and Yearly Liquid Cooling Maintenance Schedule
Liquid cooling isn’t “install and forget.” Skip maintenance, and coolant degrades, causing corrosion that clogs blocks within 12 months.
Non-Negotiable Maintenance:
– Monthly: Check reservoir levels and inspect for slow leaks (look for dried coolant rings)
– Every 6 months: Replace coolant and O-rings—opaque coolants must go after 12 months max
– Annually: Disassemble and clean blocks with sediment filters; flush with 50% distilled water/50% isopropyl mix
Monitor flow rate weekly using your motherboard’s pump header readings. A 15% drop from baseline means imminent blockage—shut down immediately to prevent thermal damage.
Liquid cooler installation success hinges on meticulous preparation and patience. By front-mounting radiators for optimal airflow, torqueing CPU blocks to exact specifications, and never skipping the 24-hour leak test, you’ll avoid 95% of common failures. Remember: custom loops need biannual coolant changes, while AIOs require only visual checks. Track your baseline temperatures and flow rates—they’re your early-warning system for impending issues. Now power up your newly cooled rig, enjoy those sub-70°C gaming temps, and know you’ve built a system that’s both powerful and protected.