You’ve packed your cooler with ice, headed to the beach, and returned to find everything warm and spoiled. The frustrating truth? Most coolers keep things cold for just 12-24 hours if you use them wrong—but a properly prepared premium cooler can maintain safe temperatures for 7-10 days. The exact duration depends on four critical factors you can control: your cooler’s insulation quality, ice type, preparation method, and usage habits. Understanding these variables transforms your cooler from a disappointing cooler into a reliable cold-storage solution that keeps food safe and drinks refreshingly cold throughout your entire trip.
Most people assume all coolers work the same, but physics tells a different story. Heat constantly battles to enter your cooler through its walls, lid, and seams. The difference between a cooler that fails in a day versus one that lasts a week comes down to insulation thickness, seal integrity, and smart preparation techniques. In this guide, you’ll discover exactly how long different coolers keep things cold under various conditions, plus science-backed methods to maximize your ice retention regardless of what cooler you own.
Why Premium Coolers Keep Ice 5-7 Days While Budget Models Fail in 24 Hours

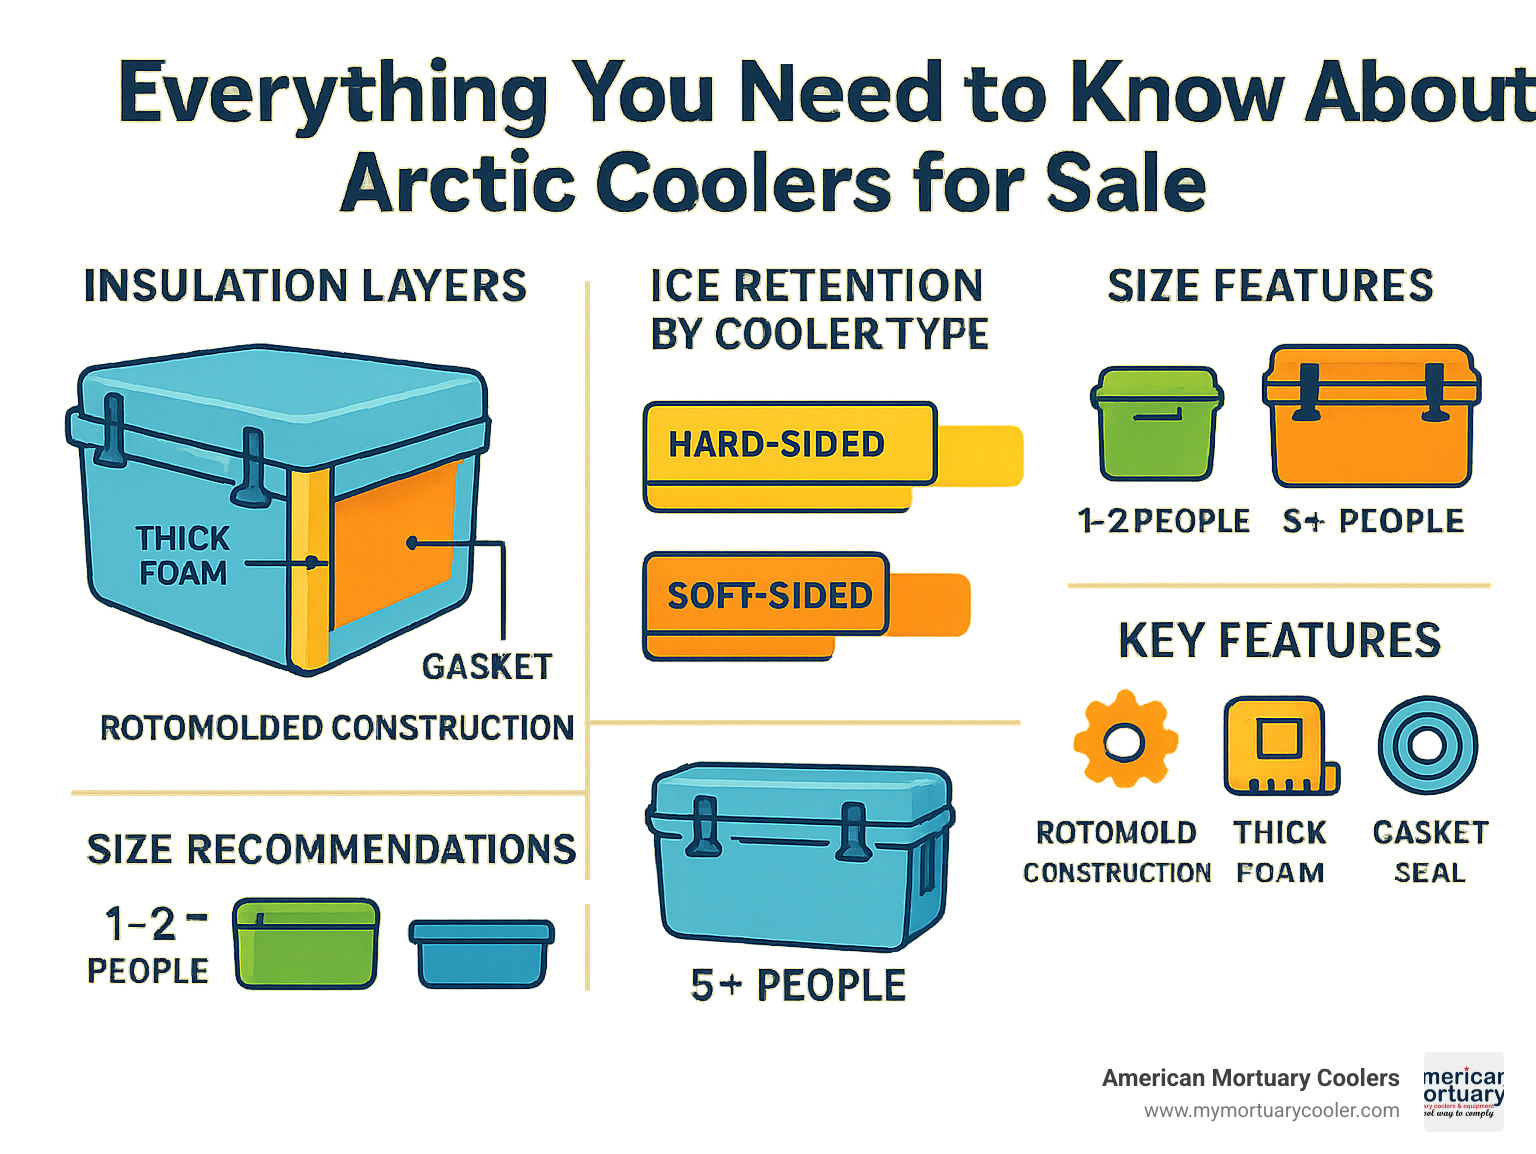
The dramatic difference in performance comes down to insulation thickness and material. Budget coolers typically have walls less than 1 inch thick with an R-value of 3-6 per inch, while premium rotomolded models feature 2-3 inch walls with R-values of 10-20+. This seemingly small difference creates a massive gap in heat transfer resistance. A disposable Styrofoam cooler might lose 50% of its ice in just 8 hours on a 90°F day, while a properly prepared premium cooler maintains frozen contents for over a week.
Rotomolded vs. Blow-Molded: The Wall Thickness Difference That Matters Most
Rotomolded coolers dominate the premium market because their manufacturing process allows for significantly thicker walls—typically 2-3 inches compared to the 0.5-1 inch walls of blow-molded budget coolers. This extra insulation creates a formidable barrier against heat transfer. While a $30 budget cooler might keep ice for 1-2 days, a $400 rotomolded model with triple the wall thickness can maintain ice for 5-7 days or longer under identical conditions. The thicker walls dramatically reduce the U-value (heat transfer coefficient), slowing heat infiltration to a crawl.
How R-Value Determines Ice Life (And What Number You Actually Need)
R-value measures insulation effectiveness—higher is better. Most coolers use polyurethane foam with an R-value of 6.5-7.0 per inch. A premium cooler with 2.5-inch walls achieves an R-value of approximately 17.5, while a budget model with 0.75-inch walls manages only R-5.25. This difference means the budget cooler absorbs heat 3.3 times faster. For weekend trips (2-3 days), an R-value of 10-12 suffices, but for extended expeditions (5+ days), you need R-15 or higher. Check manufacturer specifications for exact R-values, as marketing claims about “superior insulation” often mask mediocre performance.
How to Calculate Your Cooler’s Exact Ice Retention Time Using Physics
You can predict ice retention using the Cooling Duration Formula: Duration (hours) ≈ (Mass of Ice × 144) / (U × A × ΔT). While this looks complex, it simply means your ice lasts longer when you have more ice, better insulation (lower U-value), smaller surface area (A), and smaller temperature difference (ΔT) between inside and outside. Understanding this relationship helps you prepare appropriately for any trip duration.
The Simple Formula That Predicts How Long Your Ice Will Last
For practical use, remember these key relationships:
– Double your ice mass = doubles cooling time
– Halve your U-value (better insulation) = doubles cooling time
– Halve the temperature difference = doubles cooling time
A 50-quart premium cooler (U=0.15) with 20 lbs of ice at 90°F ambient temperature will keep things cold approximately 120 hours—nearly 5 full days. The same cooler with budget insulation (U=0.45) would last only 40 hours. This explains why investing in a better cooler pays off for frequent users, while occasional weekend campers might suffice with a mid-range model.
Real-World Test Data: Ice Retention by Cooler Type at 90°F
| Cooler Type | Wall Thickness | Ice Retention (Days) | Best For |
|---|---|---|---|
| Styrofoam disposable | 0.5″ | 0.5-1 | Single-day events |
| Budget hard-sided | 0.75″ | 1-2 | Weekend trips |
| Mid-range rotomolded | 1.5″ | 3-4 | Extended camping |
| Premium rotomolded | 2.5″ | 5-7 | Remote expeditions |
| Vacuum-insulated | 1″ (R-30+) | 8-14 | Critical medical transport |
These figures assume proper preparation—pre-chilled cooler, 2:1 ice-to-contents ratio, and minimal lid openings. Without proper prep, even premium coolers perform at 50-70% of these durations.
Step-by-Step: Pre-Chill Your Cooler for 50% Longer Ice Life (Must-Do)
Pre-chilling is the single most effective technique most people skip. When you pack room-temperature contents into a room-temperature cooler with ice, half your ice melts just bringing everything down to 32°F. Pre-chilling eliminates this waste, extending ice life by 50% or more. This simple, free technique transforms mediocre coolers into reliable performers.
Why Skipping This Step Wastes 30% of Your Ice Before You Leave Home
Physics explains the waste: cooling 50 pounds of room-temperature contents (70°F) to 32°F requires melting approximately 6 pounds of ice—before any heat enters from outside. That’s 30% of your ice gone before your trip even begins. Pre-chilling your cooler and contents means your ice focuses solely on maintaining temperature rather than achieving it, dramatically extending cooling duration.
The 24-Hour Pre-Chill Protocol That Pros Use
- Cooler pre-chill: 24 hours before packing, fill your empty cooler with sacrificial ice (a 5-10 lb bag) and close the lid. This chills the cooler walls and interior.
- Content preparation: Refrigerate all food and drinks for at least 12 hours. For ultimate performance, submerge sealed containers in ice water for the final 2 hours.
- Ice preparation: Store your primary ice supply in a freezer until packing time—never use warm ice from the gas station.
- Final packing: Dump the sacrificial ice immediately before loading, then pack pre-chilled contents with your primary ice supply.
This protocol alone can extend ice life from 2 days to 3+ days in a mid-range cooler—equivalent to upgrading to a more expensive model.
How to Pack Your Cooler Like a NASA Engineer for Maximum Ice Retention
Proper packing technique matters as much as cooler quality. Most people randomly toss items in with ice on top, creating air pockets that accelerate melting. Strategic packing minimizes airspace, creates thermal layers, and positions items for efficient access—extending ice life by 25-40%.
Block Ice vs. Cubes: When to Use Each (And How Much You Need)
Block ice lasts 2-3 times longer than cubed ice due to its lower surface-area-to-volume ratio. For trips under 2 days, cubes work fine—they chill contents faster. For 3+ day trips, use 70% block ice (or frozen gallon jugs) with 30% cubes to fill gaps. The ideal ice-to-contents ratio is 2:1 by volume for multi-day trips—meaning two-thirds of your cooler should be ice. For a 50-quart cooler, that’s approximately 33 quarts of ice to 17 quarts of contents.
The Strategic Layering Technique That Extends Ice Life by 30%
- Bottom layer: 2-3 inches of block ice (melts slowest here due to cold air sinking)
- Middle layer: Food and drinks in watertight containers (never directly on ice)
- Top layer: Cubed ice to fill voids and create a thermal barrier
- Final touch: Place a thick towel between the top ice layer and the lid for extra insulation
This layered approach creates a “cold waterfall” effect where melting ice continuously chills contents from bottom to top, while the top ice layer protects against heat entering through the lid—the most vulnerable point.
Why Your Cooler Melts Ice Too Fast: 3 Common Mistakes You’re Making
Even with a premium cooler, these three errors can cut ice life in half. Fixing them transforms mediocre performance into reliable cold retention, regardless of your cooler’s price point.
How Sun Exposure Cuts Ice Life in Half (Even With Premium Coolers)
Direct sunlight increases heat transfer by 30-50% compared to shade. A cooler in full sun at 90°F experiences surface temperatures of 120-140°F—dramatically increasing the ΔT in our cooling formula. Always keep your cooler in the shade, and for extreme conditions, wrap it in a reflective emergency blanket (shiny side out). This simple step can add 24+ hours to ice life, even on the hottest days.
The Lid-Opening Frequency That Matters More Than You Think
Each time you open the lid, warm air rushes in, replacing the cold, dense air inside. Opening your cooler for just 20 seconds introduces enough warm air to melt 0.5 lbs of ice. Plan your access: organize contents with most-used items on top, know exactly what you need before opening, and limit openings to 5-10 seconds. For group trips, designate one person as “cooler manager” to minimize unnecessary openings. This discipline alone can extend ice life by 1-2 days.
How Long Food Stays Safe in a Melting Cooler (Critical Food Safety Guide)
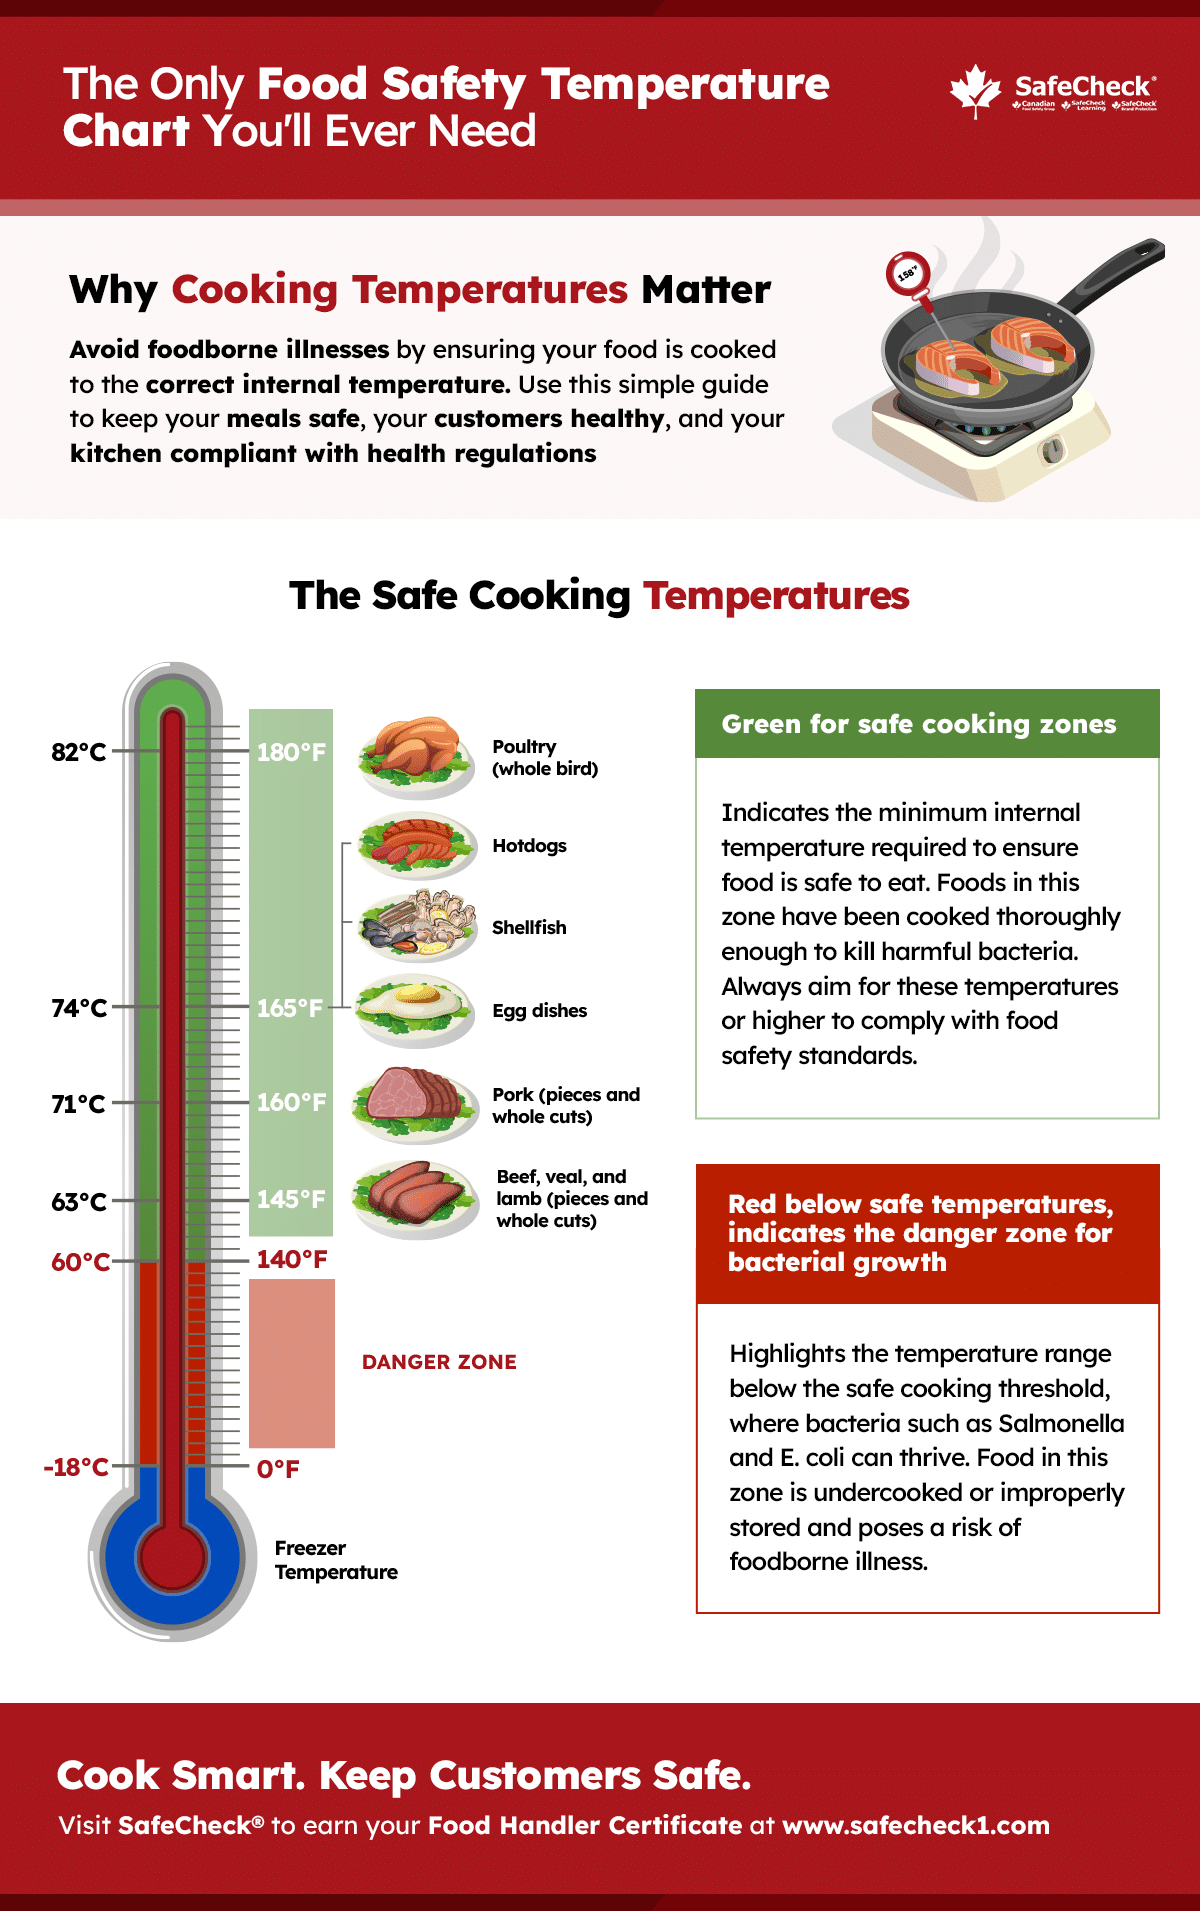
Temperature safety matters more than ice presence. Food remains safe below 40°F, but enters the danger zone (40-140°F) where bacteria multiply rapidly. Understanding these thresholds prevents foodborne illness.
When to Toss Food vs. When It’s Still Safe (Temperature Thresholds)
- Raw meat/poultry: Discard after 2 hours above 40°F (1 hour if ambient >90°F)
- Dairy/eggs: Safe for 3-4 hours above 40°F if returned to cold quickly
- Beverages: Generally safe indefinitely if kept below 70°F
- Pre-cooked meals: 3-4 hours in the danger zone
Use a waterproof thermometer placed among your food—not in the ice—to monitor actual food temperatures. Remember: “If in doubt, throw it out” applies strictly to perishables.
How to Make Ice Last 7+ Days for Extended Trips in Extreme Heat
For expeditions beyond 5 days, standard techniques won’t suffice. These advanced strategies push cooling limits while maintaining food safety.
The 3-Stage Ice Strategy for Multi-Week Expeditions
- Stage 1 (Days 1-3): Primary cooler with block ice and essential food
- Stage 2 (Days 4-7): Secondary cooler with cubed ice for immediate needs
- Stage 3 (Day 8+): Rotate coolers, replacing melted ice with frozen reserves
This approach maintains consistent temperatures while minimizing waste. For trips exceeding 10 days, incorporate phase-change materials designed to maintain specific temperatures (32-40°F) for medical supplies or critical items.
Why Water in Your Cooler Actually Helps (Counterintuitive Science)
Contrary to popular belief, don’t drain meltwater—it creates a cold slurry that transfers heat more efficiently than air. The water-ice mixture maintains a constant 32°F temperature, while air pockets create warmer zones. Only drain water if it risks soaking food containers. This slurry effect extends cooling duration by 15-20% compared to draining regularly.
Maintenance Secrets That Keep Your Cooler Performing Like New for Years
Cooler performance degrades over time due to seal failure and UV damage. Proper maintenance preserves insulation integrity and seal effectiveness, maintaining original ice retention for years.
How to Test and Restore Your Cooler’s Seal Integrity (Dollar Bill Test)
Close a dollar bill in your cooler lid at multiple points. If you can pull it out with slight resistance, the seal is good. If it slides out easily, the gasket needs replacement. Clean gaskets monthly with mild soap and water, then apply silicone lubricant annually. For UV protection, apply automotive UV protectant to exterior surfaces twice yearly—this prevents plastic embrittlement that compromises insulation.
When to Replace Gaskets Before They Ruin Your Next Trip
Gaskets typically last 2-3 years with regular use. Signs they need replacement include:
– Visible cracks or brittleness
– Dollar bill slides out with no resistance
– Water leakage around the lid
– Noticeable decrease in ice retention
Replacing gaskets costs $20-50 but restores nearly all lost performance—far cheaper than buying a new cooler. Always carry a spare gasket on extended trips; sudden seal failure can ruin your entire expedition.
By understanding the physics of cooling and implementing these science-backed techniques, you’ll know exactly how long your cooler keeps things cold for any trip. Whether you’re planning a weekend picnic or a remote expedition, these methods ensure your food stays safe and your drinks stay refreshingly cold from start to finish. Remember: the best cooler in the world performs poorly without proper preparation—while a modest cooler, properly prepped and packed, can exceed expectations and keep things cold for days longer than you thought possible.