Your Dometic cooler suddenly stops chilling your drinks after a long day on the road, or worse—it’s running constantly but blowing warm air. This frustrating scenario happens to thousands of RV and marine owners every year. The good news? Most Dometic cooling problems can be diagnosed and fixed without professional help. This guide delivers step-by-step repair instructions for the most common failures, potentially saving you hundreds in service calls. You’ll learn to identify whether your issue stems from simple blockages, electrical components, or more complex refrigerant system problems.
Immediate Power Check for Dead Dometic Coolers
When your Dometic unit shows no signs of life—not even indicator lights—start with these critical power verification steps before assuming major component failure.
Confirm Power Source and Connections
Don’t waste time troubleshooting internal components when the solution might be as simple as a tripped breaker. For RV installations, verify both your 12V DC and 120V AC connections are active. Test the outlet with another device like a phone charger. Marine installations often have dedicated circuit breakers near the unit—check for a red “tripped” indicator. If using propane mode, ensure the gas supply valve is fully open and the pilot light is lit (for absorption models). A common oversight is forgetting that many Dometic units have an internal fuse near the power inlet—consult your manual to locate it.
Test the Power Cord and Outlet Voltage
Grab your multimeter and set it to AC voltage. Insert the probes into the outlet where your Dometic cooler plugs in—standard household outlets should read between 110-120V. If you’re getting no reading, check your main electrical panel for a tripped breaker. For the power cord itself, unplug both ends and set your multimeter to continuity mode. Touch one probe to each pin on the plug end while touching the corresponding terminals at the unit end. No continuity means a damaged cord requiring replacement. Pro Tip: Many RV owners carry a spare power cord specifically for their Dometic unit—this simple precaution prevents roadside breakdowns.
Dometic Compressor Runs But Fails to Cool: Quick Fixes
This common nightmare scenario—your compressor humming steadily while your drinks warm up—typically stems from preventable issues rather than catastrophic failure. Address these problems before assuming refrigerant leaks or compressor replacement.
Clean Blocked Condenser Coils in 15 Minutes
Dust, pet hair, and road debris clogging your condenser coils is the #1 cause of poor cooling performance. For RV units, these coils typically run along the bottom exterior; marine models often have them at the rear. Unplug the unit and use a soft brush attachment on your vacuum to gently remove buildup. For stubborn debris, a fin comb (available at appliance stores) straightens bent fins without damaging them. Warning: Never use compressed air from inside the unit outward—this forces debris deeper into the coil structure. After cleaning, run the unit for 30 minutes to verify improved cooling.
Diagnose Defrost System Failures Causing Ice Buildup
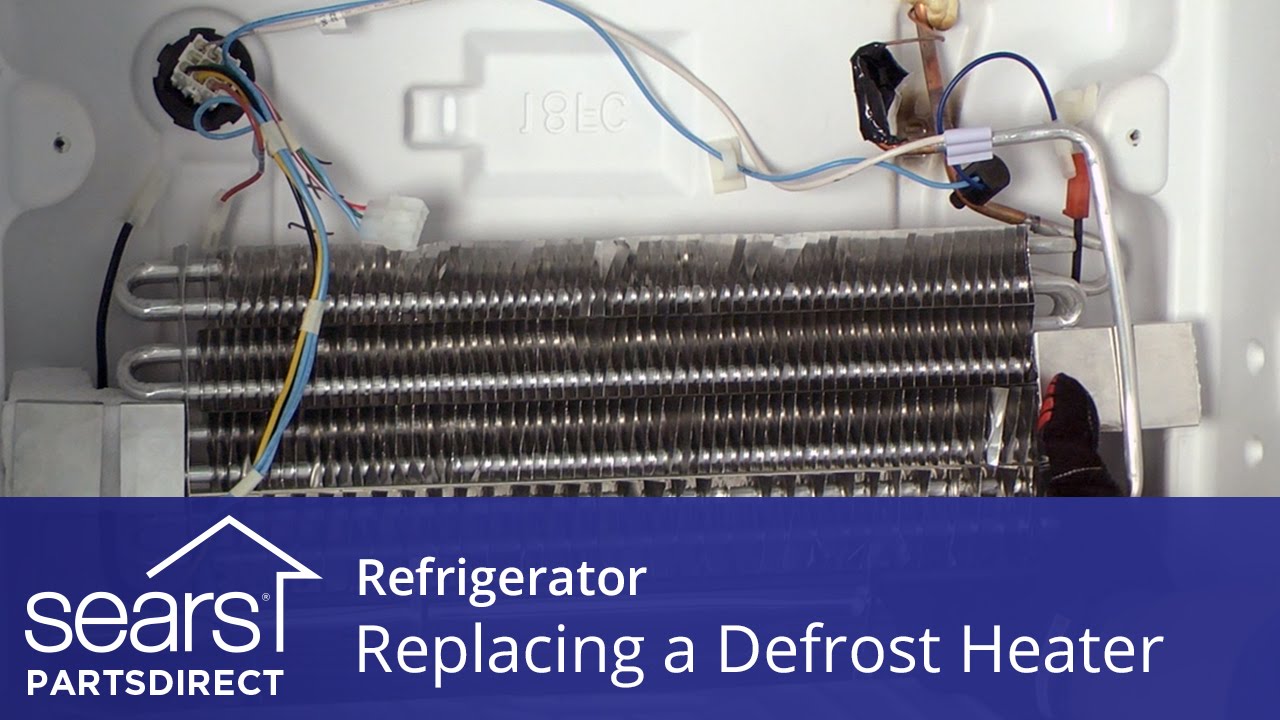
When your freezer works but refrigerator section stays warm, thick ice on the evaporator coils is usually the culprit. Unplug the unit and remove interior panels to inspect. If you see heavy frost, your defrost system has failed. Test the defrost heater by checking for continuity with a multimeter—if it shows infinite resistance, replace it immediately. Next, verify your defrost thermostat clicks closed when cold (below 45°F/7°C). Time-Saver: While waiting for parts, manually defrost your unit by leaving it unplugged with doors open for 24 hours—this buys you temporary cooling until proper repair.
Electrical Component Testing Without Specialized Tools
You don’t need expensive diagnostic equipment to identify failing electrical components in your Dometic cooler. These simple tests pinpoint problems using only a basic multimeter.
Identify Bad Start Relays by Sound and Test
That rapid clicking sound when you power on your Dometic unit almost always means a failing start relay. Unplug the cooler and locate the small cylindrical relay attached to the compressor. Remove it and gently shake—it should not rattle (indicating broken internal components). Set your multimeter to ohms and test between the relay’s terminals; you should get a reading between 5-20 ohms. No reading means immediate replacement. Warning: Always discharge the capacitor (the round component next to the relay) by shorting its terminals with an insulated screwdriver before handling—this prevents dangerous electrical shocks.
Verify Thermostat and Thermistor Functionality
A malfunctioning temperature sensor causes constant running or inadequate cooling. Locate your thermistor (usually clipped to the evaporator coil) and disconnect it. Set your multimeter to resistance mode and measure the thermistor while noting ambient temperature. Compare readings to Dometic’s standard temperature-resistance chart: at 77°F (25°C), it should read approximately 5k ohms. Significant deviations indicate replacement is needed. For dial thermostats, slowly turn the control through its range while testing for continuity—you should hear a distinct click when it opens and closes.
Dometic-Specific Repair Solutions for RV and Marine Units
Absorption refrigerators in RVs and compressor models in marine applications have unique failure points requiring specialized troubleshooting approaches.
Fix Yellow Flame in Dometic RV Absorption Units

A yellow flame instead of blue in your Dometic RV refrigerator indicates combustion problems. Turn off the unit and remove the burner assembly access panel. Use a wire brush to clean carbon deposits from the burner tube and orifice. Check the air shutter adjustment—too little air causes yellow flames. After cleaning, relight the unit and verify the flame is steady blue with minimal yellow tips. Critical Safety Note: If you smell ammonia after relighting, immediately ventilate the area and contact a professional—this indicates a dangerous refrigerant leak requiring EPA-certified repair.
Resolve Marine Unit Humidity and Corrosion Issues

Salt air accelerates corrosion on electrical connections in marine Dometic units. Inspect all wiring harness connections for white, powdery corrosion. Disconnect affected connectors and clean terminals with electrical contact cleaner and a small wire brush. Apply dielectric grease to all connections before reassembly to prevent future corrosion. For units showing intermittent operation, check the voltage at the compressor terminals—marine electrical systems often drop below 11V under load, causing compressor start failures. Install a dedicated circuit with proper gauge wiring to maintain voltage stability.
When to Replace Parts vs. Call a Professional
Knowing which repairs you can safely handle and when to seek expert help prevents costly mistakes and potential safety hazards with your Dometic cooler.
DIY-Friendly Repairs That Save $200+
Replacing start relays, defrost heaters, thermistors, and fan motors are straightforward repairs taking under 30 minutes with basic tools. These components typically cost $15-$50 and dramatically improve cooling performance when faulty. Cleaning condenser coils and unclogging drain lines also deliver significant results with minimal investment. Pro Tip: Keep a “Dometic repair kit” in your RV or boat containing a start relay, thermistor, and defrost heater specific to your model—this prevents extended downtime when failures occur far from service centers.
Critical Situations Requiring Professional Service
Immediately call a certified technician if you detect:
– Ammonia odor from absorption units (toxic and flammable)
– Oily residue around copper lines (indicates refrigerant leak)
– Loud grinding or screeching compressor noises
– Visible refrigerant leaks (requires EPA Section 608 certification to repair)
– Electrical burns or melted components
Cost Reality Check: Compressor or refrigerant system repairs often cost 60-80% of a new unit’s price. For models over 7 years old, replacement may be more economical than repair—especially considering Dometic’s standard 5-year sealed system warranty.
Prevent Future Dometic Failures With This Maintenance Routine
Implement these simple maintenance practices to double your Dometic cooler’s lifespan and avoid roadside emergencies.
Monthly Coil Cleaning Protocol
Vacuum condenser coils every 30 days using a soft brush attachment—this single action prevents 70% of cooling failures. For marine units, rinse coils with fresh water after saltwater exposure to prevent salt buildup. Check door seals monthly using the dollar bill test: close a bill in the door seal and try to pull it out. If it slides freely, replace the gasket immediately. Expert Note: Proper leveling is critical for absorption units—use a bubble level on the unit’s top surface and adjust your RV’s leveling jacks until it reads perfectly level both front-to-back and side-to-side.
Seasonal Deep Maintenance Checklist
Before storing your RV or boat for winter, perform these critical steps:
1. Unplug the unit and remove all food
2. Clean interior with mild soap and water (never ammonia-based cleaners)
3. Leave doors slightly ajar with moisture absorbers inside
4. Vacuum condenser and evaporator coils thoroughly
5. Check and clean the drain pan and tube to prevent mold
6. Apply dielectric grease to all electrical connections
This simple maintenance routine prevents 90% of common Dometic cooling failures and ensures your unit starts reliably when you need it most. By mastering these diagnostic and repair techniques, you’ll transform from frustrated owner to confident troubleshooter—keeping your beverages cold and your adventures uninterrupted.