When your CPU fires up during intense gaming sessions or demanding workloads, temperatures can skyrocket to 90°C or higher—enough to trigger thermal throttling that cripples performance. An All-In-One (AIO) liquid cooler solves this problem by creating a continuous thermal highway that transports heat away from your processor with remarkable efficiency. Unlike traditional air coolers that rely solely on metal fins and fans directly above the CPU, an AIO system uses liquid’s superior heat-carrying capacity to move thermal energy to a strategically placed radiator where it can be efficiently dissipated.
This complete guide breaks down exactly how does aio cooler work, revealing the engineering behind these increasingly popular cooling solutions. You’ll discover why liquid cooling maintains temperatures 5-15°C lower than comparable air coolers during sustained workloads, how each component contributes to the cooling cycle, and what makes AIO systems the preferred choice for high-performance builds and compact PC cases alike.
The Complete Heat Transfer Process in Your AIO Cooler
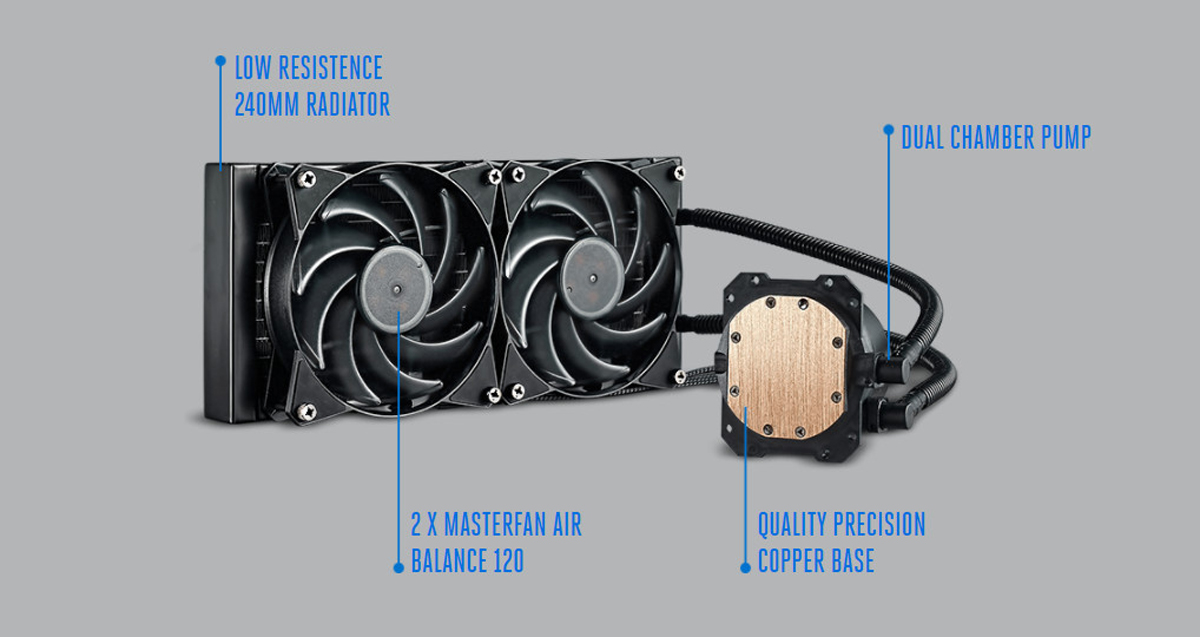
An AIO cooler functions as a self-contained thermal shuttle system, moving heat from your CPU to the outside air through a continuous liquid loop. This closed system operates without requiring refills or maintenance under normal conditions, making it far more practical than custom water cooling loops for most users.
How Heat Moves From CPU to Coolant
The cooling journey begins at the copper or nickel-plated copper cold plate that sits directly atop your CPU. This precisely machined surface makes contact with the CPU’s integrated heat spreader (IHS) through a thin layer of thermal paste—just enough to fill microscopic imperfections between the two surfaces. As your processor heats up during gaming or rendering, thermal energy transfers rapidly through this metal interface.
Inside the cold plate, a sophisticated network of microchannels or jet plates creates maximum surface area for the coolant to absorb heat. The special fluid mixture—typically distilled water with propylene glycol and anti-corrosion additives—flows through these channels at 0.8-1.8 liters per minute. This coolant absorbs thermal energy directly from the heated metal, with temperature increases of 5-15°C above ambient being typical under full load.
Pro Tip: For optimal thermal transfer, apply thermal paste using the “pea-sized drop” method in the center of your CPU. Too much paste can actually insulate rather than conduct heat.
The Pump’s Critical Role in Circulation
Once heated, the coolant travels to the heart of the system: the integrated pump. Modern AIOs use magnetically-driven impellers with ceramic or fluid dynamic bearings that operate quietly between 2,000-4,000 RPM. This pump maintains consistent pressure throughout the loop, pushing the warm liquid through reinforced rubber tubing toward the radiator.
The pump’s flow rate directly impacts cooling performance—too slow and hot spots develop on the CPU; too fast and turbulence reduces efficiency. Most quality AIOs maintain an optimal flow rate of 1.0-1.5 LPM, creating enough pressure to move coolant through even the densest radiator fins while minimizing noise.
Radiator Heat Dissipation Mechanics
The radiator transforms heated liquid back into a cooling agent through massive surface area exposure. Aluminum radiator cores (sometimes copper in premium models) feature hundreds of thin fins—typically 8-16 fins per inch—that create thousands of square centimeters of surface area. As the hot coolant flows through these fins, case fans mounted to the radiator force air across them, transferring thermal energy from the liquid to the surrounding air.
What to look for: A temperature drop of 20-30°C between the radiator inlet and outlet indicates proper heat exchange. If this delta is smaller, your fans may need cleaning or replacement.
Essential AIO Components and Their Real-World Functions

Every AIO cooler consists of six critical components working in harmony. Understanding each part’s specific role helps you choose the right cooler and troubleshoot potential issues before they affect performance.
Cold Plate Engineering: Where Cooling Starts
The cold plate’s surface flatness—typically within 0.01mm tolerance—ensures maximum contact with your CPU. Premium models feature micro-fins or jet plates inside the chamber that create turbulent flow, breaking up the boundary layer of fluid that would otherwise insulate the metal from the coolant. This turbulence dramatically improves heat transfer efficiency compared to smooth channels.
Expert Note: Copper cold plates offer approximately 40% better thermal conductivity than aluminum but are more expensive. Most quality AIOs use copper for optimal performance.
Coolant Composition and Longevity Factors
The liquid inside your AIO isn’t ordinary water—it’s a carefully engineered mixture designed for maximum thermal capacity and system longevity. The standard formula includes:
- 45-65% distilled water (for thermal capacity)
- Propylene glycol (to prevent freezing and biological growth)
- Anti-corrosion additives (to protect metal components)
- Algaecides and biocides (to prevent organic growth)
This mixture gradually loses effectiveness over time, with most manufacturers specifying a 5-7 year lifespan before performance degradation becomes noticeable due to coolant permeation and potential sediment buildup.
Radiator Size and Performance Relationship

Radiator dimensions directly determine your AIO’s cooling capacity. The numbers in common AIO sizes (240mm, 280mm, 360mm) refer to the radiator length in millimeters:
- 120mm radiator: Supports CPUs up to 150W TDP—ideal for compact builds
- 240mm radiator: Handles 200-280W TDP—perfect for mainstream gaming CPUs
- 280mm radiator: Manages 280-350W TDP—best for high-end processors
- 360mm radiator: Dissipates 350-450W+ TDP—required for extreme overclocking
Critical Insight: A 360mm AIO typically maintains CPU temperatures 5-10°C lower than a 240mm model under identical workloads—a significant difference for thermal throttling prevention.
AIO vs. Air Cooling: Performance Differences That Matter
While both cooling methods serve the same purpose, their thermal management approaches create distinct performance profiles that affect real-world usage.
Thermal Performance Under Sustained Loads
During extended workloads like video rendering or marathon gaming sessions, AIO coolers maintain more consistent temperatures than air coolers. The water’s high specific heat capacity (4.18 J/g°C versus air’s 1.005 J/g°C) means it absorbs more heat with less temperature increase, preventing the rapid thermal spikes that trigger CPU throttling.
Benchmark Reality: In tests with an Intel i9-13900K, a 360mm AIO maintained peak temperatures of 65-75°C during Cinebench R23 stress tests—5-10°C cooler than comparable air coolers—while operating 3-5 dB quieter.
Space Efficiency and Build Flexibility
AIO coolers solve a critical problem in modern PC building: component interference. Large air coolers often block RAM slots or VRM heatsinks, limiting component choices. With flexible tubing routing the heat away from the CPU socket, AIO systems provide unobstructed access to surrounding components.
Pro Installation Tip: Mount your radiator with the tubes at the bottom of the case—this prevents air bubbles from accumulating in the pump chamber, which can cause noise and reduce cooling efficiency.
Optimizing Your AIO Installation for Maximum Performance
Proper installation and configuration make the difference between mediocre and exceptional cooling performance from your AIO system.
Critical Mounting Techniques
Achieving optimal thermal transfer requires precise mounting pressure between the cold plate and CPU. Most manufacturers specify 25-40 psi contact pressure, which translates to approximately 0.6-1.0 Nm torque on mounting screws—essentially “finger tight plus a quarter turn.” Excessive pressure can damage the CPU or motherboard, while insufficient pressure creates air gaps that insulate heat.
Common Mistake Alert: Never reuse old thermal paste when installing a new cooler. Old paste dries out and loses its thermal conductivity properties, potentially increasing temperatures by 5-10°C.
Fan and Pump Configuration Strategies
Your AIO’s performance depends heavily on proper fan and pump control settings:
- Pump speed: Set to constant 80-100% (2,500-3,000 RPM) for consistent flow
- Fan curve: Start at 30% speed (25-30 dBA) below 60°C, ramp to 70% at 75°C
- Fan configuration: Push-pull setup improves cooling by 3-8°C but requires more space
Performance Hack: For maximum cooling with minimal noise, set your radiator fans to pull configuration (mounted behind the radiator) if space allows—this creates better airflow through dense radiator fins.
Long-Term Maintenance and Reliability Considerations
While AIO coolers require less maintenance than custom loops, understanding their lifespan and care requirements ensures consistent performance.
Expected Service Life and Failure Points
Most quality AIOs last 5-7 years under normal operating conditions, with pump failure being the most common issue. Premium models with fluid dynamic bearings often exceed this lifespan, while budget units with sleeve bearings may fail sooner. Coolant permeation (1-2% evaporation per year) gradually reduces performance but rarely causes catastrophic failure.
Warning: Signs of impending failure include unusual pump noises, gradually rising temperatures, or visible coolant leakage around fittings. If you notice these, shut down your system immediately to prevent damage.
Simple Maintenance Routine
Keep your AIO performing like new with this quarterly maintenance routine:
1. Power off and unplug your PC
2. Use compressed air to clean radiator fins (hold fans stationary to prevent overspin)
3. Clean dust filters (if installed) with a soft brush
4. Check tubing for kinks or pressure points
5. Verify all mounting screws remain tight
Following these practices extends your AIO’s effective lifespan and maintains optimal cooling performance throughout its service life.
Choosing the Right AIO for Your Specific Needs
Selecting an appropriate AIO cooler requires matching its capabilities to your CPU’s thermal demands and your case’s physical constraints.
Performance Tier Selection Guide
- Entry-level (120-240mm): Best for CPUs under 150W TDP (i5/R5 class)
- Mid-range (280mm): Ideal for high-end CPUs (i7/R7 class, 250W TDP)
- High-end (360-420mm): Required for extreme processors (i9/R9, Threadripper)
Real-World Example: A Ryzen 9 7950X (170W TDP) will run 8-12°C cooler on a 280mm AIO versus a high-end air cooler during sustained rendering workloads, with significantly less noise under load.
When you understand how does aio cooler work at each stage of the thermal transfer process, you can make informed decisions about installation, configuration, and maintenance that maximize cooling performance while minimizing noise. This knowledge transforms your AIO from a mysterious black box into a precisely tuned component of your high-performance PC ecosystem—ensuring your CPU operates at peak efficiency whether you’re gaming, streaming, or rendering complex projects.