Is your walk-in cooler silently costing you thousands in spoiled inventory each year? Precise walk in cooler temperature control isn’t just about keeping food cold—it’s your frontline defense against catastrophic financial losses, failed health inspections, and potential foodborne illness outbreaks. When temperatures creep above 40°F (4.4°C), bacterial growth accelerates exponentially, turning your inventory into a ticking time bomb. This guide delivers the exact protocols and systems you need to maintain rock-solid temperature control between 34°F and 38°F (1.1°C-3.3°C), keeping your perishables safe and your business compliant with FDA Food Code standards.
Why Your Walk-In Cooler Temperature Must Stay Below 40°F
Every minute your walk-in cooler exceeds 40°F (4.4°C) puts your inventory and customers at risk. The FDA defines the temperature danger zone as 41°F to 135°F (5°C to 57°C), where harmful bacteria like Salmonella and E. coli multiply rapidly. Just two hours above 40°F can render perishable foods unsafe for consumption, forcing costly disposal of entire inventory batches. Health inspectors routinely cite improper temperature control as a top violation, with fines reaching $1,000 per incident in many jurisdictions. Beyond compliance, consistent walk in cooler temperature control directly impacts your bottom line—restaurants lose an average of $2,500 annually to preventable temperature-related spoilage.
Critical Temperature Thresholds You Must Monitor
Your walk-in cooler must maintain temperatures between 32°F and 40°F (0°C-4°C), with the ideal safety buffer at 34°F-38°F (1.1°C-3.3°C). Never allow temperatures to reach 41°F (5°C)—this triggers immediate HACCP corrective actions. Monitor these critical thresholds:
- High Alert Threshold: 40°F (4.4°C) – Investigate immediately for simple issues like door seals or blocked vents
- Critical Alert Threshold: 45°F (7.2°C) – Requires emergency response within 15 minutes
- Danger Zone Threshold: 41°F (5°C) – Document all affected products and initiate disposal protocols
How Walk-In Cooler Temperature Regulation Actually Works
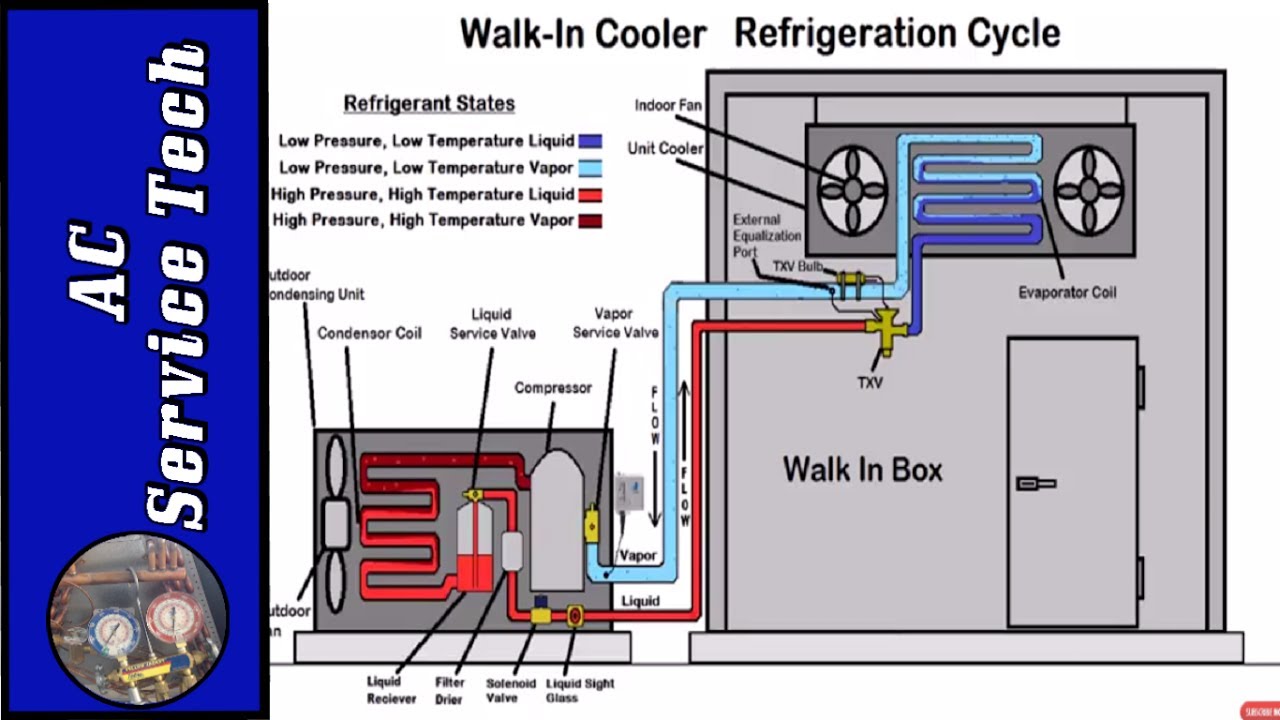
Your walk-in cooler maintains precise temperatures through a sophisticated interplay of mechanical components working in concert. The compressor pumps refrigerant through sealed coils, with cooling occurring at the evaporator inside your unit where refrigerant absorbs heat from circulating air. A digital thermostat or PID controller acts as the brain, cycling the compressor on and off to maintain your exact setpoint. High-efficiency systems use variable speed drives that adjust compressor speed rather than simply turning on/off, minimizing temperature fluctuations.
Optimizing Airflow for Consistent Temperatures
Uneven temperatures often stem from airflow problems rather than refrigeration failures. Cold air naturally sinks while warm air rises, creating distinct temperature zones within your cooler:
- Top Shelving: Typically 3-5°F warmer than setpoint due to heat stratification
- Bottom Shelves: Usually 2-3°F colder than setpoint
- Near Evaporator Coils: Can be 5-7°F below setpoint
- Doorway Area: Most vulnerable to temperature spikes during access
Place your primary temperature sensor in the warmest zone—usually near the top shelf by the door—to ensure even your most vulnerable products stay safely below 40°F.
Essential Temperature Monitoring Systems You Need Today
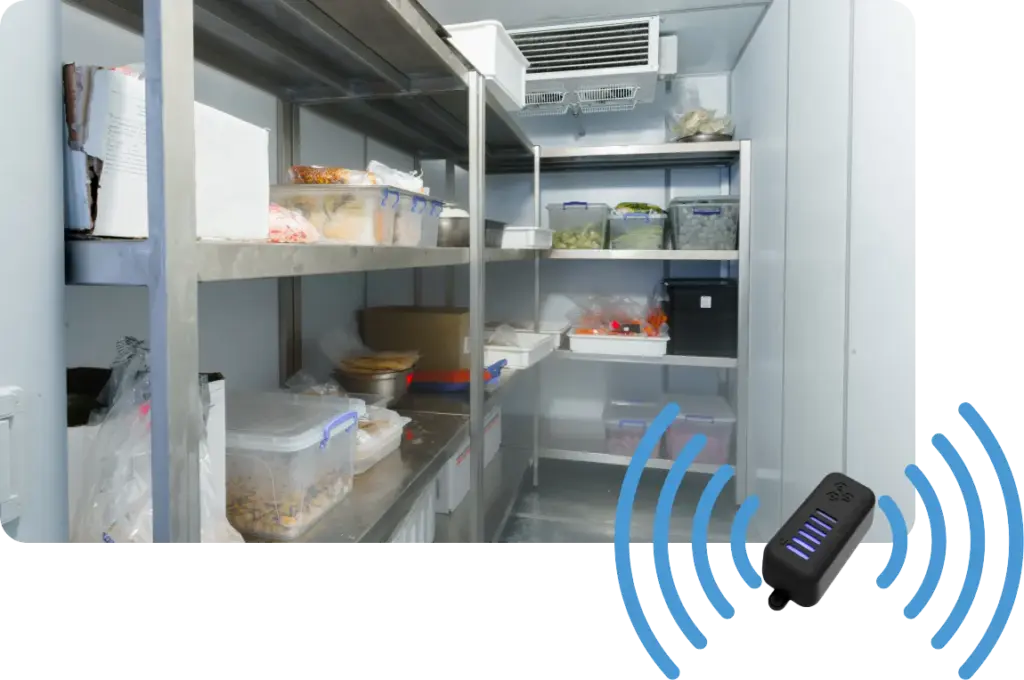
Manual twice-daily temperature checks no longer meet FDA Food Code standards. Modern operations require continuous monitoring systems that provide 24/7 protection with automated documentation.
Must-Have Monitoring Hardware Components
- Wireless Temperature Sensors: Deploy multiple sensors throughout your cooler (high, middle, low) with cloud connectivity
- Digital Data Loggers: Record temperatures every 1-15 minutes with 90+ days of historical data storage
- Real-Time Alert Systems: SMS, email, and phone call notifications when temperatures exceed thresholds
- Door Status Sensors: Trigger alerts when doors remain open longer than 5 minutes
Implementing Foolproof Monitoring Protocols
Your monitoring system must automatically document these critical data points:
- Continuous temperature recording at minimum 15-minute intervals (FDA requirement)
- Minimum and maximum daily temperatures
- Door open/close events with duration
- Power failure events and duration
- Alert notifications and staff responses
Pro Tip: Pair your primary monitoring system with a secondary NIST-traceable thermometer for daily verification. Calibrate all probes quarterly using an ice bath (32°F/0°C) or boiling water (212°F/100°C at sea level).
Preventing Temperature Excursions With Proactive Maintenance
Most temperature failures result from preventable maintenance issues rather than catastrophic system failures. Implement this maintenance schedule to keep your walk in cooler temperature control flawless:
Daily Temperature Control Checks
- Before opening: Verify temperatures are at setpoint (34°F-38°F)
- Door seals: Perform the dollar bill test—close door on a bill; if you can pull it out easily, replace seals
- Visual inspection: Check for ice buildup on evaporator coils
- Sensor verification: Cross-check digital display with secondary thermometer
Weekly Critical Maintenance Tasks
- Clean return air vents: Remove dust and debris blocking airflow
- Check condensate drain: Ensure proper drainage to prevent ice dams
- Validate sensor accuracy: Compare all monitoring probes
- Inspect floor drainage: Confirm no standing water affecting insulation
Monthly System Optimization
- Clean condenser coils: Use compressed air or soft brush (power off first)
- Check refrigerant lines: Look for oil stains indicating leaks
- Test defrost system: Ensure proper cycle completion
- Verify door gaskets: Replace if cracked, torn, or compressed
Emergency Response Protocol for Temperature Excursions

When your alarm sounds, your immediate response determines whether you save or lose thousands in inventory. Follow this exact protocol:
First 5 Minutes: Initial Assessment
- Verify the reading: Cross-check with secondary thermometer
- Identify the cause: Door left open? Power outage? Ice buildup?
- Contain the problem: Close all doors, minimize traffic
15-Minute Response Window
- If temperature < 40°F: Document the event and continue monitoring
- If temperature 40°F-45°F: Investigate and correct immediately; monitor every 15 minutes
- If temperature > 45°F: Initiate emergency protocol:
- Contact refrigeration technician immediately
- Document exact time and temperature
- Prepare backup cooling options (portable refrigeration)
Product Disposition Guidelines
- Below 40°F for <2 hours: Safe to use; document event
- 40°F-45°F for 2-4 hours: Evaluate each product; discard if questionable
- Above 45°F for >1 hour: Discard all perishable products immediately
- Above 40°F for >4 hours: Discard all perishable products without exception
Creating Your HACCP-Compliant Temperature Control Plan
For food service operations, temperature control is a Critical Control Point (CCP) requiring documented procedures:
Essential HACCP Documentation
- Critical Limits: Define 34°F-38°F as acceptable range with 40°F as maximum
- Monitoring Procedures: Specify continuous monitoring with 15-minute intervals
- Corrective Actions: Detail exact steps for each temperature threshold breach
- Verification: Schedule quarterly calibration of all monitoring equipment
- Recordkeeping: Maintain logs for minimum 90 days per FDA requirement
Never skip calibration—a study by the National Institute of Standards and Technology found that 30% of commercial thermometers drift out of accuracy within 6 months, creating false security.
Avoiding 3 Costly Walk-In Cooler Temperature Mistakes
Even experienced operators make these preventable errors that compromise temperature control:
Mistake #1: Incorrect Sensor Placement
Placing sensors near evaporator coils gives falsely low readings while products in warm zones exceed safe temperatures. Fix: Position primary sensor at product level in the warmest zone—typically top shelf near the door.
Mistake #2: Ignoring Humidity Control
Excessive humidity causes frost buildup on evaporator coils, insulating them and reducing cooling efficiency. Fix: Maintain relative humidity between 50-60% using proper defrost cycles and air circulation.
Mistake #3: Skipping Regular Maintenance
Dust-clogged condenser coils force compressors to work 20-30% harder, leading to temperature fluctuations and premature failure. Fix: Clean coils monthly—this single action prevents 70% of temperature-related service calls.
Final Temperature Control Checklist for Compliance
Implement these final steps to transform your walk-in cooler into a reliable, compliant asset:
- Install continuous monitoring with real-time alerts to your phone
- Place primary sensor in the warmest product zone (top shelf near door)
- Set alarm thresholds at 40°F (warning) and 45°F (critical)
- Document all temperature excursions with corrective actions
- Train all staff on emergency response protocols
- Schedule quarterly calibration of all monitoring equipment
Perfect walk in cooler temperature control isn’t complicated—it’s systematic. By implementing these precise monitoring protocols, maintenance schedules, and emergency response procedures, you’ll protect your inventory, satisfy health inspectors, and sleep soundly knowing your cooler maintains temperatures exactly where they need to be. Your next step? Audit your current system against these standards today—before the next temperature excursion hits.