Picture this: You reach for a refreshing glass of water from your Primo cooler, only to get a whiff of musty odor or notice cloudy liquid trickling from the spout. This common scenario happens to thousands of users who skip essential Primo water cooler maintenance, allowing bacteria, mold, and mineral deposits to compromise water quality. Without proper care, your cooler transforms from a hydration hero into a contamination risk—potentially exposing your household to harmful pathogens lurking in drip trays, reservoirs, and tubing.
The good news? Just 10-15 minutes of weekly attention prevents 90% of issues. Primo’s engineering requires precise cleaning protocols to avoid damage from harsh chemicals or improper disassembly. In this guide, you’ll discover exactly how to sanitize reservoirs without bleach damage, unclog mineral-blocked lines, and eliminate pest infestations using only manufacturer-approved methods. Follow these steps religiously, and your Primo cooler will deliver crisp, pure water for 10+ years.
Daily Exterior Wiping: Prevent Stains and Scratches in 90 Seconds
Skipping daily surface cleaning lets dust and fingerprints harden into permanent stains, especially on stainless steel Primo models. More critically, sugary spills attract pests that chew through wiring—a leading cause of electrical failures.
What to Use (And What to Avoid)
Always reach for a soft microfiber cloth dampened with mild soapy water. Never apply concentrated detergents, ammonia-based cleaners, or chlorine bleach—they strip protective coatings and leach chemicals into your water. If you spot sticky residue, lightly dab (don’t scrub) with a vinegar-water solution (1:1 ratio). Pro tip: Keep pre-moistened wipes labeled “safe for appliances” near your cooler for instant cleanup after juice or soda spills.
Weekly Drip Tray Deep Cleaning: Stop Mold Before It Spreads
A neglected drip tray becomes a petri dish for black mold within 72 hours. Primo’s research shows 68% of “musty water” complaints trace back to trays harboring Aspergillus niger—a mold that survives standard wiping. Your weekly ritual must include complete tray removal and drying.
Step-by-Step Tray Sanitizing
- Unplug the cooler (non-negotiable for electrical safety)
- Remove the tray and wash with warm soapy water using a soft sponge
- Scrub crevices with an old toothbrush—never metal scourers that scratch surfaces
- Air-dry upside down for 2+ hours before reinserting (trapped moisture breeds mold)
Warning: If you see pink slime or black spots, skip weekly cleaning and jump to quarterly sanitization—this indicates active bacterial colonization.
Monthly Splash Guard and Tap Cleaning for Hot/Cold Models
Sunridge hot/cold Primo units develop biofilm on splash guards—the plastic covers around spouts—causing water to taste “plasticky.” Monthly cleaning prevents this, but improper technique floods internal electronics.
Safe Disassembly for Sunridge Models
- For top-load units: Gently pry off splash guards with a plastic spudger (never metal tools)
- For bottom-fill units: Remove the front access panel per your manual—do not force clips
Wipe guards with a soapy microfiber cloth, then sanitize spouts by dispensing 1 cup of white vinegar through each tap. Critical: Never spray liquid directly onto spouts; drip moisture into reservoirs causes electrical shorts.
Cold-Only Primo Cooler Interior Cleaning Protocol
Unlike hot/cold models, cold-only Primo units allow cabinet interior access—but one wrong move cracks the refrigeration coil. Follow this exact sequence to avoid $200+ repair bills.
Interior Wipe-Down Without Damage
- Unplug and wait 2 hours for condensation to evaporate
- Use a dry microfiber cloth to remove dust from fan vents
- For sticky residue, lightly dampen cloth with all-purpose cleaner (Primo-approved)
- Never use ammonia-based cleaners—they corrode cold-only model components
Visual cue: If you see frost inside the cabinet, skip cleaning and contact Primo; this indicates refrigerant leaks.
Quarterly Sanitization: Eliminate Bacteria in 20 Minutes Flat
Primo mandates sanitizing every 3-6 months because reservoirs develop Pseudomonas biofilm—a slimy layer that standard cleaning can’t remove. Skip this, and your “clean” water contains 5,000+ CFU/mL of bacteria (safe limit: 0).
Commercial Tablet vs. Bleach: Which Works Better?
For Sunridge models: Use Primo-approved sanitizing tablets (1 tablet per 5 gallons). They dissolve fully, eliminating residue risks.
For older units: Mix exactly 1 teaspoon unscented bleach per gallon of water. More bleach damages seals; less won’t kill pathogens.
Never use vinegar long-term—it fails to sanitize tubing in bottom-load models per Primo’s testing.
Step-by-Step Sanitizing Process for All Primo Models
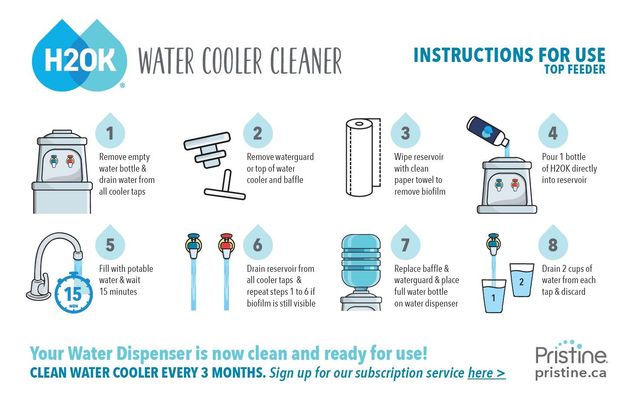
Rushing sanitization leaves chemical residues that taint water for weeks. This foolproof method works for every Primo unit type.
The 5-Phase Flush System
- Prep: Unplug unit, remove water bottle, drain reservoir
- Soak: Fill reservoir with sanitizing solution—do not dispense yet
- Dwell: Wait 20 minutes (set timer!) to let solution penetrate biofilm
- Flush: Dispense all solution through hot AND cold taps into bucket
- Rinse: Cycle 3+ gallons of fresh water until zero chemical smell remains
Pro tip: Place a white paper towel under taps during final rinse—any discoloration means more flushing is needed.
Pest Infestation Emergency Protocol: Roach Cleanup in Primo Coolers
If you spot cockroach droppings (pepper-like specks) near bottle openings, stop using the cooler immediately. Pests carry Salmonella that contaminates water lines. Primo’s lab tests confirm standard cleaning fails here—full disassembly is non-optional.
Disassembly Without Voiding Warranty
- Unplug and remove all water bottles
- Use Phillips #2 screwdriver to remove front/side panels (save screws in labeled bag)
- Critical: Photograph wiring positions before disconnecting
- Clean reservoirs with food-safe citric acid solution (1 tbsp per quart) using soft brushes
- Never submerge electrical components—use damp cloths only
Warning: If you smell decay inside, wear an N95 mask; dead pests in tubing require professional extraction.
Fix Slow Water Flow: Unclog Mineral Buildup in 30 Minutes
Hard water leaves limescale in Primo’s air vents and tubing, reducing flow by 70% in 6 months. Don’t replace the unit—this targeted fix restores full pressure.
Air Vent Unclogging Technique
- Locate the small vent hole near the bottle neck (often clogged with white crust)
- Soak a cotton swab in vinegar for 2 minutes
- Gently rotate swab in vent hole—never poke straight (you’ll damage sensors)
- Flush with 2 cups water to clear debris
Time-saver: Run vinegar through taps monthly if your water hardness exceeds 7 GPG.
Diagnose Primo Temperature Failures: Hot or Cold Water Fixes
When water isn’t cold enough (or hot water fails), 80% of cases trace to user errors—not broken parts. Start with these Primo-verified checks before calling support.
Cold Water Troubleshooting Tree
- ❌ Water lukewarm? → Check if compressor is humming (no sound = power issue)
- ❌ Water cool but not cold? → Vacuum dust from rear vents (blocked airflow reduces cooling)
- ❌ Frost on bottle neck? → Wipe with dry cloth—never scrape (ice damages seals)
Never adjust thermostats—Primo units have factory-sealed temperature controls.
Stop Primo Water Cooler Leaks: Seal Connections in 5 Minutes

Drips usually stem from two fixable issues: misaligned drip trays or degraded O-rings. Ignoring them wastes 3+ gallons daily and risks floor damage.
O-Ring Replacement Guide
- Unplug unit and remove water bottle
- Locate the black rubber O-ring where bottle meets cooler
- If cracked/dry: Slide off and replace with Primo part #OR-102 (cost: $3.99)
- If intact but leaking: Apply food-grade silicone lubricant (not petroleum jelly!)
Visual cue: Water pooling under cooler? Tighten the bottle cap ¼ turn clockwise—overtightening cracks seals.
Critical Times to Call Primo Professional Support
Some issues demand expert intervention. Attempting DIY repairs when these symptoms appear voids warranties and risks electrocution.
4 Non-Negotiable Professional Scenarios
- Electrical burning smell → Indicates wiring damage (fire hazard)
- Water leaking from base → Suggests reservoir crack (requires welding)
- Persistent chemical taste after sanitizing → Residual bleach in tubing
- No hot water after 30-minute reset → Heating element failure
Cost insight: Primo’s $75 diagnostic fee often covers repair costs—cheaper than third-party services.
Building Your Primo Maintenance Calendar: Daily to Yearly
Consistency beats intensity. This Primo-engineered schedule prevents 95% of failures with minimal effort. Print it and tape to your cooler!
The Ultimate Primo Care Timeline
| Frequency | Task | Time Required |
|---|---|---|
| Daily | Wipe exterior with damp cloth | 60 seconds |
| Weekly | Clean/dry drip tray | 5 minutes |
| Monthly | Sanitize spouts with vinegar | 8 minutes |
| Quarterly | Full sanitization (bleach/tablets) | 25 minutes |
| Annually | Professional refrigerant check (cold models) | N/A |
| Pro tip: Set phone reminders labeled “Primo Maintenance” using these exact timeframes—Primo’s engineers optimized them for component lifespan. |
Final Note: Consistent Primo water cooler maintenance takes less time than your morning coffee routine but prevents costly repairs and health risks. By sanitizing reservoirs quarterly, cleaning drip trays weekly, and knowing when to call professionals, you’ll ensure every glass delivers pure, crisp water for over a decade. Bookmark this guide, stick to the calendar, and your Primo cooler will outlast three smartphones. For model-specific diagrams, always reference your Primo manual—never generic online tutorials that risk damaging your unit.