Your cooler’s ice melted hours into your camping trip, leaving drinks warm and food dangerously close to spoiling. You’re not alone—nearly 70% of outdoor enthusiasts struggle with keeping coolers cold during summer adventures. The good news: you can maintain chilly temperatures for days without a single ice cube using science-backed techniques that harness natural cooling principles.
This guide reveals exactly how to keep a cooler cold without ice through evaporative cooling, thermal mass strategies, and smart insulation hacks. You’ll learn practical methods that work whether you’re camping in the desert, prepping for a power outage, or tailgating at the hottest summer games.
Pre-Chill Your Cooler and Contents Before Packing
Starting with a warm cooler guarantees early ice melt and wasted cooling capacity. The most effective ice-free cooling begins long before your trip.
Pack Only Refrigerated Items Into Your Cooler
Every warm item you add acts as a heat source that your cooler must combat. Drinks and food straight from the pantry sabotage your cooling efforts. Instead, transfer items directly from your refrigerator to the pre-chilled cooler. For multi-day trips, freeze water bottles or juice containers—they’ll serve as slow-melting thermal batteries while providing drinking water as they thaw.
Pre-Cool Your Empty Cooler for 12-24 Hours
Place your empty cooler in the refrigerator or freezer overnight before packing. If space is limited, fill it with ice packs or frozen water bottles for 2-4 hours, then remove all meltwater and thoroughly dry the interior. This critical step ensures your cooler’s insulation starts at maximum effectiveness rather than wasting energy cooling itself.
Double Your Cooler’s Insulation With These Field-Tested Methods
Standard coolers lose cold air rapidly through conduction and radiation. Adding strategic insulation layers creates a thermal barrier that dramatically extends cooling duration.
Wrap Your Cooler in Reflective Emergency Blanket
Mylar emergency blankets reflect up to 90% of radiant heat from sunlight. Completely wrap your cooler (including the lid) in this reflective material, then secure it with duct tape or bungee cords. For added protection in hot conditions, drape a damp towel over the Mylar—the evaporating water creates a secondary cooling effect while the reflective layer blocks solar radiation.
Add Interior Foam Board Insulation Panels
Cut 1-inch thick closed-cell foam board (R-value 4-5 per inch) to fit your cooler’s interior walls and lid. Secure these panels with waterproof adhesive to create an additional insulating barrier. This simple modification can double your cooler’s R-value, transforming a basic cooler into one that rivals premium models.
Activate Evaporative Cooling With the Wet Towel Technique

This ancient method uses water evaporation to draw heat away from your cooler—perfect for dry climates where humidity stays below 50%.
Deploy the Desert-Tested Wet Towel Method
Soak a heavy cotton towel in water until thoroughly saturated, then drape it completely over your cooler. Position the setup in a shaded, breezy location (not direct sunlight). As the water evaporates, it pulls heat from the cooler surface, lowering temperatures by 15-20°F. Re-wet the towel every 2-4 hours for continuous cooling—this simple hack works best when daytime temperatures exceed 85°F with low humidity.
Avoid These Evaporative Cooling Mistakes
Don’t use this method in high humidity (above 60% RH)—evaporation slows dramatically, making the technique ineffective. Never wrap plastic coolers in plastic when using evaporative cooling; the plastic prevents moisture escape and creates a greenhouse effect. Always keep the towel damp but not dripping—excess water pools at the cooler base and transfers heat inward.
Create DIY Phase-Change Material Packs That Outperform Ice
Phase-change materials (PCMs) absorb massive heat energy during melting, providing superior cooling capacity compared to regular ice.
Build Salt-Water Thermal Battery Packs
Mix 1 part salt to 4 parts water by weight (23% concentration) in a sealed 2-liter bottle. This solution freezes at 0°F and maintains 32°F as it thaws, absorbing significantly more heat per pound than regular ice. For best results, freeze these packs solid before your trip and place them strategically at the cooler bottom and sides to create a “cold sink.”
Make Alcohol-Water Gel Packs for Extended Cooling
Combine 4 parts water with 1 part 70% isopropyl alcohol in double-sealed plastic bags. The alcohol lowers the freezing point, creating a slushy gel that stays cold longer than solid ice. These packs remain flexible even when frozen, conforming to container shapes for better thermal contact. Always double-bag to prevent leaks—alcohol solutions can damage some cooler interiors.
Harness Night Sky Radiative Cooling for Free Temperature Drops
On clear nights, objects radiate heat directly into space. You can leverage this phenomenon to “recharge” your cooler’s cooling capacity.
Implement the Clear-Night Sky Cooling Hack
On cloudless evenings, place your cooler outside with the lid removed. Cover the opening with aluminum foil (shiny side up) to maximize heat radiation toward space while reflecting ground heat. Retrieve the cooler before sunrise—you’ll often find it 10-15°F cooler than ambient temperature, effectively resetting your cooling system without electricity or ice.
Maximize Radiative Cooling With These Tips
This technique works best in arid climates with low humidity and minimal cloud cover. Dark-colored coolers radiate heat more effectively than light ones—consider painting your cooler black if using radiative cooling frequently. For best results, combine this with PCM packs that absorb the extra cold for daytime use.
Optimize Cooler Packing for Maximum Ice-Free Efficiency
How you load your cooler impacts cooling duration as much as the insulation itself. Proper organization minimizes heat transfer during use.
Apply the Cold Sink Packing Method
Place your frozen PCM packs or salt-water bottles at the bottom and along the cooler sides—they create a reservoir of cold air that sinks and surrounds your food. Pack perishables like meat and dairy directly against these cold sources, with less temperature-sensitive items (like canned drinks) on top. This strategic layering maintains critical temperatures where they matter most.
Eliminate Air Pockets With Space-Filling Tricks
Air pockets allow convection currents that distribute heat. Fill every gap with crumpled newspaper, towels, or even empty plastic containers. Aim for 95%+ capacity—your cooler works best when nearly full. Organize items so frequently accessed drinks sit on top, minimizing how often you open the main compartment and introduce warm air.
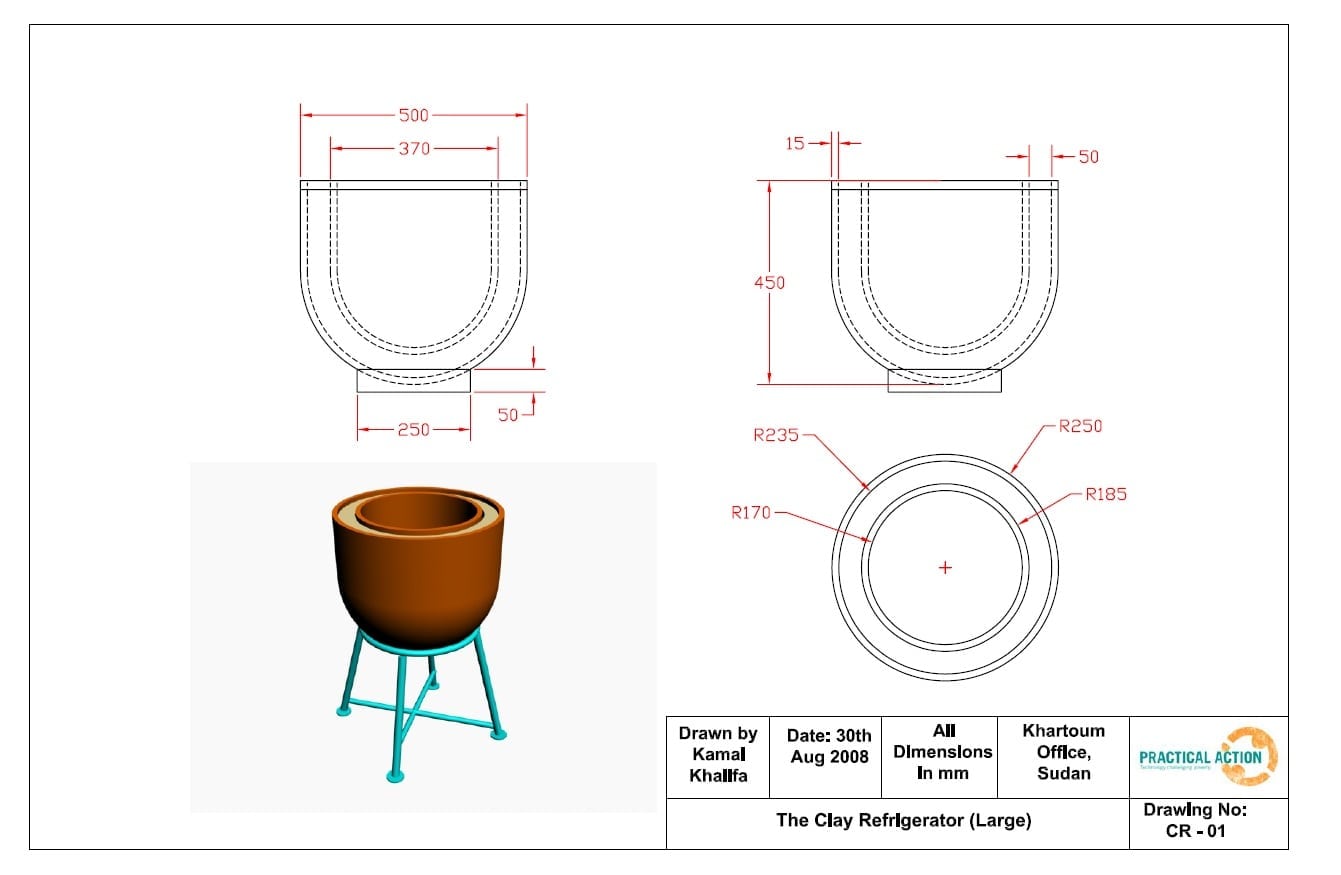
Build a Pot-in-Pot Cooler for Off-Grid Food Preservation
The centuries-old Zeer pot system uses evaporative cooling to create refrigerator-like conditions without electricity—perfect for extended off-grid scenarios.
Construct a Simple Terra Cotta Cooler
Find two unglazed clay pots (one fitting inside the other with 1-2 inches space between). Place the smaller pot inside the larger one, then fill the gap with wet sand. Put food in the inner pot, cover both pots with a damp cloth, and position in a breezy, shaded spot. As water evaporates from the sand through the porous clay, it draws heat from the inner chamber, cooling it 10-15°F below ambient temperature.
Maintain Your Pot-in-Pot System
Replenish the sand moisture twice daily in hot, dry conditions. This system works best when humidity stays below 40%—in humid climates, cooling effectiveness decreases significantly. Line the inner pot with food-safe plastic if concerned about clay contamination, but ensure the outer pot remains unglazed for proper evaporation.
Bury Your Cooler for Ground-Source Temperature Stability

Soil maintains remarkably consistent temperatures just feet below the surface—typically 50-55°F year-round at 4-foot depth in most climates.
Deploy the Partial-Burial Cooler Technique
Dig a hole deep enough to submerge the bottom half of your cooler in soil. Place your pre-chilled cooler in the hole, then cover exposed sides with dirt or sand. The earth acts as a massive thermal buffer, absorbing heat from your cooler while providing stable, cool temperatures. In summer, this method can extend cooling duration by 40-60% compared to surface placement.
Maximize Ground Cooling With These Pro Tips
Place a reflective barrier (like cardboard) over the soil surface around your buried cooler to prevent solar heating. In hot climates, dig deeper (3-4 feet) where soil temperatures are cooler. Always elevate the cooler base slightly off the hole bottom to prevent water accumulation during rain.
By implementing these science-backed methods—starting with proper pre-chilling, enhancing insulation, and leveraging natural cooling phenomena—you can reliably keep a cooler cold without ice for multiple days. The most effective approach combines multiple techniques: pre-chilled PCM packs inside a super-insulated cooler, supplemented by evaporative cooling during the day and radiative cooling at night. For extended trips, pair these methods with strategic packing and ground-cooling techniques to maintain safe food temperatures throughout your adventure.